Saturday, 5 December 2015

Sepia Christmas with Shimmerz

Hi everyone, how are you doing at this busy time of year? I am in full Christmas cardmaking mode and have another one to share on the Shimmerz blog
It's all in some of my favourite vintage sepia tones. If you want to see more, just click here.

Thanks for your visit and have a great weekend!!!

Friday, 4 December 2015

Vintage Christmas for a Vintage Journey

Hello all and welcome on this lovely December day. It's the first Friday of the month and that means a new challenge over on the A Vintage Journey blog.

The lovely Annie is our host this month and she chose  Vintage Christmas as our theme. Well right up my street of course.... Here is what I made:
As Christmas is a time for giving I made a little gift set, a card, matching envelope and little gift card holder. I'll give you a quick run down, of how I put them together. I started with the card.
I layered two bits of scrap book paper, altered with inks, mostly Ground Espresso and some Vintage Photo Distress Inks, added some gesso and distressed the edges. Next came a size 8 tag, given a similar treatment, and finally a smaller piece of paper, given the wrinkle free distress treatment. I cut some snowflakes out of it with a Memory Box die, and did some faux stitching around the edges.
I then added my embellishments.
The jolly Santa is a Calico Craft Part, painted with Distress Markers and some gesso. The ticket is from the Tim Holtz Odds and Ends set.
The keys are also Calico Craft Parts. I gave them the rusty treatment, by covering them first with Finnabair Texture Paste White Sand, and when that had dried coloured them with various Decoart paints, mostly in Dark Umber and some Cobalt Teal, until I was happy with the result. The little star at the top is a Craft Part that got the glitter treatment with Ranger Distress Glitter Dust Platinum.Then I just added a few little punched snowflakes to tie it all together and mounted it on a Kraft Card card blank cut to the right size.

The outside of the gift card started with a beer mat covered in one of the Tim Holtz Yuletide papers. I sanded the edges and then collaged a few more scraps of the papers and some of the Ideaology Festive Ephemera and finished with another ticket and little heart stamp that came as a freebie with a magazine.
Here is the inside with a pocket for the actual gift card. Again put together with the Yuletide Collection papers and some bits and pieces from the Ephemera pack. I highlighted the berries on the wreath with Decoart Liquid Glass to give them some dimension.
 The pocket was just another of the papers edged with a punch.

Finally the envelope, - simple wrinkle free distress, again with the same two colours of inks, some extra inking round the edges, and embellished with a few elements from the paper collection and Ephemera pack.
Well, that's it from me just now, but please make sure to visit the Vintage Journey Blog to see the incredible projects my talented teamies have created, and of course, if you have some time to spare, we would love you to join our challenge!! All the details are on the blog.Nothing like some crafting to relax at this busy time of year.
Thanks so much for visiting today and have a wonderful weekend!!

Tuesday, 1 December 2015

Silver and Gold for Mixed Media Monthly with Indigo Blu

Hello dear visitors and Mixed Media Monthly friends. Happy December first of all!
At Mixed Media Monthly we are being sponsored for the second month by Indigo Blu, and our theme this month is Silver and Gold.

I made a little textured canvas, using some of their papers, stamps and awesome Megaflakes, in gold.


I went on quite a journey with this canvas and it landed up in a very different place from my original idea, but as these are busy times, I will keep my post as short as possible.
I started with one of Indigo Blu's super mixed media ephemera papers  and sanded it down for a shabby effect:
I stamped my stamp in Flitterglue and then used the gold flakes, then tore around the edges and adhered it to my canvas..
Next I added various textures, using Tim Holtz Layering Stencils, going over my paper as shown. I then started to add colour and background stamping to my canvas, and that's where it all started to go wrong really. The delicate image on the paper got completely lost on the background....
So here is where I then changed tack. I stamped the image in the same way again, but this time on black card stock and carefully fussy cut around it. Now at least it was clearly visible. Not the delicate shabby chic canvas I had originally in mind, but at least I had a focal point....
Below are some close ups of the background still.
I  added background stamping using one of my favourite Indigo Blu background stamps.
A couple of large word stickers finished it all off.
I added a tiny bit of detail to my stamped image still with a fine line black pen. The girl is not exactly the subtle delicate lady I had in mind, but at least she can be seen and like me (and you I hope) she is full of happy thoughts!

Hope you will hop over to our challenge blog to see the inspiration pieces my team mates have created, and of course we all hope you will play along with our challenge even though this is going to be a busy month....
Thank you so much for visiting. My earlier project for today can be seen here

Make a Scene

Hello everyone and happy December!!!
Can you believe it's only just over 3 weeks until the big day???
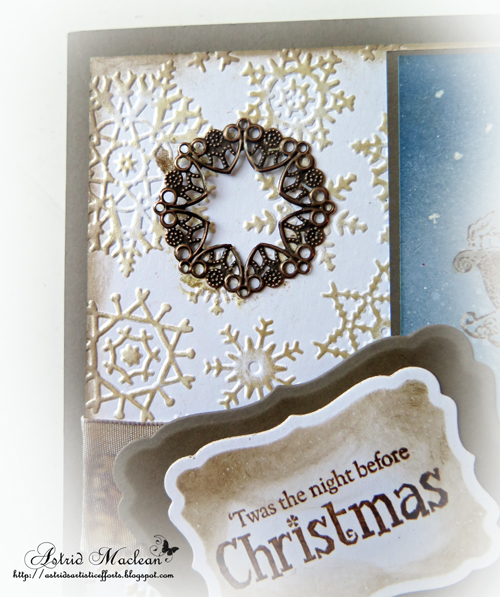
Anyway, over at the Countryview Crafts Challenge blog, the lovely Rachel has chosen the theme "Make a Scene" I decided to make a card for a friend's child:
Now to be honest, I am not really a scenic stamper, nor do I have many suitable stamps, but hey, a challenge is a challenge and I do have quite a few Sheena Douglass stamps, so for this card I used those.
I stamped the houses in Potting-soil Archival ink, heat embossed with clear embossing powder and coloured with Distress Inks, in Ground Espresso for the house and chimneys and  Hickory Smoke to add some shadows to the snow.. I used a Distress Marker in Mustard Seed for the yellow in the window. The Santa and reindeer stamp was done in the same way. Next I punched a circle mask for the moon, blended some Mustard Seed, a tiny bit of Victorian Velvet and Faded Jeans Distress around it, did some Spritz and Flick and added a few dots with a white marker and that was pretty much it.
My scene was mounted on some embossed card, I used a Sheena Douglass snowflake folder. The raised bits were highlighted with Decoart Metallic Lustre in Champagne. The metallic embellishment was coloured with Alcohol Ink in Mushroom
A fancy label with a stamped sentiment finished it all off.

This is a busy month of course, but we all hope you will find a minute to create a scene to join in our challenge. Please hop over to the Countryview Challenge blog, there are plenty of scenes there to give you lots of inspiration!
Thanks for your visit here today and I will be back in a few hours with another project, always busy here on the first of the month.
Thanks for visiting just now and have a good month!!!

Monday, 30 November 2015

Victorian Christmas Collection - exciting news

Hello dear friends and visitors, thanks for dropping in today.
I have some special news to share. As from today, a collection of Victorian Christmas 12 x 12 papers designed by me will be available to purchase through the C'est Maginfique Store in the Untited States
I was super excited to be approached over the summer, by the owner of this store whether I would design a collection of double sided scrapbook papers for her, and they will be available as of today!
Here are just some of the papers that are part of the collection:


There are 8 papers plus a sheet of tags to choose from, and all of the papers are double sided. Matching embellishments, flower add ons and a mixed media kit are also available through the store

Please be aware these are not freebies you can down load, that is why I have water marked them. Obviously the papers themselves will not have these water marks.

The C'est Maginfique designers have started to post some amazing  projects with my papers and other add ons already, do check them out HERE. You will also be able to see the full collection of papers and other kits there.

I will be showing you some of my own samples both there and on my own blog, in the next two weeks or so. Meanwhile you can see a small sample on the Calico Blog.

Well, I hope you like my papers, I promise I will not stop doing freebies from time to time too :o)

Thanks for your visit like always and happy crafting!!


Victorian Christmas fun with Calico Craft Parts

Hello all and welcome to followers old and new! Well here we are on the last day of November, - the Christmas count down has definitely begun....
Today I have some Victorian Christmas projects to share over on the Calico Craft Parts Blog
To find out more, please hop over. Hope to see you there and thanks for your visit at this busy time of year!

Friday, 27 November 2015

Snowy Christmas Card for Shimmerz

Hello all and thanks for dropping in at this busy time of year.
Today I have a snowy card to share on the Shimmerz Blog, with a step by step of course.
Here's a little preview.... To see more detail, all you need to do is CLICK HERE.
Hope you are managing to get some creative time, nothing more relaxing than that.....
Stay safe and warm and thanks for your visit like always!

Monday, 23 November 2015

Shabby chic Christmas

Hello all and thanks for dropping in! Today it is my turn to show a project over at the Countryview Challenge blog. I have made another Christmas card, this time more shabby chic in style.

I had actually planned to just make a tag, so this card started with a size 10 manilla tag.
I stencilled three snow flakes using the Tim Holtz snowflake layering stencil using texture paste. Once the paste had dried I coloured the tag with Shaded Lilac and Blueprint Sketch Distress Inks.
I deepened the colour with some Chipped Sapphire Distress Stain Spray and inked around the edges with Ground Espresso DI then did some background stamping with a text stamp.
At this point I decided I was going to turn the tag into a card, so I took a piece of scrapbook paper, cut it somewhat larger than the tag, inked around the edges with Blueprint Sketch and then adhered my tag. I also glued two bit of lace along the side.

Next I selected some flowers, leaves and berries from my stash and gave them a coat of gesso. When the gesso had dried I used a hot glue gun to create a cluster and arranged it over the lace
I also adhered a little resin bird over the hole in my tag and added a little red berry sprig for a patch of colour.
Here is a close up of the flower cluster.

I added a little sentiment by stamping and fussy cutting a ticket from the Tim Holtz Odds and Ends set, then all I needed to do was mat and layer my card and it was done.

Well, it's only just over a month until the big day, so I am glad I can tick another card of my list.
Thanks so much for visiting today, and don't forget, there are still a few days left to enter our challenge at Countryview Crafts!

Monday, 16 November 2015

Journal page for Calico Craftparts

Hello all, thank for dropping in.
I am sharing a journal spread over on the Calico Craftparts Blog today.
A mixed media background, some crackle and of course some craft part are all in the mix. Hope you'll take the time to check it out :o)
All you need to do is CLICK HERE
Thanks for coming by and have a fab creative week!!

Friday, 13 November 2015

More Christmas experiments...

Hello all and happy weekend! Following on from my last post I have been experimenting further with backgrounds and fairly quick ways to complete Christmas cards.
Today I have 3 further cards to share, - all variations on a theme really....

I'll give you a quick run down of what I did, though I forgot to take step by step photos.
The background on this one was done in pretty much the same way I described here
I coloured with Archival inks, sprays and added some Stampendous embossing powder too for additional texture. The gorgeous ivy die cuts were a gift from my lovely friend Rita. Thank you so much lovely lady!!

Here's a close up, where hopefully you can see a but more of the background. The sentiment is an old one, I think it might have been from Waltzing Mouse stamps, the image is from last year's Papermania Victorian Christmas collection.
The background on this one was done with Crackle paste and a mix of sprays. I highlighted the raised bits with Treasure Gold white fire
The pine branches were also a gift from Rita, I also used one of the new Tim Holtz punches and added some berries with a Viva Decor pearl pen. The image is from the same Papermania Collection.
And here is the last one in this set, further variation using the same techniques.
I love how these delicate ivy branches (I think they are from Sue Wilson) can be bend in whatever way you like.

Well, that's it, - 3 more to tick off my list......
Hope you are having fun with your own Christmas projects.
Until next time and thanks for your visit today
xxx

Related Posts Plugin for WordPress, Blogger...

One World One Heart

Photo

FEEDJIT Live Traffic Feed

Birthday Card

Birthday Card
Just got a whole lot of new stamps from a brilliant place called the Stamp Smith. This is the image that I first saw on Docraft and really liked. I asked the friend who has used it in an ATC, where she got it. Well she borrowed it from a friend who got it from ebay as a one off. But.... it had a title. I googled the title, and hey presto found the site. They have great stamps and offer a really friendly fast service. I highly recommend them!

Gothic Arch Trifold inside

Gothic Arch Trifold inside

Back of Gothic Arch Trifold

Back of Gothic Arch Trifold

Gothic Arch Within the Heart

Gothic Arch Within the Heart

Gothic Arch, the Key

Gothic Arch, the Key