Friday 29 March 2019

Tag Friday at A Vintage Journey

Hello friends, it's the last Friday of the month, and in a month when there are 5 Fridays, AVJ's creative guides do a tag Friday, where we create tags just for fun and hope you will add yours for us to enjoy and be inspired by. So here is my tag for this month:

I love making tags, so I made a kind of double one. I am sorry there are no process photos, but I'll quickly talk you through the details:
I cut two tags, from watercolour paper, using the largest of Tim Holtz's tag dies. I coloured the bottom one with Distress Oxide and normal Distress inks and sprays, in various green shades. I also coloured the back of the top one in the same way, but with brown tones, wetted it slightly and then rolled it down.
The front of the top tag was coloured with various sprays and inks, some stencilling with copper coloured texture paste and a prima stencil, and some background stamping in Ground Espresso Archival Ink.


 I cut various flowers with some of Tim's new and old wildflower dies, coloured them with a mix of Distress Inks and water colour paints and tucked them between the two tags.
Then I embellished with the smaller of Tim's facetted hearts, cut from Metallic Kraft Card and coloured with alcohol inks.
Finally I stamped and cut one of the moths from the Ethemology set and coloured it with some shimmering water colour paints. I also tugged some berries inbetween the flowers still to fill it all up a bit more.

Well that's it for today. I hope you will hop over to A Vintage Journey if you have not been yet, and please feel free to add your tags, - we would love to see them!

Thank you for your visit like always and happy crafting and creating! 
xxxxx


Friday 22 March 2019

A new week, a new page and some faux leather

Hello friends, it’s Friday and that usually means a new post from me. So this week I have my new calendar page to share and also a little mini travel journal with a faux leather cover and insert, all made from scratch.
Here first of all are some photos of the new calendar/planner spread, - when I took the photos it was only partially filled in.
The background was created with some Papper Artsy Fresco paint in Buff, mixed with some Decoart Media Trancelucent White, both of which were on my palette anyway from another project. I also added a few sprays of Vintage Photo Distress Oxide spray and quite a bit of water, all while the paint was still wet. I added some stencilling with a Tim Holtz stencil and Ranger translucent mat texture past and then I added some of my usual elements, stamping washis a wax seal etc.
The bee stamp is from a set by AALL&Create
Wax seal and dried leaf from my garden
Some of the washis were plain brown and I stamped them with Stazon Opaque white.
The sentiment is from one of Tim's word sticker collections. I always like to add some words to my pages. The scribbly stamp behind is also from the same AALL&Create set.
So far for the calendar page... I also made a tiny (6 x 3") travel journal, - I made it that size because I wanted to use the 6 x 6 Kaisercraft Pen and Ink collection papers, which when folded in half and trimmed a little, make for the perfect insert.
Here is the cover. I used a technique first learnt from Sheena Douglass, and rather than giving you a long winded description, here is a link to her Youtube tutorials for the process if you are interested.
I dry embossed the front
But left the back cover just plain, I actually like that better. The metal bit is actually a faux metal sticker purchased in the States a while back. Think it was at Michaels.
I added an extra strip for the spine to give it more strength, and used a really simple elastic closure. The inside was lined with fabric, like Sheena suggests.
A few photos of some of the inside pages, I have done many more, but I thought this post was long enough already...
Because the 6 x 6 papers I used are one sided, every other spread is always blank, which is of course perfect for journaling.
on one of the pages I added a little journal card, from Tim Holtz, but further decorated by me.
Here you can see the other side of the journal card

Well, that's it for this week. Sorry it's quite a long post, but at least I only post once week (grin)
Have a wonderful weekend and thanks for your visit
xxxxx


Friday 8 March 2019

Learning to Fly Just at the Moment

Hello friends, - hope life has been treating you well! This being Friday I have an other post to share, and trust me the title of this post is just a metaphore.
I have my usual calendar page to show and some further pages in my daily Midori sized journal. Let's start with the calendar page
Exceptionally I did not cover everything on the original page, as I quite liked some of it, but then I added further colour, using a little of my new Oxide sprays, some book paper and I finally pulled out a AALL&Create stamp designed by Tracey Evans and one of their stencils that I have had like forever.
I did the background stencilling partly with Gesso and partly with Distress Crayon and stamped the stamp first straight onto the page in Black Soot Archival, and then the flower part several times on old bookpaper.


I then fussy cut one of the flowers and glued it on top of the background, adding a bit of shadow to make it stick out more.
Here you can see a little of the original page peeping through.
I glued part of another flower behind one of Tim's paper dolls, who I gave a pair of butterfly wings to make her more whimsical. As you can see, she sits on some further strips of book paper and some washi tape. I also added some shadow again (I used Distress Crayon for that, wetting it with a little brush).
Finally some Tim Holtz sayings and a little bee wax seal (I am addicted to these and keep adding them to my pages), finished it all off.

Alright, that's the calendar page. There is not much to say on the pages of my daily journal I am sharing. As you can see I put them together with a mix of ephemera, washi tapes, stamps and some dried ferns here and there. The main thing is really the daily journaling...
On the final photo below you can also see some little journaling cards I made to have some more space to write.
Well, that's it for today, - enjoy the weekend and like always, thank you for taking the time to come by.
xxxxx


Friday 1 March 2019

Let's Celebrate the Journey, for A Vintage Journey Birthday Challenge

Hello lovely visitors, today is a special day as this Friday it is the 75th Challenge on A Vintage Journey. it's also our 5th birthdaybirthday, and as one of the original team, what an amazing journey it has been! So many of my team mates have become close personal friends over the years, we have laughed and cried together and have shared our creativity together and with you our lovely visitors.

Well just last week I was able to visit one of my teamies, the lovely  and talented Annie, and we had a super fun day playing with some new techniques, so it seemed fitting to use one of my projects for this special celebration challenge.
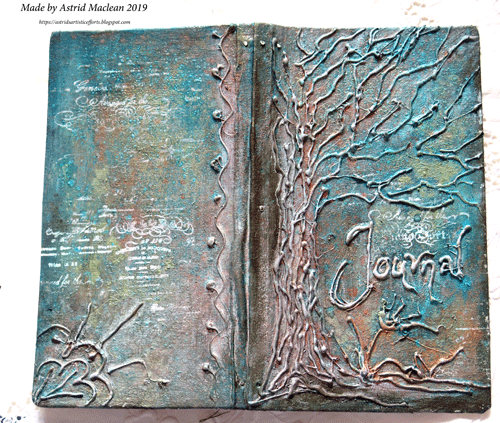
It's a journal cover created with Eileen Hull's fabulous journal die and I will give you an overview of how I put it together below.

My first step was cutting the cover from mount board with the die and gluing it together. I then covered the mountboard with calico fabric for added strength.

Annie had the fun idea of playing with hotglue, so the texture on the cover is created with a hot glue gun. This is what it looked like in it's first stage:
Sorry for the weird shadows, but I just took the photo quickly with my phone, so I could show you the first step.

We had watched some youtubes of people doing projects with a gluegun, and several showed, how after having covered everything with gesso, you can add some gold paint and when that has dried completely, go over it with a dark colour and then wipe away some of that to let some of the gold appear again.
. We decided to do that and when I got home, I used a mix of Paynes Grey and black Decoart media fluid acrylics for my dark layer.(A quick word of warning, when using hot glue for texture you can't use a heat tool for drying between layers as it melts the glue and takes away the texture, that's why I had to finish my project at home).

At this point I decided I wanted a rusty patina look for my cover so out came a variety of sprays to try and achieve that, blueish patina first of all, I used both Lindy's Stampgang and Distress Sprays, as well as some Finnabair Magicals.
Too blue, some more coppery sprays to give it a slightly more rusty look:
Sadly the rusty shimmer does not really show up on the photo, but at this point I also decided to add some white background stamping using gesso, just to lighten it all up a bit.
Next I had to decide on a closure for my journal, - at first my idea had been to use a ribbon closure attached under some design paper on the inside of the covers which you can see here:

In the end I thought that looked awful, so I cut off the ribbon and instead used a simple elastic closure. (Eileen's die has precut holes for that). I also added a few little embellishments to both the front and the back:
The insert for the cover is a Midori blank one that I will use for quotes and to practice my lettering.
Learning to do dip pen calligraphy has been my personal journey in the last few weeks, something I have spent many hours on, so I thought I would close this post by sharing one of the recent samples of my efforts with Copperplate style script:

The script is my effort, the background is not!!! I printed that background from an image on the Graphics Fairy site. Doing flourishes like that will require a lot more practice for sure!!!

Well, that's it from me for today. If you have not been yet, do hop over to A Vintage Journey to see the birthday projects my talented teamies have created and we would of course love you to show us your journey projects!

Thanks for your visit like always
xxxxx


Related Posts Plugin for WordPress, Blogger...

One World One Heart

Photo

FEEDJIT Live Traffic Feed

Birthday Card

Birthday Card
Just got a whole lot of new stamps from a brilliant place called the Stamp Smith. This is the image that I first saw on Docraft and really liked. I asked the friend who has used it in an ATC, where she got it. Well she borrowed it from a friend who got it from ebay as a one off. But.... it had a title. I googled the title, and hey presto found the site. They have great stamps and offer a really friendly fast service. I highly recommend them!

Gothic Arch Trifold inside

Gothic Arch Trifold inside

Back of Gothic Arch Trifold

Back of Gothic Arch Trifold

Gothic Arch Within the Heart

Gothic Arch Within the Heart

Gothic Arch, the Key

Gothic Arch, the Key