Friday 27 November 2020

Small is beautiful, - A Christmas project and a freebie

 Hello friends and welcome. Christmas is coming ever closer and I am in full Christmas creating mode. But before I continue, let me start by saying that I hope that all my American friends and followers had a great Thanksgiving!

First off I am showing  a couple of Christmas cards I made recently, I show them because they kind of relate to the main project I am sharing with you today:


I made these cards with a combination of some Tim Holtz 3D embossing folders and 3D embosslets and some of my own papers available in my Etsy shop HERE

I made the card bases from Kraft coloured file folders which I cut to size. I then was left with a strip of the folder, about 4" high and about 17" wide when folded open. This formed the base for the little notebook folder I am showing below: This project is similar to one I shared a while back here, just simpler and quicker to do. Perfect to make as little gifts for friends.


Let me quickly talk you through how I put it together:


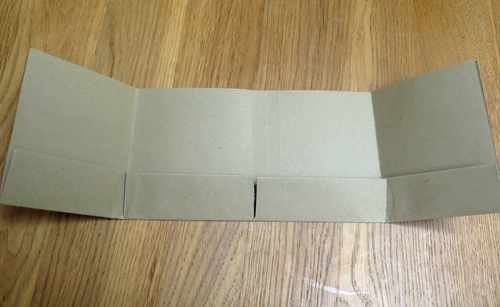
Start with a strip of a file folder, roughly 4" high, score at 4" from each side and also 1/4" on each side of the centre fold of the file folder strip, this will be the place where you will sew in your little notebook.

Next cover each panel on both sides with your chosen papers cut to size. Make pockets on some of the panels, create tags or little journal cards to put in the pockets, and then embellish as you like. Below I will show you what I did and at the end of the post you will find a freebie that you can use as well.

I started by sewing right around the outside of my strip and inked all the edges. Here is the first panel, it has a side pocket made with an element from one of my Etsy collections, you can find it HERE The journal card which you can see more clearly in the last photo was collaged with elements of that same collection.
Here you can see the next two panels, again one with a side pocket and one with a wider pocket at the bottom. The background papers are from another collection HERE
Here you can see the front of the notebook that I sewed inside. I used coffee stained papers, cut to size and folded in half. The notebook has 8 double pages and I simply sewed it in the centre with my sewing machine.
Here is the panels at the back of the notebook, again with a collaged tag inside. The tag was cut with a large decorative tag punch. I will link some of the products I used at the end of the post.
Here is the final panel, again with a large pocket at the bottom, and below finally some of the tags I made.
And here finally is the freebie. I put that together after I finished the project, so have not actually used any of the tags and embellishments here, but you could easily use them in a similar way. Like usual, if you want the full resolution one for printing just email me


And just in case you are interested in some of the products I used, I will list them below, I have no affiliation with any of the linked shops, they are really just there for your convenience, specially for my UK visitors.

Kraft coloured file folders: Here or here

Tim Holtz 3D embossing folder (used in cards): here

Tim Holtz Embosslets: here and here

Decorative tag punch: here

Well, that's it for now, thanks for your visit and happy crafting!

xxxxx


Friday 6 November 2020

Christmas is coming, a little file folder tutorial and a freebie

 Hello friends, - now that Halloween is over and winter here in the Northern Hemisphere is just around the corner, I though I would put my attention to a Christmas project, - so this is what I came up with:


A little folder, made from an old file folder with multiple pockets and a notebook sewn into the middle.
I'll show you more photos of the finished project toward the end of the post, but first a quick tutorial, really in response to the many emails I receive from visitors telling me how they appreciate them, - so thanks for that!

It all started with a simple Kraft coloured file folder:


I opened it, folded it in half, closed it again and then cut off the tabs on the side using my trimmer, as the photos below will hopefully show:


There are now 4 layers but my trimmer managed to cut through them ok as file folders are usually not very thick.

Once the tabs were cut off I opened it again and folded the bottom up to create a pocket. This is a little trickier, so a bone folder is definitely helpful at this stage.
Next you need to fold the sides in towards the centre, leaving a gap in the middle to sew in the notebook. This is a stage you could easily leave out, and just keep your project as a little tag folder only.

To make it easier to fold your project into a booklet, I found it helps to cut a little slit in the pocket fold as you can hopefully see from the photo above

Now I like the look of sewing with projects like this, but you could easily just glue. So either sew or glue everything in place. If just using glue, run a thin line of strong glue on the inside of your fold lines and then glue the sides but leave the top open. If you sew, you can zig zag right around three sides, but leave the top open also. Next glue your 4 pockets, or using a wide zig zag stitch sew them like I did. The open top is for 4 additional pockets, you can punch a notch with a circle punch to make it easier to get the tags in and out.

Now all you need to do is cover everything with papers of your choice, make your tags and you are done. I hope the photos below will show more or less what I did, but obviously the possibilities are endless.
Here you can see the side flaps folded in. I used my latest Christmas Collection, as I wanted to make a Christmas themed folder, using both the background papers and all the embellishments that come with the kit.
                                    Here you can see the inside pockets on the left of the note book.
            Here is the front cover of the notebook, the inside pages are just plain coffee dyed paper.
I just folded this paper cut to size and then sewed it in with my sewing machine, but again you could do this by hand using a pamphlet stitch.
                Here you can see the centre of the note paper with a simple running stitch holding it in place

Here are the tags that fit in the top pockets, they are slightly larger than the ones that fit in the inside pockets.
And here you can see some of these smaller tags inside their pockets on the right of the note book.
Here finally is the back of the booklet, I fitted a piece of paper and some lace around the spine to hide the stitching from the notebook. I fitted some seam binding underneath that to close the booklet.

Well, that's it, and here finally is the freebie that you have been waiting for, enjoy, and like usual, just email me to get the full resolution sheet for printing.

                                            Happy crafting and thanks for your visit like always.
xxxxx


Related Posts Plugin for WordPress, Blogger...

One World One Heart

Photo

FEEDJIT Live Traffic Feed

Birthday Card

Birthday Card
Just got a whole lot of new stamps from a brilliant place called the Stamp Smith. This is the image that I first saw on Docraft and really liked. I asked the friend who has used it in an ATC, where she got it. Well she borrowed it from a friend who got it from ebay as a one off. But.... it had a title. I googled the title, and hey presto found the site. They have great stamps and offer a really friendly fast service. I highly recommend them!

Gothic Arch Trifold inside

Gothic Arch Trifold inside

Back of Gothic Arch Trifold

Back of Gothic Arch Trifold

Gothic Arch Within the Heart

Gothic Arch Within the Heart

Gothic Arch, the Key

Gothic Arch, the Key