Friday 6 March 2020

Celebration time at A Vintage Journey

Hello everyone and welcome! I am sure many of us experience that as we get older, time seems to fly faster.... It's hard to believe that today we are celebrating our 6th birthday over at A Vintage Journey!! 
So of course I am sharing the project I put together for the celebration with you today:
There are three parts to my project and they were inspired by a crafty fun day with my lovely friends Annie and Rita, and of course Annie is also a teamie at AVJ, which is why I chose to use this project for our celebration.

The project itself consist of 3 different items, a little foldout tag book, a handmade tear off notebook and an altered envelope that will hold the other two items which will be sent to one of my penfriends.

Lets have a closer look at the items one by one.
First of the fold out tag book, we all made one of these during our craft day, Annie had made one previously already.
 There are full instructions of how to make these in a YouTube video Annie gave us the link to, you can find it HERE

All you need is a bit of square card, you can do it pretty much any size, but we used 8 x 8 card.
I have made several ones, they are so much fun. For this one I used some papers from Stamperia Old Lace collection , I added some real lace, fussy cut some of the fab. elements and collaged it all together to make the base.
On the inside there are lots of pockets for little tags, and for this one I also added some tea bags as my penfriend love tea.
Of course you can decorate it all in whatever way you please.

My next item was a little hand made notebook, so simple and it can make a great gift and is a super way to use up papers.
Obviously you can make these in any size you want, mine is 3.75 by 6.75.

For the coverr you need a piece of your chosen paper (I used more of the old lace paper) and cut it approx. 2 to 2.5 inches longer than the finished size of your note book. This is so you can score it at 1 " and 1 1/4" on one side so it can fold over the inside pages of your book. Hopefully this picture will make clear what I mean:

You will also need a piece of strong card board for the back, and what ever paper you want to use for the inside pages. I used a mix of dotted, lined and blank paper to give lots of different options, but I have also made some different sized ones just using blank, or tea dyed papers to include into my junk journals.

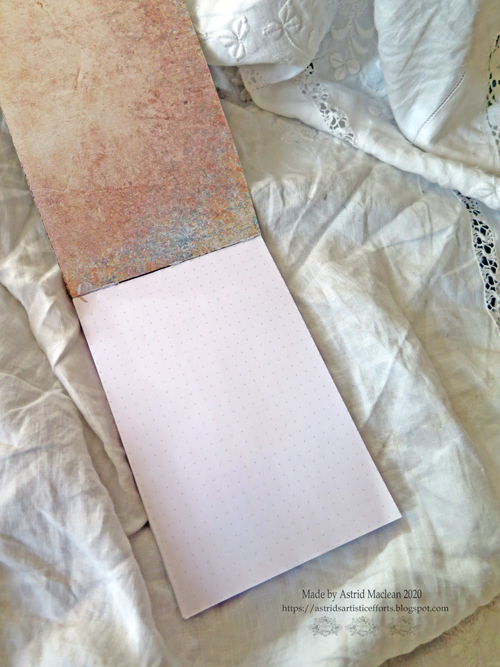
Here is a sideview and the inside view when you open the cover. 
So what you do is the following:
Cut about 25 or so papers and some strong card or board to your chosen size.
Clip them all together with some bulldog clips or similar (leave the longer front piece for later). Using some good pva glue and either a brush or your finger, run a line of glue all a long the top edge, making sure there is a good layer of glue. Now let it dry for about an hour or so.
Finally adhere your front cover, adding more glue in the groove where you have scored, making sure it is flush to you pages. Clip together again, let it dry, and your notebook is done.
And here finally is my altered envelope. I made it using an envelope punchboard from a piece of 12 x 12 paper from my stash. I sewed around the edges and then decorated it with some old book  and other vintage papers and then embellished with some further fussycut elements from the Old Lace collection.
So there you have it, please hop over to the Vintage Journey blog to see what some my other teamies have created and of course we all hope you will share our special birthday with us to add one of your own celebration pieces with us.

Thank you for visiting today and have a wonderful month of March!


Related Posts Plugin for WordPress, Blogger...

One World One Heart

Photo

FEEDJIT Live Traffic Feed

Birthday Card

Birthday Card
Just got a whole lot of new stamps from a brilliant place called the Stamp Smith. This is the image that I first saw on Docraft and really liked. I asked the friend who has used it in an ATC, where she got it. Well she borrowed it from a friend who got it from ebay as a one off. But.... it had a title. I googled the title, and hey presto found the site. They have great stamps and offer a really friendly fast service. I highly recommend them!

Gothic Arch Trifold inside

Gothic Arch Trifold inside

Back of Gothic Arch Trifold

Back of Gothic Arch Trifold

Gothic Arch Within the Heart

Gothic Arch Within the Heart

Gothic Arch, the Key

Gothic Arch, the Key