Thursday 27 April 2017

Practice makes perfect... well I hope so at least

Hello friends and welcome! A special welcome also to all my new followers, thanks so much for joining me on my journey!
Today I have a project to share that I was actually not sure I would post here..... But not every project can always be good, right?

Let me start by telling you what it is: A really simple set of tags that I made for fun and two reasons: 1) To play with my Oxides inks and try out different colour combos.
2) To practise my brushpen calligraphy ( and that is the bit I am really embarrassed to share)...

With my new interest in Midori sized travel and junk journals, I thought it was essential to work on my hand writing and learn brushpen calligraphy, - but boy, I have a long way to go as you will see.

But enough of the waffle and on to the project:
I forced myself to only use two colours of the Oxides on each tag, so this is what I used:
1: Vintage Photo & Iced Spruce
2: Vintage Photo & Peeled Paint
3. Peeled Paint & Faded Jeans
4. Broken China & Wilted Violet
5. Fossilized Amber and Fired Brick
Here are close ups of just a couple of them:
This is number 3, I was amazed just how many colour variations you get by just layering up two colours only and then spritzing, layering and spritzing again. (I did edge each tag with just normal DI in Ground Espresso)
Same thing, this is number 2, - again at least 3 or 4 layers with drying in between, - I just love these inks so much.
Anyway, onto the finished tags, each with a quote in very imperfect brush lettering. I have down loaded several so called "drill sheets" to practise each day, so hopefully I will get better in time. Oh for those of you who are interested, I used Tombow Markers.

For this and the next one I outlined in white, not sure whether that was a good idea or not...

As you probably gathered, I kept embellishments very simple, just using a few little things to add a bit more interest.


Well there you are, I'll keep going with the drill sheets and probably turn these tags eventually into a little booklet to chart my progress, - I'll keep you posted....

Hope the sun shines where you are and thanks for your visit today
xxxxx

Sunday 23 April 2017

Back from Japan

Hello all and welcome! I have finally returned from my trip to Japan, and as perfect timing would have it, I was delighted to be invited by Eileen Hull to create a journal cover with her Journal Die from her new Heartfelt Collection.


As regular visitors will know, before leaving for Japan I started a Midori traveller's journal to take along on te trip, if you missed it you can see some of the prepped pages here and here, and as Eileen's new die is just the right size for Midori notebooks, I knew it would make for the perfect cover.

I'll give you a quick step by step how I made it:


First I painted the covers with a mix of Golden Titan Buff and Victorian Velvet Distress  acrylic paints, scraped on with a little craft scraper.

Next  I added some Japanese text pages. These came from a vintage Japanese book picked up in a little antique store in Kyoto. It is printed on very delicate tissue paper, just perfect for mixed media projects.

Then I created a little front panel. The background was done with Oxide Distress Inks in Worn Lipstick, Broken China and  Vintage Photo. I then stencilled a cherry blossom branch with a Crafters Workshop stencil using Distress crayons and added a little Japanese stamp, picked up in a stationer's shop in Tokyo. I am sorry to say I actually have no idea what it says..... Here is a close up:

I added a bit of shadow with coloured pencils to bring out the flowers (it was of course cherry blossom season, Sakura as the Japanese call it), and a bit of foiling using a glue stick as well as some flowers etc from my stash.
Here you can see the front and back. The back page just had some scraps of a paper napkin and some Japanese washi tape added to it still.

The inside of the covers was done with paper from the new Tim Holtz Memoranda collection. It seemed to fit the junk journal style of some of my inner pages just perfectly.
The title was done with an additional little die that comes with the main journal die.
The spine has some charms, the Japanese one can be used as a bookmark for the inside.

The closure, another little die that comes with the main one, was adhered to the back cover and then tucks perfectly under the front panel as you can see below:

As the front panel was adhered with foam tape there is just the right space and this makes it super easy and quick to open and shut and as I plan to make several further inserts, there is still loads of space inside this brilliant cover die. 
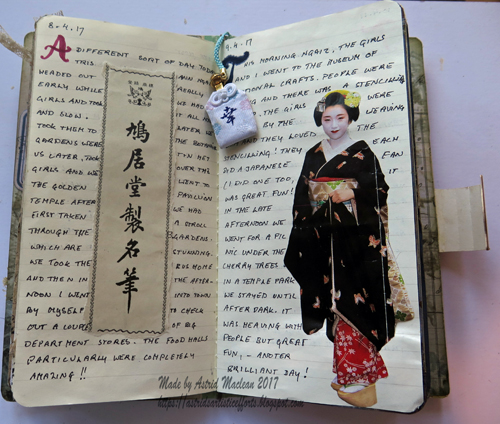
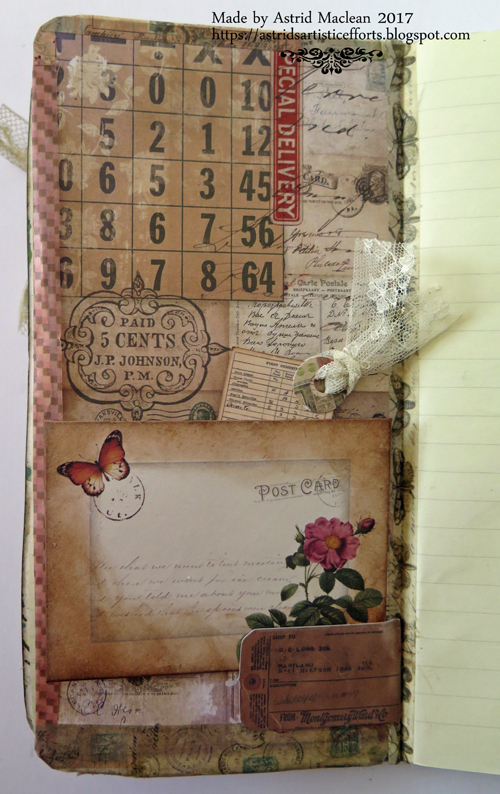
Here are a few of the inside pages still, mostly all done while in Japan:


And finally, because so many of you asked for it, some photos taken during the trip. We literally took hundreds of photos, so this is just a tiny selection lol.
 One of the numerous temples we visited, this one is in the hills, just outside Osaka.

View of the countryside around the temple
View of a bamboo grove outside Kyoto
 A Shinto shrine

Cherry blossom season, a view near our apartment in Kyoto
And finally, just a few family picks, meeting up with our grand children was one of the main reasons we went there in the first place....
The oldest, 4.5 years old
And the younger one, nearly three.
Having some fun in one of the temple gardens while mum and dad were exploring

Well that's it for today....Japan is the most amazing country and we definitely plan to go back some time. Thanks for staying with me through this mammoth post and until next time!
xxxxx


Monday 17 April 2017

Oxides and Shimmerz, - a journal spread

Hello friends and welcome.
Just another preview today, the main project can be found on the Shimmerz blog HERE
I wanted to explore how the new Oxide Distress Inks would play together with Shimmerz products. If you want to find out more, all you need to do is hop over
Have a wonderful creative week, hopefully enjoying some sunshine and creativity....
xxxxx


Thursday 6 April 2017

Japan travel journal part 2

Hello friends, hope you are all well and happy.
Today I want to share some more pages from my Japan travel journal. If you missed the first part, - you can find it here.
I did another mix of collage and own made background pages. The above is obviously a collage one.
I love this junk journal style and it is such a great way to use up all these bits and pieces that we all seem to hoard.
I used some paper from the Tim Holtz Etc 8 x 8 collection. I half the page, which makes it just slightly smaller than the pages of the Midori travelers notebook pages, adhere it to the lined paper in the note book and then put tissue tape around to make it fit.
I added a little tuck spot,  and tucked a mini envelope behind it . I then  made a tiny little book to fit behind the envelope, for a few bits of further journalling. The little envelope provides more space to keep little bit and pieces, tickets, keep sakes, little photos whatever collected during the day.
Another page, done in pretty much the same way. This time the envelope was made using the Tim Holtz pocket envelope die. I glued only 2 sides, so create another tuck spot/pocket.

The envelope opens and closes  with the flap tucked behind the little heart made with the help of a little punch, when you glue down only the bottom half, it makes for the perfect closure. A tag fits in the pocket behind.
Finally just a decorative page, using Oxide and Distress Inks, an element from the Botanical Layers ephemera, some  shadow work with  a couple of a Distress Crayons, some stencilling use a Seth Apter stencil and a Distress Crayon and finally some background stamping and washi design tape.

Well that's it for today, thanks for your visit and stay creative!
xxxxx

Monday 3 April 2017

Spring canvas for Shimmerz

Hello everyone, it's that time of the month again, my turn to show a project over on the Shimmerz blog. There is a step by step on the blog there, so here only a little snippet:
I had fun making this, - hope you'll have the time to hop over.
Hopefully the sun is shining where you are and have a great week!
xxxxx

Saturday 1 April 2017

Mixed Media Monthly - Show us your super power

Hello all and happy April!! This moth at Mixed Media Monthly we want you to show us your super power.....
Well to be honest, I did not find this an easy topic, so I decided I would let myself be inspired by nature, for to me, there is nothing more powerful then the magic Nature can display, especially at this time of the year.
Our sponsor this month is Stampers Anonymous, the winner will get a set of Bret Wedele stamps and he is our guest designer too this month.

Here is our grapic for this month's challenge, - be sure to include it if you are going to play along.


I decided to make a butterfly the central feature of my project, for butterflies certainly display super power when they emerge from their chrysalis at this time of year. Below a few step by step photos:
I started by putting down some texture through a couple of stencils, the one on the left is by Tim Holtz, the one on the right by Paper Artsy.

Next I added colour with my Oxide Distress Inks, pressing colour down on my craft mat, spritzing with water and then dipping and drying until I was happy with the results. Those inks certainly display super powers too, I just love them and they inspire me to step right out of my colour comfort zone...

I added some background stamping, using a couple of Wendy Vecchi background stamps, stamped in white acrylic paint. Raised bit were highlighted with normal Distress Ink.

I cut my butterfly from card coloured with Oxides, using a Spellbinder die.
I gathered some further embellishments and then put it all together. Below a few close ups:

A flower cluster,coloured with Victorian Velver Distress Ink and for the leaves using a variety of dies  cut from scraps of the same card the butterfly was cut from.
The word highlighted with some chipped sapphire distress ink.
And here at last, the finished card. The sentiment is one of the new Tim Holtz quote chips.

Well that's it for now. Hope you will decide to play along with our challenge and be sure to hop over, get all the details of the challenge and see what my awesome teamies have created to inspire you! All you need to do is click HERE

Thanks for your visit here today, always much appreciated because I realise how busy everyone is...
xxxxx

Related Posts Plugin for WordPress, Blogger...

One World One Heart

Photo

FEEDJIT Live Traffic Feed

Birthday Card

Birthday Card
Just got a whole lot of new stamps from a brilliant place called the Stamp Smith. This is the image that I first saw on Docraft and really liked. I asked the friend who has used it in an ATC, where she got it. Well she borrowed it from a friend who got it from ebay as a one off. But.... it had a title. I googled the title, and hey presto found the site. They have great stamps and offer a really friendly fast service. I highly recommend them!

Gothic Arch Trifold inside

Gothic Arch Trifold inside

Back of Gothic Arch Trifold

Back of Gothic Arch Trifold

Gothic Arch Within the Heart

Gothic Arch Within the Heart

Gothic Arch, the Key

Gothic Arch, the Key