Friday 27 July 2018

Oops, I forgot.....

Hello friends and welcome. I am so not into blogging right now (see previous post) that I totally forgot to mention here that I have a card tutorial that went live earlier on A Vintage Journey. I am using the new Alcohol Lift Ink by Tim Holtz. Here is a sneak peek:
If you want to see more, all you need to do is CLICK HERE

Have a wonderful day and a great weekend and if you are anywhere in the Northern Hemisphere
stay cool!!!
xxxxx

Wednesday 25 July 2018

A little update

Hello friends, just a short post from me today, first of all just apologizing that I have been a terrible blogger once again.

We are off to France at the weekend, where we will be staying in a home of people we are doing a house swap with, so I have been frantically busy getting everything ready for them to feel welcome in our house.

So before we leave, just a few pieces of art I have been working on for the last few weeks, mostly pages from my bullet journal, but also the cover of the travel journal I am taking along with me.
It's a travellers' notebook (midori) size, not too large and easy to pack. It's got a mix of water colour and drawing paper inside, so plenty of options.

Alright and now the bullet journal pages, some I have written in already, and some still waiting to be written in. Each day has my to do list and then some quick notes on how the day went.

All pages are done in a mix of collage, mostly washi tapes, stamping, inking and stencilling, - quite a change from how I started this journal, almost a year ago now, but I feel much more at home with this style.


Well, that's it for now, I look forward to visiting blogs more regularly soon and meanwhile, thank you so much for your visit today!
xxxxx

Wednesday 18 July 2018

Junk journal with video flip through

Hello friends and thanks for dropping in! About 10 days or so again I shared the cover of a junk journal I am working on and today I am finally ready to show you some pages. I have also made a little flip through video, if you would like to see more.
First a few photos:
What I am showing today is just the first insert. I am in the process of making three in total.
Here you can see the cover, made from Kraftcard and embossed with one of Tim Holtz's new 3D embossing folders.
Here the first double page with a pocket, you can find a tutorial for these here and a number of different tags, a tuck spot and journaling card. All the papers used are tea dyed and then inked with Distress inks.
Another double page, this time with an embossed belly band, a pocket created with a die and another tag with space for journaling or a photo on the back.
Yet more pockets and tags/journaling spots

And finally one more page with quite a bit of stamping and stencilling as well as a little altered little glassine bag holding yet another little tag.


There are a lot more pages and if you would like to see them, just click HERE to go to the youtube video. As it is my very first actual video rather than just a slide show, I do apologize for the quality, I am still learning...

Well, that it's for today, thanks for visiting like always and until next time.
xxxxx

Thursday 12 July 2018

Junk Journal corner pocket tutorial

Hello friends, hope your week is going well. As more than half of you who commented on my previous post requested a tutorial for the corner pockets, here you are:
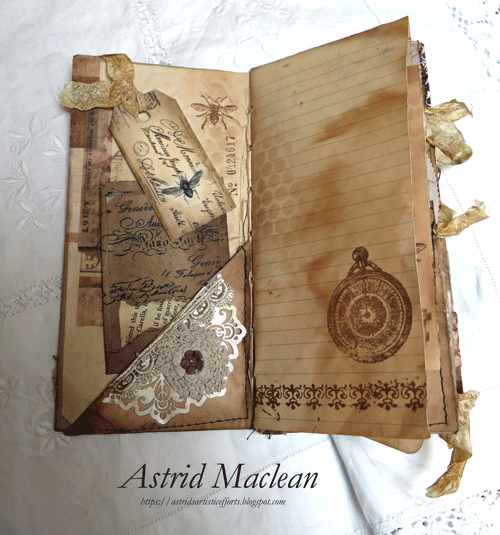
First of all, a little reminder of how such a pocket can fit into a junk journal:
The journal I am making right now is Midori size (roughly 4 x 8" each side, so the actual pages are 8 x 8" folded in half), but of course a pocket like this can fit in any size journal, or indeed on the inside or even outside of a card.

1. Start with an A4 sized piece of paper ( more or less 8.5 / 11 for my American visitors).
I used tea dyed printer paper, but you can obviously use any kind of paper or thin card.
2.Fold the paper in half length wise
3. Fold one side down to form a triangle. The open side needs to be at the top.
4. Cut along the side as shown in the photo below. With the paper left over you can make one more corner pocket, plus a decorated envelope if you wish.
5. Lift one corner and fold it back on itself, this will create the pocket.

As you can see in the photo, the bottom is open, but so is the long diagonal side, which will form the actual pocket.
6. You now need to close the bottom and loose flap. This can either be glued, or as I decided to do, sewn.

7. Time to decorate and if you want a vintage look, ink the edges.

8. Gather some bits and pieces to add, here is what I used: A piece of lace, half a doily, some cheese cloth and a medallion made with the Tim Holtz 3D impresslets and a tiny little flower.

9. Now all you need to do is put it all together.
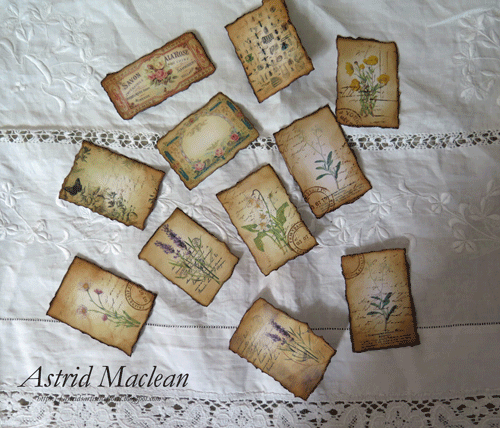
Here you can see it with the two journaling cards I plan to keep inside.I coloured my medallion with Distress Oxide Inks to match the l I fitted mine on the right side of my journal, but if you turn it 90 degrees clockwise you can fit it on the left. If you don't glue the whole back side to your journal page, put just put a thin line of glue along the two short sides, you then have a double pocket.
Well, there you have it, hope it all made sense and happy crafting!
xxxxx


Sunday 8 July 2018

Junk Journal part one

Hello friends, I hope your week is starting off well.
I am busy working on my latest junk journal, and thought it would be best to show it in stages. So today just the cover and some of the many embellishments I have been making for it.
Here first of all is the cover. Those of you who follow me on Instagram will have seen this already as I posted it there a few days ago.
Here you can see both the front and the back:
I made the journal using the Eileen Hull Journal die which makes a Midori sized journal, one of the sizes I love for journals. I used paints (on a die cut cut from black mount board), washi, some ripped card, enbossed with Tim Holtz 3D embossing folder, and some embellishment made with his new 3D Sizzlets cut and emboss dies. I absolutely love these, they are so versatile.
Below a photo of the inside:
On the right I made a deep pocket, a place to keep ephemera, journaling cards etc, etc.

I am making three insert, all with tea dyed papers, but will show you that some other time.
Today just some photos of some of the numerous tags, pockets, tug spots and altered paperclips etc.
Exceptionally I actually used a downloadable journaling kit, something I normally never do, but when I found this shop on Etsy, I could not resist, and she even makes kits in TN (Travelers Notebook/Midori) size...
Corner pockets and little envelopes. There are a ton of tutorials on youtube on how to make things like this. I watched quite a few of them, but then did my own thing. If you are interested in a tutorial on these, let me know in the comments and I will do one.


Loads of tags to insert in the pockets of course.

And journaling cards


Finally my favourite thing to do:
Altered paperclips. If you want to know how to do these, my lovely Ozzy friend Margaret from Margyz Paper Games, just did a brilliant tutorial on how to make these and I made mine in a very similar way.
Here are two of my favourites. The images for these were from another lovely Etsy shop

Well, that's it for part one, I'll show you part 2 and probably 3 at some other time. Meanwhile, thanks for your visit today like always and happy creating!!
xxxxx

Friday 6 July 2018

Get sentimental for a Vintage Journey

Hello friends, it's the first Friday of the month and that means a new challenge starting at A Vintage Journey. The talented Nikki has chosen the theme "Get Sentimental", and this is what she would like you to do:
Let's see lots of sentiments on your project, whether they be words, poems or quotes. Just remember to create your project in our preferred styles of vintage, shabby, mixed media, art journaling, industrial, timeworn or steampunk.
Well I decided to create a journal specifically to use quotes and also to experiment with different mediums and styles.
Here first of all is the cover:
I had this piece of Stamperia London themed rice paper hiding in my stash and decided to use it for my quotes journal. I also wanted to finally put some of Lynne's Affirmations stamps and stencils to use, so that was my starting point.

I cut two pieces of scrap card to just over 6 x 8  and covered them with the paper. I then cut  7 pieces of A 4 water colour card, folded them in half to form signatures. I sandwiched them between the two bits of card and then wrapped a bit of sports tape tightly around the spine side right along the length. The sports tape is so sticky it holds the pieces in place, so super easy. Then all I did was glue a spare bit of the rice paper over the spine, and that was it.. If ever one of the signatures get loose, you can always hold it in place with some washi or design tape.
Once everything was held together I started to decorate the front cover a bit further.
I wanted to try and get a sort of faux encaustic technique both on one of the inside pages and on the cover. For the cover, I first of all stencilled one of the sentiments of the affirmations stencil with white opaque embossing paste and when that had dried covered the whole cover with a thick layer of thick Matte Medium, using a pallet knife and scratching into it a bit for some additional texture. I then let it dry overnight.

 My new Tim Holtz 3D embosslets had just arrived, so they were put to good use to embellish the cover. I cut them from Kraftcard, coloured them with Distress inks and then highlighted the raised bits with some Whitefire Treasure Gold.
Some of the textural bits in the now dry medium were further highlighted with some Distress Crayon in Cracked Pistachio.

The inside of the covers were covered with some Prima Design papers I had in my stash, I just inked, stamped and gessoed them a bit and then added another sentiment to the front one, using the stencil once more.
Alright, onto the first of the journal pages, another faux encaustic experiment that I messed up rather...
There are numerous layers on this piece, paints, inks, washi tape, gesso etc and then I stamped some of the affirmations stamps onto tissue paper and added them too before covering everything in the thick medium again.
The sentiments got lost against the background, I tried to rescue that by outlining with a stabilo all pencil, but I am still not happy with the result.....
So the next double page was done in a very different style:
I often use this style in my daily and bullet journals, using washi tapes, stamping and stencilling, but again, in this size of journal, the sentiments got lost a bit....
Here are a few close ups still:


I added a few drops of sealing wax for some extra highlights...
I absolutely love these stamp sets, the sayings and additional images that come with them, but ultimately I think they would work better on a smaller format journal or cards/tags.

My final spread is a combination of the previous two: These pages were done in a similar way, Using paint for the background and then adding other elements, background stamping and some of the wonderful bugs from the Tim Etymology set, stamped on tissue paper. To give Lynne's affirmations a bit more prominence I stamped them on scraps of paper first.
And a couple of close ups, to finish it all off:

This time for the faux encaustic I used Transparent Texture Paste, this worked better and if ever I wanted a slightly more waxy look I would probably just add a tiny bit of paint...

Well, that's it, sorry for this mammoth post, thanks for dropping by like always, and if you have not done so yet, do check out the projects of my talented teamies, tons of "get sentimental" inspiration for sure.
xxxxx


Related Posts Plugin for WordPress, Blogger...

One World One Heart

Photo

FEEDJIT Live Traffic Feed

Birthday Card

Birthday Card
Just got a whole lot of new stamps from a brilliant place called the Stamp Smith. This is the image that I first saw on Docraft and really liked. I asked the friend who has used it in an ATC, where she got it. Well she borrowed it from a friend who got it from ebay as a one off. But.... it had a title. I googled the title, and hey presto found the site. They have great stamps and offer a really friendly fast service. I highly recommend them!

Gothic Arch Trifold inside

Gothic Arch Trifold inside

Back of Gothic Arch Trifold

Back of Gothic Arch Trifold

Gothic Arch Within the Heart

Gothic Arch Within the Heart

Gothic Arch, the Key

Gothic Arch, the Key