Sunday 24 February 2019

Sunday Postcard Challenge - Vintage Florals

Hello friends, and extra post from me today, because the wonderful and talented Mandy invited me to be guest designer for her challenge blog Sunday Postcards.
I decided to choose the theme Vintage Florals, so here is the postcard I designed:
The background was created with the help of some rice paper by Staperia. I have had this in my stash for years and am not sure if it is still available.I also used some paper napkin scraps, some free printables  and stamping. I then felt I wanted some more texture, so I used a text stencil by Finnaibair and did some stenciling using gold texture paste by Wendy Vecchi. Below I will show you some details:

The flowers on the right side are scraps of rice paper, I used two different ones, layering one on top of the other. You can also see some of the stencilling. The lavendar is from an Etsy digital download that I prented on thin paper. I tore the edges and then went over it with some watered down gesso, to blend it into the background. Some colour was added in again using a mix of acrylic paint and some Distress Crayons.
Adding a background stamp over the various paper scraps, blends it all together.
Here you can see the other corner, I darkened some of the stencilling with a Distress Crayon to blend it in with the darker edge which was part of another scrap of rice paper. I also added a wax seal, plus a bit of text, and that was pretty much it.


Well, that's it from me for today. If you don't know the Sunday Postcard challenge, do check them out, and if you do, I really hope you will decide to play along and I will look forward to seeing your postcards
Happy Sunday to you all and thanks for your visit!
xxxxx


Friday 22 February 2019

The future awaits... and some freebies

Hello friends, it's Friday and that means I am sharing here on my blog a few of the things I have been doing lately.
First up, my usual weekly calendar/to do journal:
This time instead of covering the right hand page with gesso, I added some paper from the Stamperia Blue star collection and then used that as the background for some further playing around with Distress Crayons, paper serviettes, some stencils and some elements from another Stamperia collection, Voyages Fantastique. Below a few close ups:


I have also been busy creating some things for some snail mail swaps with various people.
This is an altered index card and envelope to send it in.
Finally, - as most of you know, I love journaling and recently got involved with a swap with another journaller on Instagram. So I decided to create some journalling cards and other little embellishments she can use in her own journals if she likes, and thought I could share them with you all here as downloadable freebies.


Most of the imagery in these sheets came from the Graphics Fairy, so thank you Karen for the amazing things you offer on your site!!!

Well, that's it for this Friday, but exceptionally I will have another post going live on Sunday as I was invited by the lovely and talented Mandy to be host for the Sunday Post Card Challenge, 
so if you want to see the postcard I created and the theme I chose, please do come back then.

Meanwhile thank you like always for your visit today
xxxxx
 

Friday 15 February 2019

Sow a little kindness where ever you go

Hello friends and like always, thank you for taking the time to visit. I hope this last week has been a good one for you.

I have two projects to share with you this week. The first one is a Valentines make, a mixed media piece I created to wish all my online friends the most wonderful Valentines day.

I know I am a day late here on my blog, though perhaps not for friends across the pond. In anycase, I hope you had a day full of love! This is a  4 x 6 canvas panel.
And here are a few steps of how I created it:
1. Cover board in Gesso.
2. Adhere diecut (Tim Holtz Thinlets Organic die)
3. Add some stencilling.
4 Colour with a mix of acrylic paints (I used Distress paints as well as some Paperartsy and some Decoart Media paints).
5.Do some drybrushing to highlight some of the raised bits.
6. Add some embellishments: a digital download slightly distressed, a Tim Holtz paper doll and word band, and a Facetted heart also a Tim Holtz die, cut from metallic cardstock and coloured with alcohol inks.
Below a few close ups:
The second project is my calendar page for the past week. Seeing it was Valentines, I also added a heart to my page.
I layered various home made and downloaded ephemera, added some colour with Distress crayon and also a dried fern from my garden.

Well, that's it for now. I hope you will have a good and creative week ahead and thank you for dropping by today!
xxxxx

Friday 8 February 2019

Each Day Has Beauty....

Hello friends and happy Friday! Today I have two projects to share, both using the same papers that are a digital download you can purchase on Etsy. Just in case you are interested, they are by Tracy Fox of Fox Creative and you can find them HERE.
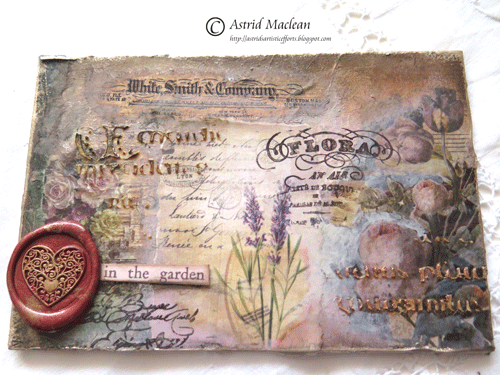
The first project is my weekly calendar page.
I layered up the papers, added washi, did some background stamping and finally finished with a wax seal and a hand written sentiment.

Below just a few close ups:
One of Tim's paper dolls whom I gave a pair of wings for a bit of whimsy.
The hand written quote, written with a dip pen. Much of my crafting time these days is spent doing my dip pen practice, I'm afraid to say, progress is very slow and I am not really ready to share much of it...
I always add a little colour and or stencilling to the facing page too, to tie them together.

I had lots of fun creating the second project which was for an art swap:

The swap was for 3 Artist Trading Coins, but I decided to add some extra bits, just for fun and created a little folder and decorated envelope, just because I love doing things like that.

Here first of all are the 3 coins:
And here a close up of the envelope: Obviously before I added the address
The little folder was adapted from a tutorial by Nik the Booksmith  I found on Youtube, and I used the same printable paper as for the calendar page:
It has pockets inside, where I stuffed bits and bobs that I hope she will enjoy using in her own artwork.
Well, that's pretty much what I have been up to, have a good week ahead and until next Friday...

Thank you like always for taking the time to visit
xxxxx


Friday 1 February 2019

Your Hearts Desire for A Vintage Journey

Hello all, - happy Friday and Happy February!
Today sees the start of a new challenge at A Vintage Journey, and no surprises, - there are some hearts and love involved in our challenge theme this month.
Our fabulous host this month is the talented Annie, and this is what she had to say about the challenge theme:
Since February is the month of love, include hearts as the main focus of your project. Just be sure your design is in keeping with our vintage, shabby, mixed media, art journaling, industrial, timeworn or steampunk styles we prefer.

Well, I decided to alter one of Tim Holtz's ETC tags, but started my project with a Graphics 45 tag and then cut some scrapbook paper with the matching G45 die. I love the shape of these tags.
I embellished the tag with another G45 die, it comes as part of another tag die. Instead of the clock hands I then added a heart cut with an old Movers and Shapers die.
I sanded the edges of the adhered paper for a distressed look.
The heart was cut from mettalic Kraft card and then treated with some alcohol inks and a crackle stamp stamped in black Archival ink.

Time to put it all together.

I covered the ETC tag with Gesso and then some buff acrylic paint. Next I added crackle paints and when then had created its crackle added a thin wash off watery dark umber.
I diecut some leaves, and added some flowers from my stash for a little cluster.
And finally added this happy couple from Tim Holtz's Paper Dolls collection to finish of my love themed tag, and also added a handlettered sentiment, using a dip pen and some Prima paint.

Well, that's it from me for today. Do hop over to A Vintage Journey to see what my marvellous teamies have created and we all hope you will share some heart themed projects with us too.
Have a great month!!


Related Posts Plugin for WordPress, Blogger...

One World One Heart

Photo

FEEDJIT Live Traffic Feed

Birthday Card

Birthday Card
Just got a whole lot of new stamps from a brilliant place called the Stamp Smith. This is the image that I first saw on Docraft and really liked. I asked the friend who has used it in an ATC, where she got it. Well she borrowed it from a friend who got it from ebay as a one off. But.... it had a title. I googled the title, and hey presto found the site. They have great stamps and offer a really friendly fast service. I highly recommend them!

Gothic Arch Trifold inside

Gothic Arch Trifold inside

Back of Gothic Arch Trifold

Back of Gothic Arch Trifold

Gothic Arch Within the Heart

Gothic Arch Within the Heart

Gothic Arch, the Key

Gothic Arch, the Key