Hello everyone, hope your month is going well. Today I am back to share a second little project with you for the challenge I am hosting at Our Creative Corner
As you can see it is a tag, the flowers are made with dies and stamps from the Heartfelt Creations Adriana Blooms collection. If you are into making your own flowers, you should check out their stamps and dies!
I started by making a background for my tag using Tim Holtz sprits and flick technique in soft green tones, mainly Iced Spruce and Bundled Sage. I also used the Brushed Pewter Distress Stain and edged with Walnut Stain Distress Ink.
I added some background stamping with Coffee Archival and then made my flowers. Here is a link to a video giving you loads of different flower shaping techniques with these stamps and dies, if you are interested.
I stamped my flowers in sage coloured pigment ink, then clear embossed them and coloured them with a tiny bit of Gathered Twigs Distress Ink, both in the centre and on the edges. The stamping does not really show up on the photo, but on the leaves below you can see the effect a lot better:
I cut a piece of trellis with a Cheery Lynne die and then layered up my tag as you can see below:
Here are some close ups still:
Hope you like this little project. The original challenge project can be seen HERE.
Hope you'll decide to play along in the challenge! And for those of you that have no flower dies or even punches, - there are so many different ways in which flowers can be created out of lace ribbon or just cut by hand. In a couple of days I will be back with a last project for the challenge, showing how flowers can be made just using stamps!
Thank you for visiting and hopefully see you next time!
Thursday, 3 July 2014
Tuesday, 1 July 2014
Home made flowers and hand dyed ribbon
Hello everyone and happy, happy July to you all! I am excited today because it is my very first time to be hosting a challenge over at Our Creative Corner. The theme I chose was to make something, what ever kind of project you like, but it must include some hand made flowers and ribbon that you dyed yourself!. You can read all the details by clicking HERE.
Here is the project I made for the challenge:
I made a little box envelope, deep enough to hold a tag with quite bulky embellishments.
Below is a quick step by step of how I created the box from scratch:
Start with a piece of 12 x 12" card, I used Kraft card, because it is sturdy. Trim it down to 10 x 10"
Along one side score at 3.3/4", 4 1/4", 8" and 8 1/2"
Along the other side score at 1/2", 1", 7" and 7 1/2"
Cut away the parts indicated on the picture right up to the inner score lines:
Mitre your glue strips.
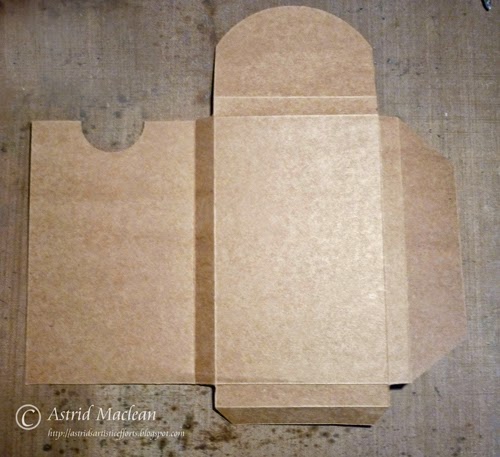
Your card should now be shaped like this:
Next shape the bit that is going to form the top flap of your box, I used a circle die, but you just round the corners or give it whatever shape you fancy. I also made a nodge in to the panel that will form the front of the box with a circle punch, so it is easier to take the tag out:
Time to glue your box together. I like using a wet glue for that, as it gives you some time to position everything just right, but you can use score or red-line tape too of course.
Here you can see it all glued together and I distressed all the edges with Gathered Twigs Distress Ink.
Time to make the front panel. I used a whole rainbow of colours for this, blending them together with my blending tools: Squeezed Lemonade, Wild Honey, Victorian Velvet, Seedless Preserves and Dusty Concord. I then toned it all down a bit with some White Linen Dylusions spray and stamped a swirl stamp in Picket Fence .
Next I created a slightly smaller panel and finally a third one by stamping with one of Tim Holtz's Classics 17 butterfly stamps. I stitched around the largest panel and then layered them up like this:
As you can see, I then made my shabby tea roses, using the Tim Holtz pine cone die. There are numerous tutorials of how to do this, so I won't go into how I made mine, but I used Victorian Velvet again.
Here are a few close ups:
Next I made a little panel for the top flap in exactly the same way and decorated it with some hand dyed ribbon. For that I squeezed some Victorian Velvet Distress stain on my craft mat
I took some white seam binding and swirled and dabbed it through the stain, crumpled it up and dried it with my heat gun:
When dry I swiped some Seedless Preserves onto my craft mat and swirled my ribbon through that too:
I then tied it into a messy bow and added it to the flap together with a little butterfly made from paper clay.
Next came the tag, I made mine from scratch out of Manila cardstock, but the box is the right size for a Ranger #8 tag if you trim a bit from the bottom.
As I wanted box and tag to match, so I created it in a very similar way:
As you can see I used a piece of the Tim Holtz Trellis on the edge die and decorated with some leaves from the Garden Greenery die, some more roses and some paper clay embellishments plus some chit chat words for my sentiment.
I brought out the detail of the paperclay embellishments with some White Fire Treasure Gold, and added a few drop of Glossy Accents onto the roses to look like rain drops.
Below is the tag pushed down half way inside the box. Because the sides of the box are 1/2" deep the tag fits easily inside, despite the quite bulky roses.
The box closes with the help of a little magnet.
I will be back in two days time to share another little project with home made flowers, hope you will come back to look. Here is a little preview:
Well hope you like my project, it will make a useful gift for someone special. Please hop over to Our Creative Corner to see the wonderful projects my team mates have created and of course we would all love it if you joined in our challenge. Our sponsor this month is Nicecrane Design, so you are even in with a chance to win one of his fabulous collage sheets!!
Hope you will have the most wonderful month of July. It is going to be rather quiet here on my blog as I am off to Australia next week to see my lovely grand daughters, but in between cuddling and playing with them, no doubt there will be some time to come and see your lovely creations, so see you soon in crafty blogland!
Here is the project I made for the challenge:
I made a little box envelope, deep enough to hold a tag with quite bulky embellishments.
Below is a quick step by step of how I created the box from scratch:
Start with a piece of 12 x 12" card, I used Kraft card, because it is sturdy. Trim it down to 10 x 10"
Along one side score at 3.3/4", 4 1/4", 8" and 8 1/2"
Along the other side score at 1/2", 1", 7" and 7 1/2"
Cut away the parts indicated on the picture right up to the inner score lines:
Mitre your glue strips.
Your card should now be shaped like this:
Next shape the bit that is going to form the top flap of your box, I used a circle die, but you just round the corners or give it whatever shape you fancy. I also made a nodge in to the panel that will form the front of the box with a circle punch, so it is easier to take the tag out:
Time to glue your box together. I like using a wet glue for that, as it gives you some time to position everything just right, but you can use score or red-line tape too of course.
Here you can see it all glued together and I distressed all the edges with Gathered Twigs Distress Ink.
Time to make the front panel. I used a whole rainbow of colours for this, blending them together with my blending tools: Squeezed Lemonade, Wild Honey, Victorian Velvet, Seedless Preserves and Dusty Concord. I then toned it all down a bit with some White Linen Dylusions spray and stamped a swirl stamp in Picket Fence .
Next I created a slightly smaller panel and finally a third one by stamping with one of Tim Holtz's Classics 17 butterfly stamps. I stitched around the largest panel and then layered them up like this:
As you can see, I then made my shabby tea roses, using the Tim Holtz pine cone die. There are numerous tutorials of how to do this, so I won't go into how I made mine, but I used Victorian Velvet again.
Here are a few close ups:
Next I made a little panel for the top flap in exactly the same way and decorated it with some hand dyed ribbon. For that I squeezed some Victorian Velvet Distress stain on my craft mat
I took some white seam binding and swirled and dabbed it through the stain, crumpled it up and dried it with my heat gun:
When dry I swiped some Seedless Preserves onto my craft mat and swirled my ribbon through that too:
I then tied it into a messy bow and added it to the flap together with a little butterfly made from paper clay.
Next came the tag, I made mine from scratch out of Manila cardstock, but the box is the right size for a Ranger #8 tag if you trim a bit from the bottom.
As I wanted box and tag to match, so I created it in a very similar way:
As you can see I used a piece of the Tim Holtz Trellis on the edge die and decorated with some leaves from the Garden Greenery die, some more roses and some paper clay embellishments plus some chit chat words for my sentiment.
I brought out the detail of the paperclay embellishments with some White Fire Treasure Gold, and added a few drop of Glossy Accents onto the roses to look like rain drops.
Below is the tag pushed down half way inside the box. Because the sides of the box are 1/2" deep the tag fits easily inside, despite the quite bulky roses.
The box closes with the help of a little magnet.
I will be back in two days time to share another little project with home made flowers, hope you will come back to look. Here is a little preview:
Well hope you like my project, it will make a useful gift for someone special. Please hop over to Our Creative Corner to see the wonderful projects my team mates have created and of course we would all love it if you joined in our challenge. Our sponsor this month is Nicecrane Design, so you are even in with a chance to win one of his fabulous collage sheets!!
Hope you will have the most wonderful month of July. It is going to be rather quiet here on my blog as I am off to Australia next week to see my lovely grand daughters, but in between cuddling and playing with them, no doubt there will be some time to come and see your lovely creations, so see you soon in crafty blogland!
Labels:
Classics 17,
Distress Inks,
Our Creative Corner,
Tim Holtz
Stencil it for Countryview Challenges
Hello everyone, welcome specially also to new followers, it's wonderful to have you follow along for my crafting journey.
The first of the month is always terribly busy as several challenges start on that day, so this is one of two projects showing on my blog today. This one is for the Countryview Crafts Challenge blog. The theme there is Stencil it, so make sure to check it out. All you need to do is click HERE
Stencils are so popular and I had great fun creating a special card and matching envelope, using both inks and texture paste.
I started by making an inky background using Dylusions Inks and then sprinkling them with kitchen salt when still wet. When the salt crystals have dried you scrape them off and get this:
Don't you just love it, - and it's so simple!
Next I added some subtle background stamping using the text stamp from the Mercantile set with some teal Stazon ink.
This was followed with some stenciling using some of Tim's Layering stencils using Archival Ink:
This was followed by some further stenciling with texture past through a Crafters Workshop stencil (not available from Countryview Crafts but Dylusions do a very similar one which I will link below. The texture paste was coloured with Distress markers and I also added some more stenciling with a Layering Stencil along the side.
The final touch to the card was to stamp and fussy cut the 3 butterflies from the Classics 17 set and to adhere them to the embossed vine
The card was then mounted first on some white and then olive green card.
The envelope was made with an envelope punch board out of green Core d''nations Kraft core papers and stencilled and stamped in a very similar way:
The bee was stamped separately (it's an Artjourney stamp) and fussy cut.
Hope you like this little set, not sure who it is going to be for yet, but I am sure it will come in handy at some point.
Thanks for dropping in and have a good month!!
The first of the month is always terribly busy as several challenges start on that day, so this is one of two projects showing on my blog today. This one is for the Countryview Crafts Challenge blog. The theme there is Stencil it, so make sure to check it out. All you need to do is click HERE
Stencils are so popular and I had great fun creating a special card and matching envelope, using both inks and texture paste.
I started by making an inky background using Dylusions Inks and then sprinkling them with kitchen salt when still wet. When the salt crystals have dried you scrape them off and get this:
Don't you just love it, - and it's so simple!
Next I added some subtle background stamping using the text stamp from the Mercantile set with some teal Stazon ink.
This was followed with some stenciling using some of Tim's Layering stencils using Archival Ink:
This was followed by some further stenciling with texture past through a Crafters Workshop stencil (not available from Countryview Crafts but Dylusions do a very similar one which I will link below. The texture paste was coloured with Distress markers and I also added some more stenciling with a Layering Stencil along the side.
The final touch to the card was to stamp and fussy cut the 3 butterflies from the Classics 17 set and to adhere them to the embossed vine
The card was then mounted first on some white and then olive green card.
The envelope was made with an envelope punch board out of green Core d''nations Kraft core papers and stencilled and stamped in a very similar way:
The bee was stamped separately (it's an Artjourney stamp) and fussy cut.
Hope you like this little set, not sure who it is going to be for yet, but I am sure it will come in handy at some point.
Thanks for dropping in and have a good month!!
Labels:
Countryview Challenges,
Dylusions,
Tim Holtz,
Wendy Vecchi
Subscribe to:
Posts (Atom)
FEEDJIT Live Traffic Feed
Birthday Card
Just got a whole lot of new stamps from a brilliant place called the Stamp Smith. This is the image that I first saw on Docraft and really liked. I asked the friend who has used it in an ATC, where she got it. Well she borrowed it from a friend who got it from ebay as a one off. But.... it had a title. I googled the title, and hey presto found the site. They have great stamps and offer a really friendly fast service. I highly recommend them!
Gothic Arch Trifold inside
Back of Gothic Arch Trifold
Gothic Arch Within the Heart
Gothic Arch, the Key