Hello everyone and happy, happy July to you all! I am excited today because it is my very first time to be hosting a challenge over at
Our Creative Corner. The theme I chose was to make something, what ever kind of project you like, but it must include some hand made flowers and ribbon that you dyed yourself!. You can read all the details by clicking
HERE.
Here is the project I made for the challenge:
I made a little box envelope, deep enough to hold a tag with quite bulky embellishments.
Below is a quick step by step of how I created the box from scratch:
Start with a piece of 12 x 12" card, I used Kraft card, because it is sturdy. Trim it down to 10 x 10"
Along one side score at 3.3/4", 4 1/4", 8" and 8 1/2"
Along the other side score at 1/2", 1", 7" and 7 1/2"
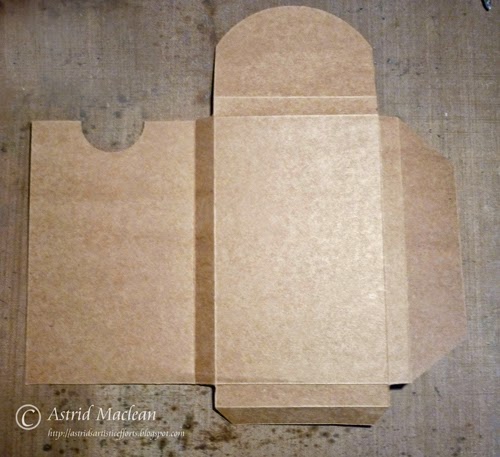
Cut away the parts indicated on the picture right up to the inner score lines:
Mitre your glue strips.
Your card should now be shaped like this:
Next shape the bit that is going to form the top flap of your box, I used a circle die, but you just round the corners or give it whatever shape you fancy. I also made a nodge in to the panel that will form the front of the box with a circle punch, so it is easier to take the tag out:
Time to glue your box together. I like using a wet glue for that, as it gives you some time to position everything just right, but you can use score or red-line tape too of course.
Here you can see it all glued together and I distressed all the edges with Gathered Twigs Distress Ink.
Time to make the front panel. I used a whole rainbow of colours for this, blending them together with my blending tools: Squeezed Lemonade, Wild Honey, Victorian Velvet, Seedless Preserves and Dusty Concord. I then toned it all down a bit with some White Linen Dylusions spray and stamped a swirl stamp in Picket Fence .
Next I created a slightly smaller panel and finally a third one by stamping with one of Tim Holtz's Classics 17 butterfly stamps. I stitched around the largest panel and then layered them up like this:
As you can see, I then made my shabby tea roses, using the Tim Holtz pine cone die. There are numerous tutorials of how to do this, so I won't go into how I made mine, but I used Victorian Velvet again.
Here are a few close ups:
Next I made a little panel for the top flap in exactly the same way and decorated it with some hand dyed ribbon. For that I squeezed some Victorian Velvet Distress stain on my craft mat
I took some white seam binding and swirled and dabbed it through the stain, crumpled it up and dried it with my heat gun:
When dry I swiped some Seedless Preserves onto my craft mat and swirled my ribbon through that too:
I then tied it into a messy bow and added it to the flap together with a little butterfly made from paper clay.
Next came the tag, I made mine from scratch out of Manila cardstock, but the box is the right size for a Ranger #8 tag if you trim a bit from the bottom.
As I wanted box and tag to match, so I created it in a very similar way:
As you can see I used a piece of the Tim Holtz Trellis on the edge die and decorated with some leaves from the Garden Greenery die, some more roses and some paper clay embellishments plus some chit chat words for my sentiment.
I brought out the detail of the paperclay embellishments with some White Fire Treasure Gold, and added a few drop of Glossy Accents onto the roses to look like rain drops.
Below is the tag pushed down half way inside the box. Because the sides of the box are 1/2" deep the tag fits easily inside, despite the quite bulky roses.
The box closes with the help of a little magnet.
I will be back in two days time to share another little project with home made flowers, hope you will come back to look. Here is a little preview:
Well hope you like my project, it will make a useful gift for someone special. Please hop over to
Our Creative Corner to see the wonderful projects my team mates have created and of course we would all love it if you joined in our challenge. Our sponsor this month is
Nicecrane Design, so you are even in with a chance to win one of his fabulous collage sheets!!
Hope you will have the most wonderful month of July. It is going to be rather quiet here on my blog as I am off to Australia next week to see my lovely grand daughters, but in between cuddling and playing with them, no doubt there will be some time to come and see your lovely creations, so see you soon in crafty blogland!