Showing posts with label Distress Stains. Show all posts

Monday, 7 July 2014

Message in a Bottle

Hi everyone, thanks for dropping in here!

After grandly announcing two days ago that it was going to be very quiet here during July, I am actually back after all sooner than expected because I could not resist doing my Tim Holtz July tag.
This definitely was one of my favourites this year, even though mine has turned out completely differently....
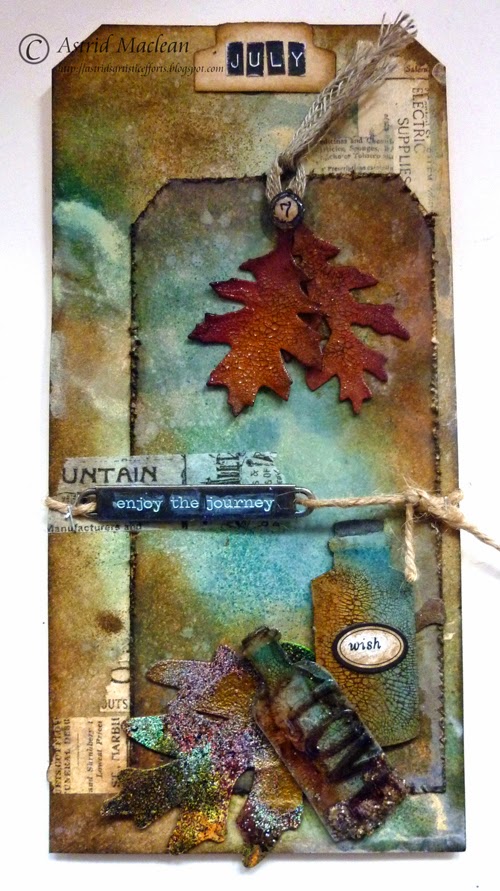
Two reasons for that, first of all, I had none of the main supplies he used, so I had to think of different things. Second reason, - his is a very summery tag, but it's really only summer in half of the world. I am going off today to Australia and there as in the whole Southern Hemisphere it is winter, and as I was busy packing my winter things, I just could not get into a summery mood. Having said that, I still managed to use all of the techniques he used, be it in somewhat different colours.
So here goes, following Tim's brilliant tutorial:
I took some grunge paper (don't have any grunge board) die cut my shapes and coloured them with various Distress Paints, added the Rockcandy Crackle when dry and rubbed and heat set the stain to show up the cracks.:

Here's a close up of the bottle:

Next the embossing powder onto the wet paint, I did it on a large leaf rather than the sand dollar and used several colours of powder, for a more wintry effect.
Next came the background to the tag using Distress Paints, Stains, Ink, water splats and the Spritzer tool:
Again, sticking to more wintry colours.
Next came the cool technique with the plastic through an embossing folder. Well, that one had me stumped for quite a while. Then it hit me, why not create a second bottle and put the sand inside the bottle.
So this is what I did: I cut the bottle out of grunge paper first and coloured and crackled it like the first bottle.
Next I cut the bottle again, but this time out of plastic packaging. I ran it through the Harvest Words embossing folder, just picking out the word Love. It embossed it beautifully. I coloured the word with a Faber Castell Big Brush pen and let it dry while making my "sand mixture with more or less the same supplies Tim used. Glued it onto the base bottle and then glued the plastic one on top with the sand inside. I just could not manage to photograph it properly, below, you can maybe see it a bit better:
Ok, so time to put the tag together.....
Now I decided at the beginning of the year that I would make layered tags, a size 8 on top of a size 10, so I made another background, using the same technique but adding some tissue tape here and there for a bit of variation.
Next I picked a word band, using Tim's technique of bringing out the word with paint and then put it all together.
Well, there you have it, an wintry version of Tim's July tag. I have the sea horse etc on order, so I may do a summery version still when I come back.

Thank you for all your kind visits like always and hopefully you get to do something creative most days! I'd also like to thank Tim for showing us all these fab techniques, month after month!!!

Look after yourselves


Monday, 20 January 2014

"Good Friends" Tim's January Tag

Hello everyone and welcome! A special welcome also to new followers, thank you so much for joining me here for my creative journey.
Well, today I want to share a tag inspired by no other than the wonderful Tim Holtz
As most of my visitors are  likely making their own, I don't need to say much by way of introduction, but if by any chance you don't know about Tim's wonderful monthly challenge, you can find out all about it HERE.

Now as some of you know, despite me having loved Tim's creations ever since I found out about them probably way back in 2008 or so, I have never followed his tag challenges, until last year that is when I managed to do two of them. But after completing Tim's Creative Chemistry 102 and having so much fun with it, I decided that this year I would join in with all of his tags.... wish me luck....

Anyway, like most people I had to do some adaptation as I don't own many of the products he used, but that was half the fun of it.
I did my background pretty much just like Tim. One of my favourite bits was the sanded down rub-ons, just love the distressed look of that, here's my version:

I don't have the pocket watch die nor any cog embossing folders, but I do have some Wendy Vecchi pocket watch art parts, so decided to use one of them and filled it with some rusted watch parts, purchased unrusted on ebay and then rusted with rusting powder from Crafty Notions. I embedded them in Glossy Accents and I have to say, I like the result.
I happened to have one of those tickets Tim used in my box of scraps, and as I wanted my tag to be about friendships in the arty crafty world, which have started to mean so much to me over the years, I themed both my stamped sentiment and my chit chat stickers around that.


After adding the stickers I added a bit of shading to make them pop a bit more.
I added a bit of seam binding at the top of my tag, coloured with Pumice Stone and added a type charm, just with the letter J for January
It's one of those little letter stickers mounted on a scrap of inked card.
Finally I decided it all looked a bit cramped on the #8 tag, so I mounted the whole tag on a #10 tag that I inked and stamped first and then added a January tab too. I will do this for all of my tags I think and then put them together in a little book at the end of the year.
Full of good intentions like always........

Well, that's it, tag number one done, can't wait for the next one now. I am guessing it may well include the new hearts stencil, I have got it on order, but will it be available by Feb?????Anyway, running ahead of my self like usual.....
Hope you like my version of the tag and of course I will be adding it to Tim's January Challenge

Thank you for visiting and have a creative day!!

Saturday, 31 August 2013

Autumn Serenity

Hello everyone and lovely to have you visiting here today!
After a very hectic week, I needed to find a bit of peace in my soul, and what better way than to get out some inks, paints and stamps and have a little play.
The background to this stamp was created with the help of Distress Stains and then toned down a bit with Dylusion Spray in White Linen. Love that stuff, it can tone down anything that has gone too bright. When I was happy with the background, I stamped around the edges with a back ground stamp from Stempel Glede in  Gathered Twigs Distress Ink. The vocal image was stamped in Jet Black Archival and is a stamp I have had for years and years, I thought it was an Oxford Impression one, but I can't find it on their current list. If anyone knows who made it, I'd be happy to know.
The leaves were cut from some papers I made with various inks and sprays and then added salt, to give the lovely salt effect, but you cant see that very much any more.
I diecut them with Spellbinder and Sizzix dies. The idea for this came from the lovely Maria of Maria's Knutsel Plezier. If you don't know her blog, go check it out, she makes the most wonderful cards with amazing backgrounds!

The tag was finished with a little Autumn Quote, stamped on a scrap of paper, some twine,  a charm and button rusted with Rusting powder by Crafty Notions and a hand died ribbon.


I certainly felt a whole lot better after having a little play like this. I'm sure we all know that really, crafting in many ways is therapy for our hectic lives....

Thank you for visiting and hope you get some creative time too!!

Related Posts Plugin for WordPress, Blogger...

One World One Heart

Photo

FEEDJIT Live Traffic Feed

Birthday Card

Birthday Card
Just got a whole lot of new stamps from a brilliant place called the Stamp Smith. This is the image that I first saw on Docraft and really liked. I asked the friend who has used it in an ATC, where she got it. Well she borrowed it from a friend who got it from ebay as a one off. But.... it had a title. I googled the title, and hey presto found the site. They have great stamps and offer a really friendly fast service. I highly recommend them!

Gothic Arch Trifold inside

Gothic Arch Trifold inside

Back of Gothic Arch Trifold

Back of Gothic Arch Trifold

Gothic Arch Within the Heart

Gothic Arch Within the Heart

Gothic Arch, the Key

Gothic Arch, the Key




