Friday, 2 March 2018

Vintage Folio for A Vintage Journey's March Challenge

Hello lovely visitors, it's the first Friday of the month and that means a new challenge is starting at A Vintage Journey.
March is our birthday month and there are a lot of exciting changes coming, as you may have seen already, if not make sure to head over and check them out.
The wonderful Brenda who is our host this month chose "Share your Treasure" and this is what she had to say:
Treasure can be described as wealth or riches we store or accumulate, a collection of valuable, interesting or useful things, bits and pieces we highly value, articles that we hang onto that we’ve bought or found and might never be able to purchase again. What is in your crafty or artsy treasure trove - those items we squirrel away to keep for something special? Maybe some elegant embellishments, that hoard of ephemera or memorabilia found in a junk shop, a tin of old buttons, rusty keys or diamanté jewels, a paper pad you get out and stroke then put away again, some beautiful fabric or lace you can’t bear to part with. We invite you in this challenge to share a project that includes a part of your treasure trove, just let us know what it is so we can see it and comment on it and remember our focus styles and genres to work in (which can be seen under out blog banner) if you would like to be considered for being chosen as one of our top 3 Pinworthy mentions.
Well those that know me know that my greatest treasures can all be found in my craft room. There is no doubt about it, I am a hoarder of stash, and one of my great loves is design papers! So for this project I decided to dig out some of my most beloved treasured papers and create this vintage folio. By the way, this was very much inspired by one created by Cathy Clement from Kathy by Design, which she made for a challenge at the Frilly and Funkie blog a little while back.
I used mostly papers from Blue Fern Studios. They are hard to come by in the UK but The Mad Scrapper, a wonderful little shop not too far from where I live stocks them. (She has an online shop too if you are interested, with many stunning paper collections hard to get elsewhere).
The folio's base is a trifold card made from Kraftcard, and then I added loads of flaps, pockets etc, either glued to the base card, or inserted with the help of washi tape.
Below I will show you some of the main pages, just flipping through from left to right.
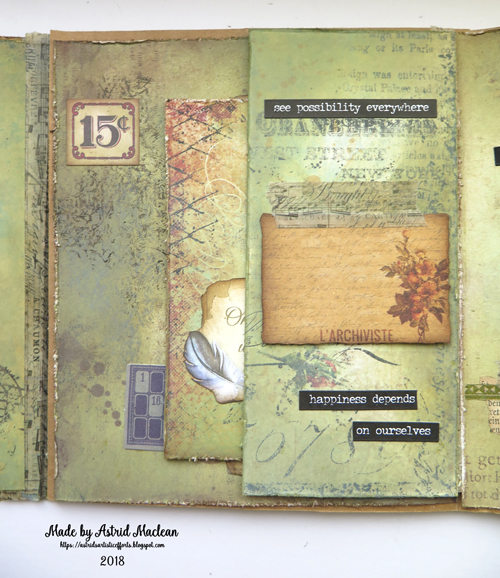
Inside left of the original gatefold. (all the pages were inked with 2 of my new Oxides, Bundled Sage and Forest Moss). They are decorated with various paper dolls, washi and other ephemera, mostly by Tim Holtz.
The little tag came from a paper collection by Stamperia (another treasure). Again hard to come by in the UK, but being a treasure hunter I found it at Craftelier, if you are anything like me and live in the UK, it's worth checking out, - they have a huge selection of stuff and very reasonable prices!

I found that different collections can be easily combined if you use the same inks on them. I also used the same sets of back ground stamps (Stamperia and Andy Skinner) through out, to make the project coherent.


This is the final page, the bit sticking out is the back of the front cover.

The little book closes with a clip to which I added a bit of seam binding (another idea from Cathy Clement, - thank you Cathy)!

The dies used to decorate the front are by Sue Wilson. The flowers are from my stash of treaured ones, both the flowers and seambinding where coloured with Distress Spray in Antique Linen.
Finally the topper was cut from a scrap of one of the Blue Fern papers, I covered it first with clear gesso and when dry with Decoart Crackle glaze, highlighting the cracks with Antiquing Cream.
Well that's it, sorry for this very long post, I hope you got some idea of the nature of this project.


Thank you for your visit and do check out my teamies' amazing work and even better join us in our challenge and show us your treasures!!
Happy crafting and creating,
xxxxx


Thursday, 1 March 2018

Fairydust minialbums for March minialbum makers challenge

Hello everyone and happy March, - the month Spring is meant to start here in the Northern hemisphere. As far as I am concerned, it can't come soon enough.
It being the first of the month, there are several new challenges starting today, so I will share another project later in the day, but here is the one for the Minialbum Makers.
I am off to Australia later in the month to spend time with family and my two grand daughters, and when I saw the gorgeous G 45 Fairydust collection, I knew straight away I wanted to use it to create something for them. 
So I made them each a little book with lots of the fairy images (they both love fairies) and photos of themselves from when they were babies up until now.

I used the Eileen Hull cardbox die to keep their minis in, and obviously created the minis themselves, so they would be the right size to fit inside them.
The albums themselves are very simple envelope minibooks. I used Kraft envelopes as the substrates.
These are very simple to make. You just slot the pointed bit of one envelope into  the opening of another one, like you can see above. I used 6 envelopes for each booklet. But rather than giving you a longwinded explanation of how to put it together, here is a link to a video, that explains it really clearly: Video

After I glued my books together I trimmed the sides so the finished booklets would fit into the book boxes. This also gave me side pockets to add photomats.
These are the products I used:
6 kraft coloured envelopes for each booklet, plus
 The Graphics 45 Fairy Dust collection 8 x 8 papers, the 12 by 12 Patterns and Solids, the Ephemera and Journaling cards and the chipboards and stickers, and I have still plenty left to decorate two wooden treasure boxes which they will also get, but that I will leave for another day.

Below some photos of the insides of the albums:
Here are the fronts, I made them identical, just using different colours.
Lots of pockets and tags. Behind the bellyband on the left is a photo mat with their photos. Inside the various pockets are also further folded mini booklets with more photos.


As you can see, there are plenty of interactive elements on each of the pages.


Inside this pocket is a little accordion booklet that closes with a magnet.
Here you can see it folded out, and on the other side are more little photos on each page.
Here is one that closes just with a belly band
And here some more of the little tags and accordions fitting inside all those pockets.
And here finally the two little girls themselves, having fun dressing up as fairies...
The spines of the book boxes holds their names, no confusions as to which book belongs to whom.
Alright, and because I know some of you will be curious what they look like,
This is Lucia the elder of the two, when she is not pulling a silly face
And this is Arielle, always cheeky and full of fun.

I realize this is not much of a tutorial but hope the pictures tell their own story.

So thanks for staying with me and do make sure to check out the wonderful books and albums my team mates have created, just click here. Our sponsor this month is no other than the amazing Seth Apter. And if you play along with our challenge you could win a full set of his new embossingpowders!!!
So, get your craft on create an album or minibook of any kind and join us for our challenge!!

Thanks for your visit like always
xxxxx

Tuesday, 27 February 2018

Getting ready for March in my bulletjournal and some different freebies

Hello friends, hope you are keeping warm and happy.
I have been busy setting up the new March pages for my bullet journal.
March cover and gratitude page
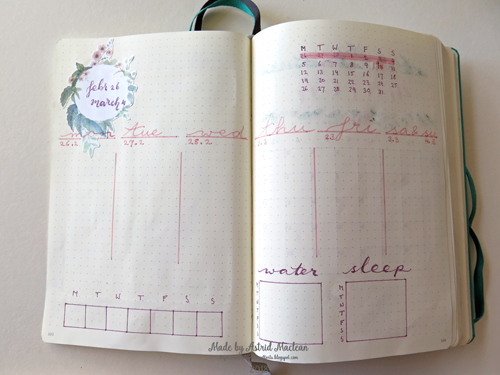
Setting up a new month always takes quite a bit of time, and this month I decided to take a few shortcuts: I spent a happy afternoon painting a leaf wreath with watercolous only. I then scanned that page and use it to decorate all of my March pages. I did it for two reasons, - to save time, but also because I have found it more and more frustrationg that any watercolour or pen work directly in the journal, bleeds through the thin pages of my Leuchtturm journal. This is a well know phenomenon and the bulletjournal communty calls it ghosting.
I did a few original drawings still, but mostly just used my scans.
Here you can see the original scanned painting, which I resized and used on the various following pages.
My weekly spread for the for this week, transitioning from February into March.
My monthly spread. The top here is the only other original drawing I did, I tried to match the clours but used pencils rather than watercolours. (They still ghosted through somewhat).

Monthly habit tracker with a bit of doodling to the side of the wreath.
Blogging schedule and keeping track of my spending (usually way too much specially on craft)

And finally keeping track of my house hold spending and tasks.

If any of you are into planners or journals like these, you are welcome to download this little wreath as a freebie. I'll add it in three different versions below.


Just print it on your printer's best setting (I used glossy paper)
You can resize them to your own needs of course in any photediting programme.

Well, that's it for now and like always thank you so much for taking the time to visit, I really appreciate it.
xxxxx

Related Posts Plugin for WordPress, Blogger...

One World One Heart

Photo

FEEDJIT Live Traffic Feed

Birthday Card

Birthday Card
Just got a whole lot of new stamps from a brilliant place called the Stamp Smith. This is the image that I first saw on Docraft and really liked. I asked the friend who has used it in an ATC, where she got it. Well she borrowed it from a friend who got it from ebay as a one off. But.... it had a title. I googled the title, and hey presto found the site. They have great stamps and offer a really friendly fast service. I highly recommend them!

Gothic Arch Trifold inside

Gothic Arch Trifold inside

Back of Gothic Arch Trifold

Back of Gothic Arch Trifold

Gothic Arch Within the Heart

Gothic Arch Within the Heart

Gothic Arch, the Key

Gothic Arch, the Key