Showing posts with label watercolour. Show all posts

Tuesday, 27 February 2018

Getting ready for March in my bulletjournal and some different freebies

Hello friends, hope you are keeping warm and happy.
I have been busy setting up the new March pages for my bullet journal.
March cover and gratitude page
Setting up a new month always takes quite a bit of time, and this month I decided to take a few shortcuts: I spent a happy afternoon painting a leaf wreath with watercolous only. I then scanned that page and use it to decorate all of my March pages. I did it for two reasons, - to save time, but also because I have found it more and more frustrationg that any watercolour or pen work directly in the journal, bleeds through the thin pages of my Leuchtturm journal. This is a well know phenomenon and the bulletjournal communty calls it ghosting.
I did a few original drawings still, but mostly just used my scans.
Here you can see the original scanned painting, which I resized and used on the various following pages.
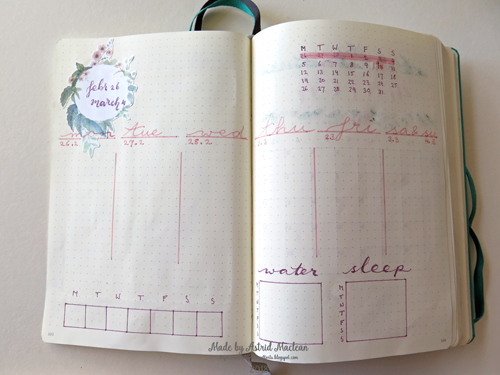
My weekly spread for the for this week, transitioning from February into March.
My monthly spread. The top here is the only other original drawing I did, I tried to match the clours but used pencils rather than watercolours. (They still ghosted through somewhat).

Monthly habit tracker with a bit of doodling to the side of the wreath.
Blogging schedule and keeping track of my spending (usually way too much specially on craft)

And finally keeping track of my house hold spending and tasks.

If any of you are into planners or journals like these, you are welcome to download this little wreath as a freebie. I'll add it in three different versions below.


Just print it on your printer's best setting (I used glossy paper)
You can resize them to your own needs of course in any photediting programme.

Well, that's it for now and like always thank you so much for taking the time to visit, I really appreciate it.
xxxxx

Sunday, 25 February 2018

A Greatful Heart

Hello all, a very quick post from me today to share my latest project created as part of Lifebook 2018
This latest class was taught by Kathy Glynn and was called words of gratitude. Like usual with Lifebook projects I cannot tell you exactly how I went about it, but it was basically a watercolour portrait with flowing hair into which you added words of things you are grateful for.. I pretty much did my own thing, both in terms of colours and in the way I added the words and did the actual face part of the painting.

It's a long time since I have done a portrait all in water colour, all I can say is, - it was useful practice, even though I really don't like the finished result, but this is all a journey, so live and learn and better luck next time.

Well that's it, hope you all get some creative time and that the weather is kind to you, - here more winter weather is forcast, and I am sooooo ready for Spring.

Anyway, like usual, thanks for taking the time to visit
xxxxx

Monday, 15 January 2018

Watercolour portrait play

Hello friends, - today I have another little portrait and some warm up exercises to share. These were inspired by the second week of Lifebook 2018. This week we had a guest teacher, Andrea Gomoll, who inspired us to work creatively with water colour. Loved her class!

Here first of all are two warm up excercises, the first one followed her instructions pretty much exactly.
I just did it in my own chosen colours and elements. Adding the water droplets was an idea from Shirley Deatcher from Papercreations by Shirley, who is also doing the Lifebook classes. I think many of you will know her, if not check her out, she is an amazing artist!
With this next one something went wrong and it became a complete wet mess, so I put some clingfilm all over the wet painting and let it dry. This then gave me the background to add the other elements.
Finally, the main project of this class, a watercolour portrait with an inspirational quote. Andrea's portrait style is very different from mine. At first I tried to follow her style (more cute), but I absolutely could not do it and failed miserably, so in the end I gave up and did my own style of portrait... There apparently is something deep inside me that really resist "cute" lol.....

Anyway, that's it for today. Hope you are not getting too bored with all my portraits, I am trying to keep these posts short as I know how busy we all are, - but in any case, thanks for your visit, and happy creating!
xxxxx

Monday, 30 May 2016

Little Book part 1 - shopping my stash

Hello everyone and welcome. I have been a terrible blogger lately and I do apologize, but life is crazy busy for me right now, and sometimes visiting blogs has to take a back seat, sorry about that.
I am still on a mission to use up some of my stash, ink up some rarely used stamps and for this project even used some paints from my watercolour palette that were left over from other projects.

I made a mini book out of 1 piece of 12 by 12 card, and today I am just showing you the inside pages:


Each little page was pretty much done in the same way. I used some leftover bits of scrapbook paper, cut them to the correct size (3 3/4 by 5 3/4"), and then gave them a coat of clear gesso. This stops the paints from soaking straight into the paper, I then added further colour with the help of some watercolours and Distress Inks here and there, added stamped detail, some crackle glaze and Antiquing Creams and finally some Prima adhesive rub on bits by Christine Adolph, and foiled them with gold.
Below some close ups from the individual pages:


Below finally is the back cover. The front cover I will share in a few days time as I made it for a design team piece. 
There are pockets between the pages, and I will make tags to go inside. The size of the pockets is perfect for a standard size 8 tag. If you are interested to know how to put a book like this together, I did a tutorial a while back, - you can find detailed instructions HERE

Well, that's it for now, thank you for dropping by like always and have a good week!
xxx

Thursday, 12 May 2016

Behind the covers.....

Hello all and thanks for dropping by here. A couple of weeks ago I created a cover for a little Moleskine Sketchbook, it looked like this:
The full description  of how I made it can be seen here in case you missed it. Anyway, today I thought I would show you some of the pages inside... It is a mix of watercolour, ink and pencil work, and please bare with me, it's baby steps for sure, as I practise to get better at painting and drawing..... Anyway, here goes:
There is nothing that I find more difficult than architecture and perspective. Of course I kind of know about horizon line, vanishing points etc, - but knowing and actually managing, is quite a different thing..
I seem to have a fascination with Hawthorn, so the page above shows first the blossoms, then the berries. I am trying to learn to paint more loosely and less precise...

The drawing below was copied from a photograph I found on line, always good to practice birds. On the whole I find drawing a lot easier than painting.
This one was done with watercolour pencil mostly and then finished with some light washes of paint.
Here finally a double page that I have called reflection on an ordinary day. A view from my bedroom window, and a little study on blueberries which I love to have for breakfast.

Well, that's it for today, thanks for indulging me as I practice, practice practice. Hope you are all having a good week and see you next time.

Related Posts Plugin for WordPress, Blogger...

One World One Heart

Photo

FEEDJIT Live Traffic Feed

Birthday Card

Birthday Card
Just got a whole lot of new stamps from a brilliant place called the Stamp Smith. This is the image that I first saw on Docraft and really liked. I asked the friend who has used it in an ATC, where she got it. Well she borrowed it from a friend who got it from ebay as a one off. But.... it had a title. I googled the title, and hey presto found the site. They have great stamps and offer a really friendly fast service. I highly recommend them!

Gothic Arch Trifold inside

Gothic Arch Trifold inside

Back of Gothic Arch Trifold

Back of Gothic Arch Trifold

Gothic Arch Within the Heart

Gothic Arch Within the Heart

Gothic Arch, the Key

Gothic Arch, the Key


