Friday, 11 March 2016

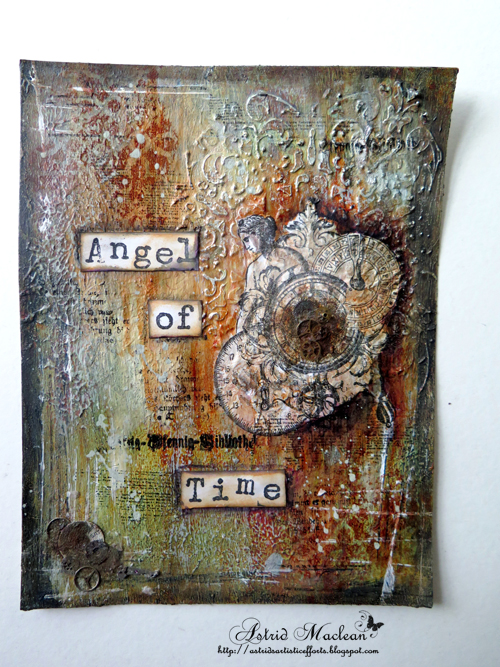
Angel of Time

Hello all and thanks for dropping by. I don't know about you, but recently I have really struggled with time and balancing life between day job, crafting, blogging and social media....
This page came about while struggling with issues like that, - trying to carve out some time to create art, without feeling guilty I should actually be visiting blogs and leaving comments etc. I am really sorry I have been a bad blogger recently, I know I am missing posts from many of you and I do want to apologize!!

This page started on a loose piece of watercolour paper that was covered with a thick layer of gesso and texture paste and then coloured with various Decoart Media paints. I added many layers with subtle background stamping in between.

Further textures were also created with dabbing my finger into the still wet gesso and then dry brushing with lighter paint colours. The little gears above are actually old clock parts I purchased on ebay a long time ago (I found them when doing a massive clear out recently). I rusted them up a bit with rusting powder and vinegar.
The sentiment was created with the help of a set of little letter stamps on A4 paper and then cut into words.
Here you can see some of the background stamping and splats and scrapes created with the help of a small paint brush and an old credit card.
This main stamp is from La Blanche. I named her Angel of Time and stamped her on tissue paper and then blended her into the page. I added a few more clock parts to the center of the clock in the stamp.

Well that's it pretty much. Thanks for your visit today like always and I hope I shall find the time to come and visit you in return. Maybe my angel of time will help me.

Have a wonderful weekend with hopefully some creativity within it.
xxx

Wednesday, 9 March 2016

3 Different Cards

Hello all and lovely to have you drop by. Today I am sharing some cards in a very different style from my usual.
I have been hugely enjoying a journaling class with the talented Sanda Reynolds, from Artful Flight
and today's cards incorporate some of her techniques.

Obviously I can't go into detail as to how I made this, all I can say is that I used both sprays and brushos for the background and stencilled with heavy gesso. Detail was added with the help of Derwent Inktense pencils.
The little branches that I stamped around the edges are from Penny Black. I recently did a massive clear out of my craft space and it was great to use some of my supplies that had been gathering dust for years. They now actually have a proper place and I shall be able to find them again...yay!
I loved doing the shading with the Inktense pencils, they blend easily with a water brush and of course the great thing is when they are dry they are permanent.
Below are a couple more samples.
I used pretty much the same techniques on these ones. The massive flower is a Martha Stewart silk screen stencil.
When I was done with my background, I simply cut it in half and made it into two card panels. They were finished with some butterflies that were punched with a Marta Stewart butterfly punch that before the clear out I quite forgot I had. I have to say, I now love shopping my stash. The whole clear out took me 3 full days, but it was well worth it, - I highly recommend it lol.

Well that's it from me for today. Thanks for your visit, I'll try my best to come and visit some of your blogs soon as I am well aware I have been a terrible blogger lately.

xxx

Monday, 7 March 2016

Longing for Spring a wall hanger for Calico

Hello all, - just a little preview today....
I don't know about you, but I am totally longing for some Spring sunshine and warmth. Calico has some amazing Springtime craft parts right now.

Hope you'll take the time to hop over and see how I used some of them. All you need to do is click here
Thanks for taking the time to drop in here like always and have a good creative week!

Sunday, 6 March 2016

Springtime in Paris, a card for Shimmerz

Hello lovely visitors, today I have a card to share over on the Shimmerz Blog.
Here is just a little preview, if you want to see more, just click HERE.
Thanks for dropping by and have a good week,


Friday, 4 March 2016

Happy Birthday AVJ

Hello all and welcome. It's the first Friday of the month and that means a new challenge over at A Vintage Journey. But this is not an ordinary challenge month, it's our second birthday and there are lots of changes afoot!!! For details do hop over to check it all out! So what have I made and why?
Let me start by explaining our theme this month: The lovely and multi talented Nikki is our hostess and she chose a very clever theme. Those of you who know AVJ will know that for the last year we have been publishing so called Destination Inspiration posts. Each month we pick 4 things, a substrate, a technique, a colour choice and a product, and then members of the team create a project with those 4 items for the month.
Well this month Nikki chose as her theme that everyone should use the 4 things for this month, and this is what she had to say:
For our birthday challenge we thought it would be fun to challenge you to use the products in our DI Travel Bag this month. You’ve seen how the Creative Guides have used the products in the past and you will see how they use them this month too. So join us in using the following products and enjoy the journey!
Substrate: Board (eg grey board, coaster board, cardboard)
Main Colour: Lilac or Pale Purple
Technique: Rust Effects (perhaps using rusting or embossing powders or rust coloured paints)
Product: Something Metal
Time for some honesty, - I thought this was quite a challenge, rust technique together with lilac or pale purple??? But, nothing like a challenge right, so this is what I came up with. Below is a short step by step:
I decided to use mount board as my substrate and started adding some texture through a stencil and when dry, adding  some pale lilacy colours. I used Paper Artsy Mushroom and Moonlight Fresco Finish paints and mixed a bit of gesso into it too.
Next I added a couple of sprays, to add more interest, - Victorian Velvet and Seedless Preserves.
I also added a few drops of Shimmerz "Before Dawn" for some more interest and did some background stamping.
I think these are both old Prima stamps.
Time to gather some embellishments, the die cuts are all Sue Wilson dies, the flowers are from my stash.
Now for my metal and rusting technique. Well I layered up a little dragonfly over one of the trusty old Tim Holtz ornate frames and put some book paper behind the opening. I then gave it the rust treatment with a mix of paints and a bit of rusting powder too..
Now all that was left was to put it all together.
And here you are, but....somehow it all did not quite hang together for me, so I decided (and this was after it was all mounted onto card already) to give it a bit of mixed media treatment. So I pulled out my Shimmerz spray again as well as the Hickory Smoke spray and carefully sprayed over the diecuts and flowers. I also added some gesso splatter still, so here is take two:
There is not much difference but I'd love to know which version you prefer, so below you can see them side by side:
Here's a close up of the spraying and splattering:
I added the word Friendship still, because all of my fellow design team members have become my friends, many of whom I have met in real life, so a Vintage Journey will always be special to me.

Well, that's it, and sorry for this rather long post.... do make sure to visit A Vintage Journey to see what wonderful new things we have in store for you, (including a fantastic new sponsor for this month yay!!!!) You want to know who it is? Andy Skinner!! And for those of you who don't know him, Andy's mixed media creations are sensational - if you are not familiar with his work do check out his website. Andy has kindly donated a fabulous package to this month's lucky winner which will be made up of his brand new stencils and stamps. But aside from that trust me you do not want to miss the inspiration pieces my team mates have created.

Thanks for your visit here today and stay crafty and creative!!!

Tuesday, 1 March 2016

Spring Fairy for Mixed Media Monthly

Hello everyone, welcome and lovely to see you here! Can you believe it is March already? I think many of us feel that time just flies away with us.
Anyway, the theme this month for the Mixed Media Monthly Challenge is eggs.
I created a little Spring Fairy,, and here is hoping that she may she be a little herald of Spring, because I for one am longing for some spring sunshine!
I started by working on the pot, there were about 4 different steps to achieve the weathered look on it:
It started as a terra cotta flower pot that I gave a coat of gesso first, Next followed a coat of Paper Artsy French Roast. When dry that was covered with a coat of Decoart Weathered Wood crackle medium and when that was touch dry it received a top coat of Paper Artsy Stine Fresco Finish paint. The last step was to seal it all with a coat of Decoart Ultra Matte Varnish.
Next came the eggs. I tried to find some nice natural looking eggs but my local craft store only sold pink ones, so in the end I got some little polystyrene eggs and painted them to make them look as natural as possible.
The fairy came next. She is from one of the  Paper Whimsey down loadable collage sheets, - I gave her some butter fly wings in Photoshop Elements and then printed her twice, once flipped over so she is two sided. I glued her onto some black card so she would be able to stand.
Now for the finishing touches: I filled the pot with sand, added some moss, the eggs and some died cheese cloth. I also made the garland with some rusty wire and a few flowers and that was pretty much it.
Here you can see the other side still, with some additional flowers.

Like usual we have a sponsor for our challenge and this month that is Waffle Flower, who are offering a $25 gift voucher for our winning entry.

Well, I hope you will decide to play along, we would love to see what you create, and of course if you have not done so already, - do check out what my talented teamies have created, by clicking HERE

Thank you for visiting like always and Happy Month of March!

Saturday, 27 February 2016

Make your own background

Make your own background is the theme at Countryview Challenges and today I am posting my second project created for the challenge.

Well this theme was easy as I mostly make my backgrounds anyway, but for this project I wanted to try something a little different....
It all started with a size 10 tag.
I gave it a coat of gesso and then played around with a mix of acrylic paints, - Antique Linen Distress, a bit of Peacock Feathers Distress and some Golden Paynes Grey (this particular brand has a blueish tone, which I rather like).
Next I did some stenciling with gesso and a couple of different stencils, - when that was dry I did further stenciling with Watering Can Archival ink, bringing in some further stencils.
It all got a bit busy, so by that point I decided to use the tag as the background to a vintage collage.
Here you can see some of the elements I collected and stamped to add to my collage.
And here you can see the finished collage. The lady is from the 7 Dots Studio Cool Country collection. As you can see I also added a die cut,  the word Authentic from the Tim Holtz Adventure Thinlits die set and the word love which comes from a Prima vintage trinkets collection.
Well when the tag was pretty much complete I decided I was going to make it part of a next page in my Techniques Journal. Earlier pages can be seen HERE,  HERE and HERE.
So I made the background to the page for that, using similar colours and a stencil to integrate the tag into the background.
I kept it much simpler as the tag would cover most of it anyway. I just added a few strips of tissue tape and an old book page to add a bit of interest in the corner that would not be covered.
I also did a tiny bit of background stamping with a text stamp.

Below finally you can see the tag on its background.

I die cut the word Journey from the same die set, placing it partly over the tag, to integrate the two elements together a bit more still and make it all part of a whole.
I pounced a bit of ink on the little Prima plaque still
And here is another little detail still, the bottle stamped from the Tim Holtz Mercantile stamp set and a little label tied to its neck with some twine.
Here finally you can see the whole piece in situe in my journal.

Well that's it and this is actually also my very last project as part of the Countryview Crafts Design Team. I have very much enjoyed being part of the team, but life is taking me in different directions so I felt it was time to move on.....
There are however still a couple of days left to join into the challenge, you can find all the details here

Thank you for your visit like always and I hope you enjoyed my little background experiment.

Related Posts Plugin for WordPress, Blogger...

One World One Heart

Photo

FEEDJIT Live Traffic Feed

Birthday Card

Birthday Card
Just got a whole lot of new stamps from a brilliant place called the Stamp Smith. This is the image that I first saw on Docraft and really liked. I asked the friend who has used it in an ATC, where she got it. Well she borrowed it from a friend who got it from ebay as a one off. But.... it had a title. I googled the title, and hey presto found the site. They have great stamps and offer a really friendly fast service. I highly recommend them!

Gothic Arch Trifold inside

Gothic Arch Trifold inside

Back of Gothic Arch Trifold

Back of Gothic Arch Trifold

Gothic Arch Within the Heart

Gothic Arch Within the Heart

Gothic Arch, the Key

Gothic Arch, the Key