Showing posts with label La Blanche. Show all posts

Monday, 14 March 2016

Background fun

Hello all and thanks for dropping in! Well the weekend was here and I had some time to play, yay, - so I experimented in my techniques journal and played with  a new background technique, (well for me anyway). Here first of all is the finished page:
I'll give you a quick run down on how I did the background. Mine was inspired by a video I watched on Youtube by Blanche Siegmann from La Blanche stamps.

There are 3 main steps to it: You need Ranger or indeed La Blanche speciality stamping paper, - I used Ranger and it worked fine.
Step 1 - cover your page with Metallic Distress Stain (I used Brushed Pewter).
Step 2 - When stain has dried, swipe over it with a Distress Ink Pad, I used two blue tones, Salty Ocean and Tumbled Glass. You can blend the colours a bit with a blending tool if you want.
Step 3 - Take some stencils of your choice, a damp cloth or baby wipe, gently rub over the stencil and the colour will lift. After that I did some more stencilling, this time using Archival ink in coffee.

I finished the background by doing some background stamping, using La Blanche stamps, and both Archival Black and gold acrylic paint.

Here is the finished background and I have to say I am pretty pleased with it and will definitely use this technique again.


Here you can maybe see a bit how the stamping in Black and gold kind of works together. Unfortunately it's almost impossible to pick up the subtle shimmer of the gold paint.
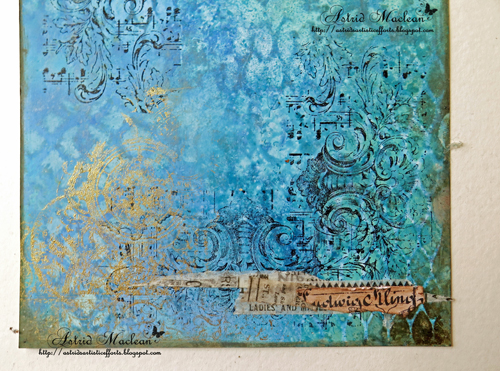
I added a few thin strips of old book paper and tissue tape for a bit more interest.

To finish the page I stamped a few Ephemera pieces, again, using various La Blanche stamps.
I also used a vintage photo from  a 7 Dots Studio  collection.
And here is the finished page.
With a rusted up pen nib added to the little paper strips.
And here at last the finished page glued in place in my journal.

Well, that's it for today, have a good week and stay creative! Thanks for your visit like always

Tuesday, 9 February 2016

3 different cards for 3 different friends...

Hello everyone and lovely to see you here.
Three of my friends have not been very well lately, so I thought it was high time to send them a card and let them know I am thinking of them....
I set myself the challenge to use similar stamps and colours, yet make 3 very different cards.
I'll take you through them briefly one by one.
This one is very much a mixed media card. The background was card, cover with gesso, strips of book paper and tissue tape, stencilling using one of Seth Apters super cool stencils and when everything was dry another thin layer of watered down gesso and then coloured with a mix of sprays and Distress inks and a bit of gelatos. As you can see I also added some background stamping with the Tim Holtz ledger stamp
The focal image (La Blanche) was stamped on tissue paper and when dry I sprinkled on some embossing powder, which when melted added some further subtle textures.

I finished it all with some hearts and sentiments etc.
The hearts and words are from a Finnabair set, stamped, fussy-cut and coloured with Distress Inks in Antique Linen, Scattered Straw and gelatos.
For card number 2 I created a background panel, stamped with Picket Fence Distress paint and the Tim Holz Distress Damask stamp and then inked with Antique Linen, Vintage Photo and Ground Espresso. Cut it into 3 strips and then mounted on white card.

The centre frame is a Sue Wilson die and matching stamp set (the background bit). The bee is another La Blanche stamp cut with one of the Sue Wilson dies in the set and then I added a crackle effect with an Indigo Blu crackle stamp.
To give it more of a shabby chic feel I added some flowers and leaves from my stash, coloured in matching colours and high lighted with Treasure Gold.
Finally a somewhat simpler textured card. The background was created in a similar way as card number 1, obviously using a different stencil. The focal image is the same too.

Well, that's it for today, thanks for your visit like always, happy crafting!

Wednesday, 7 October 2015

Words to live by

Hello all and thanks for your visit!
I found myself with a few hours to spare and a wonderful vintage paper collection from Indigo Blu, and so I decided to have a play and create a little 4 x 6 book, - always one of my favourite projects to do.....
The book itself is made from 1 sheet of 12 x 12 scrap card and then I covered each page with some of those yummy papers.

I have explained many times in the past how to construct these little books, so I won't go into much detail here. A more extensive step by step can be found HERE
I have kept this one quite simple, as time was limited, below is a quick run down through the pages:
The actual papers are totally vintage, so I have kept this whole project in monochrome. I sanded each paper a bit, to give the shiny surface more bite and then added stencilling and stamping.
I used a variety of stamps from Indigo Blu, La Blanche and Tim Holtz.
Oh the little typewriter is a little prima stamp, and all the words are from the Tim Holtz Small Talk stickers.
Here's the next double page, both stamps here are from La Blanche. I used mainly Ground Espresso for both my stenciling and stamping, though a few images were stamped with Archival, either in Black or Coffee.
Here is a close up, I just love this steampunky guy with his butterfly wings.....
By using the same stencils on both sides of the double page, they hang together better I think....
And here is the final double page, this time the main stamps are mostly from the Tim Holtz Mercantile set, though there are also a La Blanch and some Indigo Blu stamps in the background.

Making your book like that also gives you two pockets, so I created a couple of very quick tags....

I made a spine from a spare bit of the papers and made a little tag to enhance the front a bit further. The title was  stamped with a little letter set I happen to have.
Well, that's it, time keeps being short at the moment, so I keep hoping that soon I will have the time to create something a bit more elaborate again.....

Anyway, thanks for your visit like always and look after yourselves!

Thursday, 1 October 2015

Mixed Media Word search

Hello lovely friends and visitors! Welcome on this fine October day!
This is my second post for today, you can find the first one HERE
For this post I am sharing a project for Mixed Media Monthly challenges.

Our theme this month is a fun Halloween word search. Just pick one or more words from the graphic below and create your project around that in mixed media style.
You can find words by reading horizontally, vertically, left to right and right to left. Just make sure to read all the challenge rules on the blog.
Our wonderful sponsor this month is the art firm GRUMBACHER

Here is a quick step by step of how I put my project together:
I used some fabulous Grumbacher acrylic paints on my gelli plate and pulled a number of prints. Here is the one I used:

I used various stencils on the plate and red, yellow and black acrylic paint.
Next I used the red and the black paint to do further stencilling and stamping. As these paints are quite thick and rich in pigments, this worked like a dream.
I added a few strips of Tim Holtz tissue tape and then stamped and fussy-cut my focal image on a separate bit of card (the stamp is a collage stamp from La Blanche).
I coloured the image with a wonderful set of woodless coloured pencils also by Grumbacher. They blend to perfection!
As the gent has a sort of steampunk feel to him, I decided to add a few gears and sprockets as embellishments, altered with a mix of embossing powders and more of the acrylic paint.
Here's a close up still of the finished card
As you can see, my card is not purely Halloween themed but it certainly uses several words I found in the word search. Can you guess which ones they are?

Well that's it for now, hope you will check out the challenge and see the fantastic projects my teamies have created, and of course we would love it if you played along with the challenge. Like always there is a fab prize to be won, all the details are on the Mixed Media Monthly Blog
Hope you'll have a super creative month and happy crafting!
Thanks for your visit like always


Sunday, 19 July 2015

For the love of children, - ICADs 11 - 15

Hello lovely visitors and thanks for dropping in today.

It's been an age since I posted some further ICADs, but here at last they are:
If you are wondering what this is all about, you can find more information in this post.
I am having a ton of fun with these and treat them like a kind of mini journal, perfect for trying out new techniques and revisiting old ones.
Below a few more details:
The base for most of this little set is watercolour paper. I finally succumbed to the Brusho craze, so the background to this was created with a mix of Brushos and Distress Inks. The stamp is from Artistic Outpost, stamped twice, once straight onto the background and once on smooth stamping card, I then fussy cut the little boy, rubbed Glue 'n Seal all over him and then coloured with Faber Castell Big Brush Pens. . Some background stamping finishes it all off.

Background done in similar way, same with the focal image. The stamp is from Art Journey. The stars were stencilled with the Tim Holtz layering stencil and a white Gelato.

More of the same, this time using two Tim Holtz layering stencils and a Tim stamp too.
Not too pleased with this one, it got a bit dark... The stamp is a very old one, no idea who made it. The white stamping was done with Snowflake Fresco Finish paint.
Finally, - just using Distress Inks on this one and a La Blanche stamp. Colouring was all done with Distress Inks too.

Well that's it, - I love doing these little ICADs, it's a great way to dig out some old stamps and give them a work out as well.
Have a great weekend and thanks for visiting like always!

Thursday, 23 April 2015

More craftpart fun

Hello everyone and thanks so much for dropping by here today!

I admit it freely, I am a "little book" addict, I just love creating them and they have so many uses. So today I am sharing a couple of pages in another one made from a file folder, a buff coloured one this time.

Here are the two double pages I will show today, more will follow later:
First double page
second double page
Now because I know some of you might want to know how I made it, - here is a link to the tutorial I followed, though I slightly adapted the size.

I did not use a manila folder for this one but a much thinner buff coloured folder, they are readily available in the UK and worked fine for this rather masculine project.

Here are some closeups:
The paper I used is a download from Megs Garden, it's a paper collection called Sherlock and is full of yummy masculine papers, tags and ephemera. The old car stamp is a collage stamp from La Blanche. Also did some background stamping and stenciling to add more texture and interest.
Here is the other side:
This side has a pocket made from an envelope image that comes with the collection of papers, the feather stamp is another one from La Blanche and inside is a tag and a tiny little note book made with off cuts from the file folder.
I decided to embellish with some Calico Craft Parts, just perfect for this project.

A corner wood shape, they have the most amazing selection;
And a little butterfly, again there is a wide choice. For this kind you could push out the darker bits, but I decided I rather liked the texture it gave, so I left them in. I did not do much altering on them this time, just darkened them with a mix of brown paint and ink, though the first one has some Decoart crackle glaze on it too.
Here is a quick look at the next two pages still, a Tim Holtz Stampers Anonymous stamp, some background stamping and a quote, digitally created as was the steam punk bee stamp. That's the great thing with downloadable papers, you can add text etc before printing them. And of course another Calico Flourish, again they have a stunning collection of them and you can expect to see many more.
And another pocket page, using the Tim Holtz gentlemen as focal images. I fussy cut two of them for the pocket and the third one on the tag that fits inside:
The cogs are from another wonderful collection of Craft Parts

Well, that's the first two double pages. The little book has 6 double pages in all and is made from 3 file folders.
Oh and for those of you who are interested, I found a source for manila folders in the UK. I'll be in touch with those of you who indicated you might be interested in sharing a box with me.

That's it for now, thank you for your visit and stay crafty!!

Related Posts Plugin for WordPress, Blogger...

One World One Heart

Photo

FEEDJIT Live Traffic Feed

Birthday Card

Birthday Card
Just got a whole lot of new stamps from a brilliant place called the Stamp Smith. This is the image that I first saw on Docraft and really liked. I asked the friend who has used it in an ATC, where she got it. Well she borrowed it from a friend who got it from ebay as a one off. But.... it had a title. I googled the title, and hey presto found the site. They have great stamps and offer a really friendly fast service. I highly recommend them!

Gothic Arch Trifold inside

Gothic Arch Trifold inside

Back of Gothic Arch Trifold

Back of Gothic Arch Trifold

Gothic Arch Within the Heart

Gothic Arch Within the Heart

Gothic Arch, the Key

Gothic Arch, the Key




