Friday, 31 July 2020

A new journal, a freebie and tag Friday at A Vintage Journey


Hello friends, it's hard to believe it is the last Friday of July already. Here's hoping everyone has managed to stay safe and well!
Today I have a number of things to share, as it is tag Friday today over at A Vintage Journey,
let me start with that. I made this rather grungy tag to become part of an Autumn (sort of) themed journal.

Below some details of the tag, I made the background with a mix of Distress colours, did some stamping and then added some die cuts, cut from Kraft card, and an embellishment from my stash that I coloured a sort of coppery colour with Treasure Gold paste.


Now the journal that goes along with the tag is an A5 sized Junk Journal, I'll show you just a few of the pages, there are in fact many more, but I don't want to make this post too long.
Here first of all is the cover, it is decorated with some real dried flowers and leaves and a wax seal.
Below some of the inner pages, like usual with this type of journal, most of the pages are coffee stained printer paper, and then I added a mix of digital images, papers, ephemera, paper napkins and stamping and stenciling.


As you can see, there are lots of pockets, additional tags and journaling cards.

And then finally the bit, that I know many of you have been waiting for, - the freebie. It's nature themed I suppose you could say, and will go along well with some of my latest collections in my Etsy shop
There are journal cards, embellishments and words, enjoy!


Like usual, if you want the hi resolution version for printing, just email me (details in sidebar under contact me)


Well, that's it for today, happy crafting, thanks for your visit and stay safe and well!
xxxxx


Friday, 17 July 2020

A little fold er/notebook and a freebie

Hello friends, hope you are all keeping well! Nearly a month has passed already since I last posted here, and since it is Friday, I thought it was probably time to share a little project and a freebie once again, as I know how many of you like these.
So here first of all, the project with some brief descriptions:
Here you can see the outside of the folder which was made from a brown file folder. I cut it to about 6 1/2 inches high, trimmed of the tab and then folded it concertina style, into 4 equal parts more or less, each measuring about 4 3/4 inches wide. I numbered each of the panels and then cut the papers I wanted to use to size and inked all the edges. The reason I numbered all the panels, is because each one is slightly different in size, and I measured the papers one at the time and numbered them too, thus making sure they all fitted. Hope this makes sense. I then adhered them to all the panels of my folder.
Next I created a little notebook, slightly smaller than the folder, out of a mix of printed papers and coffee stained papers. I sewed them together with a 3 hole pamphlet stitch into the actual folder.
Here you can see one of the inside pages.
On this photo you can see some of the panels and on the left the back of the little notebook.
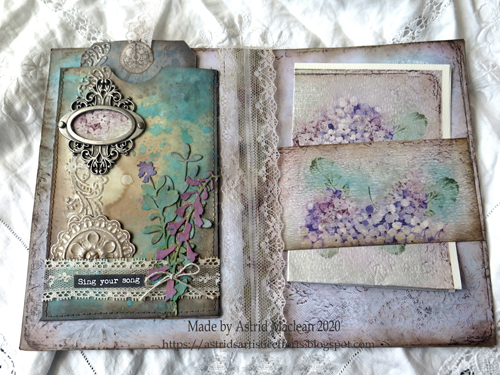
Here you and see how on some of the panels I added pockets, which I then filled with the tags, journaling cards and ephemera you can see below.

Here are some of the other panels on the back of the folder when they are folded out.
And the photos above and below show some close ups of the pockets decorated with some elements of the freebie.
The papers I used to decorate this folder are all from the Garden Grunge Collection in my Etsy shop, they match the freebie, but of course you can use that with any other papers too.

Like usual, this is just the low resolution image of the freebie. If you want the high res. version for printing, please email me (see sidebar) and I will send it to you. As you can see there are little tags, tabs to add to tags or journaling cards, postage stamps, and some bits to fussycut and decorate your projects. Enjoy and like always, thank you for visiting!
                  xxxxx

Friday, 19 June 2020

Tag pocket tutorial and another freebie

Hello friends, welcome! Today I have a tutorial over at the A Vintage Journey blog, where I explain in detail how you can create a simple pocket for a tag, like the one I showed as part of our June challenge there. Of course you can use such a pocket for ephemera, gift or journaling cards or whatever you like.

Here I am showing just a few more ideas for such pockets that I mostly decorated with freebies I have posted here, including the one from today.
Each one is in a different size, and the beauty of these pockets is, they are super simple to make without the use of any expensive dies.
Below some close up pictures and brief descriptions:
The tag for this pocket was made from one of the papers in my etsy shop. I used a Graphics 45 die for it.
The pocket that it fits into is a matching bit of paper, I used another die to cut the aperture (before gluing it together obviously) and also did some stamping on the inside, to make it look more interesting when the tag is not inside. It is decorated with some elements from the freebie and a piece of lace.
This pocket is much smaller, again made with papers from my shop. The tag was cut with a large tag punch and decorated with another freebie. The butterfly on the pocket was pinched from another one of the papers.
This tag is more grungy. I used a Tim Holtz #8 tag from Mixed Media Heavy stock and used The Baroque stamps and distress spray inks and oxides to make the background and then more freebies to decorate.


The pocket to go along with it is made from Kraft card stock, sewn around the edges and collages with
scraps of paper.

The final pocket I am going to show is one made again from coffee dyed card and decorated with elements from my latest Etsy kit called Flower and Butterly Collage.
It is a kind of gift pocket with a decorative flap.
                                                      This is the front, the flap closes with a velcro tab

this is the back, the flap fits over the opening and the top
                                 And here is the back, the flap fits right over the opening at the top
                            and you just glue it to whatever side you want to be the back of your pocket.
                                        Here are some of the little tags and bits that fit inside.


And here finally is the freebie, it includes some little element from the new kit, but can be used with anything you like of course:

Like usual, if you would like a high resolution of this for printing, please email me. I am have been getting so many requests for these lately that I am now using "We Transfer" to send the files, as it is quicker and my internet is slow.

Well, that's it for now, - you can find the papers to go along with this freebie in my Etsy Shop, and if you want a description of how to make a pocket like this with several step by step photos, please hop over to A Vintage Journey .
Thanks for visiting like always
xxxxx


Tuesday, 9 June 2020

Butterfly freebie ideas used in my journal

Hello friends, thanks for joining me here today. Can you believe it, two new posts, in one week... Yes it looks as if I may start using blogger a bit more again. In my previous post I offered you a freebie and today I want to show you a few options of how you can use it. I think the photos pretty much speak for themselves, but if you have any questions, I am always happy to answer.
all pages in this journal are made with coffee dyed paper.
Here you can see the butterfly a bit more clearly, I really used them mostly as embellishments. Stencils are by Tim Holtz

Here I used a smaller one to decorate a pocket


I often like to add extra little notebooks to my journals, to give more space for more journaling, quotes or like here a space to add things you are grateful for, or as you can see in one of the photos above to make notes.

This journal is far from finished, so stay tuned for further ideas and on the left of the photo above, you can see some little tags from a freebie that will be coming your way soon.

Most of the other pages, pockets etc are made with papers from collections that are available in my Etsy Shop

Well, thats it for now and like always, happy crafting and creating, and thanks for dropping by.
xxxxx

Friday, 5 June 2020

Rustic Charm for A Vintage Journey #90 and a Friday Freebie

Hello all, welcome and happy June!! Hope you are all keeping healthy and safe!
Today sees the start of a new challenge at A Vintage Journey, and this month I am actually the host of the challenge. So this is what we would like you to do:

Rustic describes a design that is natural, rough, aged and casual. We would love to see you create a project using these elements: think nature inspired textures and simple and earthy colours. Just remember to create your project in one of our preferred styles: vintage, shabby, mixed media, art journaling, industrial, timeworn or steampunk.
  
Here is what I made:
You may remember the tag I made for our tag challenge last week, well today's project is a little holder for this tag, that in turn is part of a gift folder for a pen friend. I will do a full tutorial on how I made the bag in a couple of weeks time on the A Vintage Journey blog, so today I will just share a few photos here.
I tried to match the colours of the holder to the tag itself, and tried to give it a rustic feel with the choice of embellishments, including an actual charm, because of course charm has a double meaning.
I made a little folder for the tag and pocket, which serves as a gift for a penfriend.

It is A 5 in size, the closure is a little altered paperclip, and it is covered with papers from one of the downloadable kits in my Etsy shop. It's called Summer Melancholy.
Here you can see the back of the folder and the next photo will show you what it looks like from the inside.
The tag pocket is stuck down on the left side and the letter for the penfriend is tucked underneath
a belly band on the right.

Now in a previous post I said I would share a freebie again, and as it is Friday after all, why not have that Friday Freebie today.

Like the last time I posted a freebie, the one you see here is just the low res version. If you would like it for printing, please email me and I will send it to you.
Well, that's it for today. Like I said I will do a full tutorial with step out photos of how I made the bag on the third Friday in June over at A Vintage Journey,  and I will also show some examples of what you could do with the freebie here soon,so until then, happy crafting, and do hop over to the A Vintage Journey blog to see the fabulous projects my teamies have created, and we would all love it of course, if you played along with the challenge.
Thanks for visiting here like always and happy crafting!
xxxxx


Related Posts Plugin for WordPress, Blogger...

One World One Heart

Photo

FEEDJIT Live Traffic Feed

Birthday Card

Birthday Card
Just got a whole lot of new stamps from a brilliant place called the Stamp Smith. This is the image that I first saw on Docraft and really liked. I asked the friend who has used it in an ATC, where she got it. Well she borrowed it from a friend who got it from ebay as a one off. But.... it had a title. I googled the title, and hey presto found the site. They have great stamps and offer a really friendly fast service. I highly recommend them!

Gothic Arch Trifold inside

Gothic Arch Trifold inside

Back of Gothic Arch Trifold

Back of Gothic Arch Trifold

Gothic Arch Within the Heart

Gothic Arch Within the Heart

Gothic Arch, the Key

Gothic Arch, the Key