Can you believe it is 2015 already, the turn of the millennium seems only weeks ago. Oh dear, how time flies when you grow older.....
Anyway, today sees the start of a new challenge over at Our Creative Corner. It's a new year and also a brand new challenge host, the amazing Pamellia Johnson, who only recently joined the team as you may have seen.
This is what she had to say about the challenge:
With the holidays merely a shadow behind us, my guess is you still have bits of Christmas leftovers stashed everywhere, not to mention bags of Christmas bits meant for the recycle bin. I am a hoarder of all things I think I might get around to using one day, and Holiday bits are no exception! Every closet, drawer and cupboard is overflowing with the little things I collected throughout the holidays. Things I think I might use and things heading to the curb.
Christmas wrapping, gift bags, tinsel, ribbon, gift boxes, tissue paper, Christmas crackers, wine boxes, empty gift wrap rolls, Christmas cookie tins, even the images from the fronts of cards I received...you name, I hoard it!
Let's put those bits to good use this month!
With that in mind, for my introductory challenge theme, I have chosen........CHRISTMAS LEFTOVERS
To be clear, your project does NOT have to have a Christmas theme, I only want you to recycle your Christmas scraps.
If it's not obvious what Christmas leftovers you used, make sure to tell us about it, somewhere in your post.

Any regular to my blog know that I am a paper hoarder, I also LOVE altering papers, and this project was made with the leftovers from some Prima pads of paper that I used for several of my Christmas cards.
I made another little paper wallet to keep memorabilia in, as I am away on a trip to Australia right now, and wanted something small enough to fit in a handbag, and yet have plenty of room for photos, tickets, journaling notes etc.
HERE is a link to a brilliant video tutorial that shows you how to make one, all it uses is 3 sheets of 12 by 12, plus other scraps of paper to line all the different sides.
I made my base out of 3 pieces of 12 x 12 Kraft card.
As the project has so many flaps and pockets, it is hard to photograph, but here you can see the inside:

Above is the inside of the wallet with all the panels open. As you can hopefully see, I covered each side and pocket with different, but matching bits of paper. Adding some texture with the help of stencils and some paste too here and there. Below are some more close ups:

Here you see the two sided flaps folded in, more bits of paper on the back of the flaps, these are meant as photo mats.

A close up of one of the pockets. As the whole little wallet needs to be quite flat in order to close, I did not want to add bulky embellishments to the inside, so decorated with fussy cut elements from the papers.
 This is the central panel, I made a belly band to keep journal notes etc in place.
 Here you can see the side flaps completely closed, again these panels are for photos. Below it is a bigger pocket for tickets and other bits, it can hold smaller photos too.
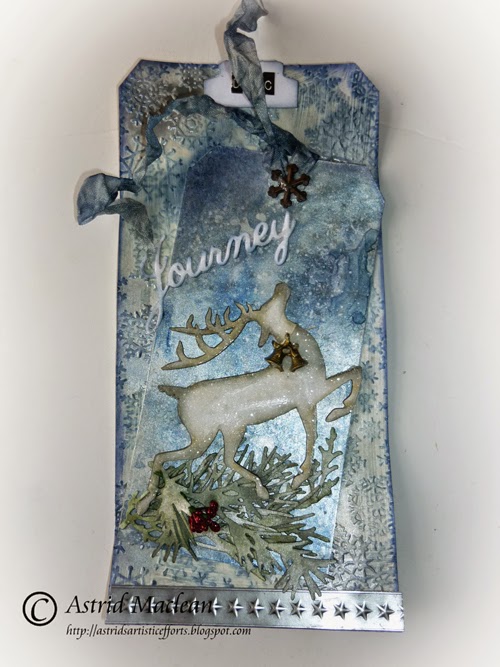
Here is the front:
 I added a flower cluster here and as you can see there is also some stencilling with paste and high lighted with treasure gold.
 As the wallet is specifically to hold my journey's keepsakes, I die cut the word journey from one of the papers stuck on some Kraft card for strength and altered it a bit with some gesso.
 Here is a close up of the flowers still, as you can see, I tucked some cheese cloth underneath to soften it a bit.
 Well, that's pretty much it. A quick and fun project to make and great to use up all those bits of paper that most of us will have plenty of after Christmas.
Please make sure to check out the projects of my amazing teamies new and old, I promise you, you will be stunned and inspired, all you need to do is click HERE. And of course we hope you will play in the challenge too!
Thank you for visiting like always and may 2015 be your best year ever!!!

Here is the front:
Please make sure to check out the projects of my amazing teamies new and old, I promise you, you will be stunned and inspired, all you need to do is click HERE. And of course we hope you will play in the challenge too!
Thank you for visiting like always and may 2015 be your best year ever!!!