Showing posts with label Distress Oxides. Show all posts

Wednesday, 21 November 2018

A little sparkle on a dull day...

Hello friends, hope you are keeping well. The weather has been chilly and grey here the last couple of days, perfect weather for some crafting, - so I am in full Christmas Card making mode. I have made nearly 20 cards so far, but don't worry, I will not show them all, - today I will share just a couple made with some of my Tim Holtz stamps:
I'll keep this post quite short, as these are busy times for us all, just a few close ups and some product info:

This one uses the Holiday Greetings stamp set. The background was done with Antique Linen and Frayed Burlap Distress Oxides. I stamped some trees from a much older set in the background, using Iced Spruce Doxide.
The main stamp was stamped in Ground Espresso Doxide and then clear embossed, I also added some white pencil for snow,
The main card was mounted on a piece embossed with the Lumber 3D folder, coloured with Distress Inks in various brown tones and then I applied a layer of Crazing Medium with a palette knife, a cool trick I learn from my lovely blog friend Sara Emily from Saras Closet  After the crazing medium had dried I then rubbed in some Distress Crayon with a damp finger, to bring out the cracks. I also drew in some stars with a white gel pen and added a little sparkle with Diamond Stickles.
The second card was done in a very similar way, - the bird is from the Simon Says Stamp limited edition stamp set and was coloured with a mix of Distress Markers and coloured pencils

I then finished it with a die cut coloured with Doxides and then I added just a tiny bit of Distress Glitter in Vintage Platinum, it looks really sparkly in real life but it all gets lost in the photo.

Well that's it, hope you are all having a good week and are not too busy. I'll try and visit soon...

xxxxx


Tuesday, 1 August 2017

Mixed Media Monthly #39

Hello all and welcome to a new challenge at MMM! It's the first of the month, so happy August to you all.

Our challenge this month is a photo challenge, and here is our graphic for this month:
Well, as you can see, my contribution is a rather loose interpretation, but hey ho, I tried......
But before I tell you more, our wonderful sponsor this month is no other than Indigo Blue

I used the following two stamp sets for my project: Victorian Garden and Country House, and created a dreamy page for my nature journal.
I created my background with a mix of Oxide and normal Distress Inks and then slowly built up layers of stamping using the images from the stamp sets, stamping again with both Oxide and Distress Inks. The darkest layer in the foreground was stamped with a Big Brush Pen. The moon was done with the help of a mask.
Lots of spritzing and flicking to make the inks react with one another and then I added a few white high lights with a white pen.
The sentiment is part of the Victorian Garden set, sorry the photo turned out a bit blurry...

Well that's it for today, for further details on the challenge please head over to Mixed Media Monthly and of course we all hope you will play along with our challenge and if you do, don't forget to add our graphic to your post to qualify for our prize!

Thanks for your visit today, and have a happy, healthy and creative month!
xxxxx

Friday, 21 July 2017

Nature Journal installment 1

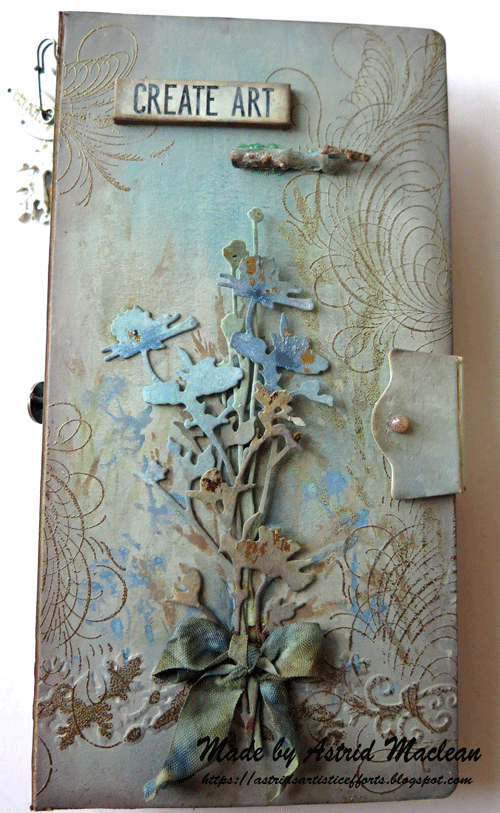
Hello friends, today I have a new journal cover to share with you, made with the awesome new Eileen Hull Journal die.
Unfortunately this die is extremely hard to come by. I have had mine on pre-order since February, but have just heard it is now on its way to me. The cover used for this one was donated to me by my wonderful friend Anne Redfern, you can see some amazing examples and tips of how to use the die on her blog. Now that I know my own die is on its way to me, I finally felt ready to use the last one of the ones she sent me....
The covers were coloured with a mix of Doxide Inks in Faded Jeans, Iced Spruce, Cracked Pistachio and Vintage Photo, using both blending tools and dipping. I then toned it all down a bit with a layer of watered down gesso for a more faded look. I did some gold embossing around the edges, some background stamping with various flower stamps (Paper Artsy and Tim Holtz) and finally used some of Tim's wild flower dies as my focal point.
They were coloured with the same inks and then tied together with a seam binding bow, again, died with the same colours.
I added some nature themed charms to the spine and used some text stamping on the back.
The closure is made from one of the dies that comes with the set. It closes at the front with a little magnet.
I added one of Tim's chip board phrases and a pen nib to the front, some tiny flecks of gold foiling to the flowers, to blend in with the gold embossing, and that was pretty much it.
I made a first insert out of Kraft card, I will use it as backgrounds for watercolour nature themed pages I am planning to keep in this jounal, but more of that on another day, stay tuned :o)
Thanks for your visit like always
xxxxx


Friday, 31 March 2017

Spring Queen tag Friday at A Vintage Journey

Hello everyone, happy Friday and last day of the Month, - where did March go?....
It being a month with 5 Fridays, this means the happy team at A Vintage Journey are sharing tags for a bit of inspiration today and here is mine:
Like many of us it seems, I wanted to have a play with my new Distress Oxide Inks again. I had a number of try out tags flying around, so decided to use one of them. I'm sorry that I don't have step by step photos of how I created the first bits, but this is what it looked like when I decided to use it as the base for this project:
I think I used Cracked Pistachio, Faded Jeans, and Vintage photo. Spreading them on my craft mat, spritzing with water and then dipping my manilla tag into it drying between layers until I was happy with the result. I then used a couple of Wendy Vecchi's background stamps, Rectangle Collage Stamp and the Vintage Text, stamping in Black Archival. Finally I ran it through one of Tim's newer embossing folders and highlighted the raised bits with matching colours of Distress Crayons, Cracked Pistachio and Walnut Stain..
Next I selected a number of different elements I wanted to add to my tag: One of the new paper dolls, she was holding an American flag, which I cut off as I wanted to turn her into a Spring Queen, some elements from the new Botanical Layers and from the Snippets Ephemera.
As you can see, I added some further elements still, some tissue tape,  some new design tape at the bottom of my tag and other bits and pieces from my stash.
Below a few close up photos still:
I decided to add a bit of colour to the girl's sash with a Cracked Pistachio Distress Crayon, it looks much more silky in real life than on this photo. The little star is from the new Ideaology Findings stars.
I love these elements from the Botanical Layers, they save so much time fussy-cutting, and many of them go so well together.
The words are from the Quotations Metallic Stickers, I added it on top of some tissue tape.
Shadows were added around the main elements with a Stabilo All pencil to add more depth to the collage, and that was it.

If you would like to see some more inspirational tags, please go over to see what my teamies have created, - I am sure you will not be disappointed! Just click HERE

Thanks for dropping by here today. I know I have not posted very often lately, but life has taken me in other directions. Hopefully there will be more time soon again.
xxxxx

Related Posts Plugin for WordPress, Blogger...

One World One Heart

Photo

FEEDJIT Live Traffic Feed

Birthday Card

Birthday Card
Just got a whole lot of new stamps from a brilliant place called the Stamp Smith. This is the image that I first saw on Docraft and really liked. I asked the friend who has used it in an ATC, where she got it. Well she borrowed it from a friend who got it from ebay as a one off. But.... it had a title. I googled the title, and hey presto found the site. They have great stamps and offer a really friendly fast service. I highly recommend them!

Gothic Arch Trifold inside

Gothic Arch Trifold inside

Back of Gothic Arch Trifold

Back of Gothic Arch Trifold

Gothic Arch Within the Heart

Gothic Arch Within the Heart

Gothic Arch, the Key

Gothic Arch, the Key