


Hello friends,
Let me start by saying that I hope you have had a good start to 2021 so far. Where I am we are still in full lock down, so life is rather quiet, but at least that leaves lots of time for creating.
Today I want to share a couple of small projects, that are good fun and simple to make. I have used a new downloadable collection from my Etsy shop, plus the freebie you will find at the end of this post, but obviously you could make these with any papers and embellishments you have.
Rather than give complicated instructions, I will give a brief description with a link to a YouTube video which I used to make mine, though in each case I adapted them to what I wanted to use.

Below is what it looks like from the back:

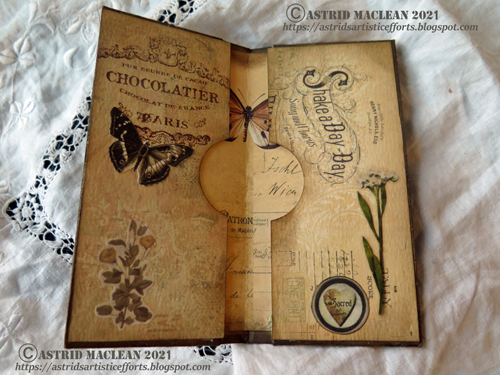
Here you can see what it looks like from the outside when you open the flap.
 I embellished it with some bits and pieces that come with the freebie. The flap(on the left) that closes the folder, is a separate bit of paper. Unlike what is shown in the video, I attached mine on the outside, so it looks like a kind of spine.
 Here you can see the inside, the pockets on the side come about through the construction of the folder as is shown in the video. The front pockets are separate bits, that I decorated with bits and pieces from my stash.
 And here are the tags that fit in the pockets, the larger ones are part of the collection, the smaller ones are cut with a large punch and then decorated with bits from the collection and other bits from my stash.
 I made mine from a piece of 11.5 by 11.5 sugar paper (trimmed to a square from an A3 piece). It was a rather nasty yellow colour, so I inked all the edges and then covered all the sides with papers from the collection.
 Here you can see the back of it. These clever folders have 6 pockets, two on the outside , two right on the sides, and two on the inside. If you watch the video it will all become clear. Making the folder this size meant that the tags in the freebie are just the right size to fit.
 Here you can see the inside of my folder, it looks quite different than the ones in the videos, but that is because I covered the inside pockets with extra paper.


Here is the link to the videos (there are two) that describe how to make a folder like this, though the finished look is very different. Video 1 and video 2
On to project number two, this is a little origami folder, again heavily adapted, but in principle the same as described in the video linked further down.


I made a larger matching journal card still from one of the elements that come with the main collection and both fit into a matching pocket that is part of a journal I am working on, but more about that at some other point.

And below finally is the freebie which like usual you can get in full resolution if you email me

Enjoy and happy crafting!
xxxxx


9 comments:
Oh the inserts are gorgeous! xoxo
Beautiful Astrid!
They all look amazing, xxxx
These little book inserts always amaze me. I could never think of all the cool folds to make it possible. Great paper too, and love the inking and sewing to really transform it. Those flowers look so real. Gorgeous makes!
Beautiful, i love it.
hugs Conny
Thank you so much for sharing Astrid as I so love these fabulous folders and insde details xx I have your gorgeous new kit so can you please forward your freebie whe you have time xx
Happy Sunday xxx
شركة تنظيف سجاد بالجبيل
شركة تسليك مجاري بالخبر
شركة تنظيف منازل بالدمام
شركة تعقيم بالاحساء
شركة تنظيف منازل بالجبيل
شركة تسليك مجاري بالدمام
شركة تسليك مجاري بالقطيف
شركة تعقيم بالخبر
شركة تسليك مجارى بالاحساء
شركة رش دفان بالقطيف
You do have the most beautiful ideas!
Thank you for inspiration!
Just found your Blog and I'm excited.
Thanks for the freebies, too!
LOVE,
Annette
Absolut amazing project as always hun, I really admire your style and amazing work. And thanks sooo much for all the great tutorials, you always share with us here.
Post a Comment