


Hello friends, - now that Halloween is over and winter here in the Northern Hemisphere is just around the corner, I though I would put my attention to a Christmas project, - so this is what I came up with:


I'll show you more photos of the finished project toward the end of the post, but first a quick tutorial, really in response to the many emails I receive from visitors telling me how they appreciate them, - so thanks for that!


 There are now 4 layers but my trimmer managed to cut through them ok as file folders are usually not very thick.
It all started with a simple Kraft coloured file folder:

I opened it, folded it in half, closed it again and then cut off the tabs on the side using my trimmer, as the photos below will hopefully show:


Once the tabs were cut off I opened it again and folded the bottom up to create a pocket. This is a little trickier, so a bone folder is definitely helpful at this stage.

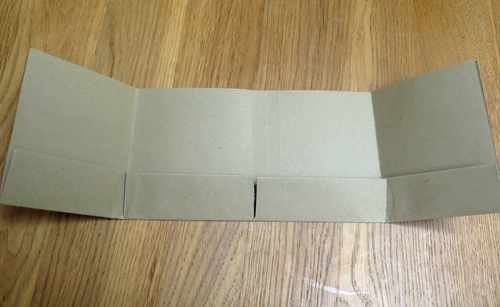
To make it easier to fold your project into a booklet, I found it helps to cut a little slit in the pocket fold as you can hopefully see from the photo above
Now I like the look of sewing with projects like this, but you could easily just glue. So either sew or glue everything in place. If just using glue, run a thin line of strong glue on the inside of your fold lines and then glue the sides but leave the top open. If you sew, you can zig zag right around three sides, but leave the top open also. Next glue your 4 pockets, or using a wide zig zag stitch sew them like I did. The open top is for 4 additional pockets, you can punch a notch with a circle punch to make it easier to get the tags in and out.
Now all you need to do is cover everything with papers of your choice, make your tags and you are done. I hope the photos below will show more or less what I did, but obviously the possibilities are endless.

Here you can see the side flaps folded in. I used my latest Christmas Collection, as I wanted to make a Christmas themed folder, using both the background papers and all the embellishments that come with the kit.


I just folded this paper cut to size and then sewed it in with my sewing machine, but again you could do this by hand using a pamphlet stitch.


Here are the tags that fit in the top pockets, they are slightly larger than the ones that fit in the inside pockets.


Well, that's it, and here finally is the freebie that you have been waiting for, enjoy, and like usual, just email me to get the full resolution sheet for printing.

Happy crafting and thanks for your visit like always.
xxxxx


9 comments:
WOUW I just LOVE your filefolder here and what a great idea to use both the notebook and tags inside it, and make more folds and then more pockets too. I could think of making some of these and fill them with smaller cards and use as a gift for older members in the family, who can´t make any and can´t get out to buy mush these days, then they alwyas have a small card to use, when they need it and they could make the notes as n adressebook too maybe.
It´s so gorgeous and well made as always hun.
Have a wonderfu week-end ahead and stay safe outthere everyone.Heard you´ve just been locked down like we are here in our part of our country from yesterday SIGH.
What a lovely tutorial Astrid! Very pretty little folder. I like the idea of the layered pockets.
Beautiful, love filefolders like this. Nice Job!
Wow, such an amazing design! I so enjoyed seeing the folder come together and all the beautiful details that you added 😀. Your winter image designs look stunning and I'm loving all your pockets and tags that you created with them - gorgeous! Take care and wishing you a Happy November! Hugs, Jo x
So beautiful Astrid x Love the file folder and notebook x As always your designs are fabulous and I can’t wait to play with my Christmas Collection xx Have a lovely weekend sweet friend xx
Waouhhhhhhhhh splendide merci ����
Fabulous that’s such a special project Love and hugs Carole x
Loving this Astrid. its so unique and would make a lovely gift. Could I please have the full resolution please as I'm hopeless at making things bigger. Stay Safe my friend. Hugs Rita xxx
i love your construction work. it makes me feel like doing some but i dont have the patience.
thanks for sharing freebies with us
Post a Comment