Hello friends, can you believe it is actually November already? Where has the year gone....?
Well, it's the first of the month and that means there is a new challenge starting over at the
Mini Album Makers challengge blog.
So here is my contribution for this month's challenge:
Whether we like it or not, Christmas is only a few weeks away. We all know what a busy time of year lies ahead, and so I thought I would make myself a littlle Christmas planner. I am including some freebie pages in this post, so if you want to, you can download those to make your own. But first let me tell you how I made mine.
I'll start with the cover: I used the
Eileen Hull Mini Album Die and cut the cover from white mount board to which I had added some scrapbook paper. Next I coloured both sides using a mix of Archival and Distress inks, did some spritzing and flicking and finally added a little gold foiling, using a gluestick and some Ranger foil.
On the back I added a little angel left over from another project. It was cut with a Tim Holtz Movers and Shapers die. The nodges you see on the top and bottom were cut by me. Eileen's Passport die has nodges like that, which I like because it makes adding inserts easier, so if I want I can print more of the inside pages and add them later.
I added some Tim Holtz charms to the spine and my inside pages are attached using an elasticated ribbon glued and twisted around some black elastic. I'll show you more in a minute, but first the embellishments:
I made the poinsettia using the Tim Holtz Poinsettia die cut from some Wendy Vecchi Clearly for Art and coloured it with alcohol ink. I glued a brad in the centre and added some little berries around (making a bit of a mess). Next I added some cheesecloth with gel medium, having coloured it with Distress sprays to match the rest of my cover first. I then arranged some metal branches, berries and leaves round about my poinsettia and glued everything to the cover with hot glue. A light coat of gesso was added to it all to give it a bit of a frosty look.
Finally I added the title with little stickers, but as I had no numbers left I had no choice but to add the year with a black and white pen, not too happy with that, but too late to do anything about it.
The album closes using the tab that comes with the die and a little magnet.
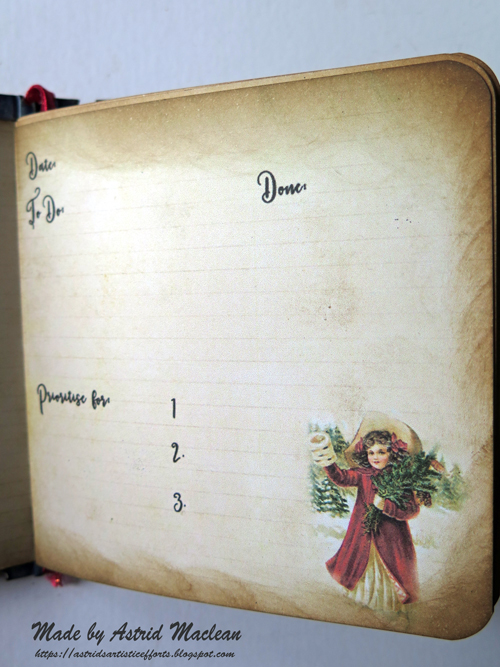
Alright onto the inside: I designed some papers in Photoshop Elements, printed them and then cut them with the die.
HERE is a link to a video where Eileen shows exactly how to do that.
And here a few more of the pages:
I darkened the edges with some Vintage Photo DI, and put a little key in the centre attached to the end bit of the ribbon, so it can act like a little bookmark.
Well, that is pretty much it. Below you will find the freebies for the inside pages, for those of you who want to have a go yourself.
If you don't have the die, you can of course still use the papers, just print, cut with a trimmer, round the corners if you want and fold in half. In any case make sure to print them two sided, otherwise you land up with every other page being white once you have folded them, you may want that of course, and add your own notes or whatever you want.
Well, that's it for now, - sorry for this very long post, but please make sure to check out
our challenge and see the wonderful books and albums my talented teamies have created. And if you decide to play along again, you could win a $25 voucher from Lindy's Stampgang!!!
Have a good month of November, - happy crafting and creating and thank you so much for your visit here today!
xxxxx


31 comments:
Gorgeous album, love all the vintage details and the muted colours. Hugs, Valerie
I've read all with interest Astris, so many steps but what a stunning finished piece. Interesting you use a glue stick to add the foiling so will give that method a try.
B x
Absolutely gorgeous Astrid - in fact you have inspired me to make one too for Christmas. The cover is divine with that wonderful Poinsietta. And thanks for the link to Eileen's tips for cutting the pages. Brilliant! (Gorgeous freebies too!) Jennie x
Such an inspiring post Astrid xx I love your mini planner and all the glorious pages xx Wonderful details on the covers and so kind of you to give away papers........just might have to make one xx
Huge hugs Annie xx
Beautiful planner and I adore the images!
Astrid, you are as creative as you are generous and I appreciate it so very much! It has been on my to do list to do some TJ printables, but I have been slack... Well done you for offering these! I'm wild over your altered cover and that incredible poinsettia! The metal twigs are sooooo cool! I'm going home to emboss some real life twigs and see if I can get a similar result! I just love this project and appreciate your tutorial so very much. Big hugs, Autumn
A wonderful new, and long post from you, again, Astrid :-) I always enjoy visiting.
Your Christmas Planner is so beautiful, with the altered cover and that gorgeous flower. I love your color tones, the cheesecloth and twigs, a beautiful Christmassy result. Thank you for always being so kind, to leave freebies for us :-) Dorthe, xoxo
It's lovely!
Wow Astrid, your journal is a real stunner, I love the colour and the gorgeous poinsettia and twigs, they look amazing. Your pages that you created are just beautiful and I will definitely be incorporating them in a journal - thank you so much for sharing - you are so generous! Hugs, Anne xx
What a wonderful Christmas planner - I love the intricate images on the interior pages, and the wonderful red to green blending on the cover is so beautifully done. Love the poinsettia and leaves with their touch of frosting too - a delight!
Alison x
That is such a delightful planner - this green and red and all this wonderful details - specially the backside speaks to me with this angel- so arsty done!
A wowser again Astrid!
oxo Susi
Its a beautiful Christmas planner Astrid. The inside pages you designed are wonderful as well. It was a good post to read and the photos looked great.
Yvonne xx
Thankyou so much Astrid, this is totally stunning. Fingers in my ears about Christmas approaching but I adore your creation. Splendid! Xx
I love everything about this project. The inked papers, the vintage images and the gorgeous cover. No need to apologise for a long post Astrid - I pored over every word and every step. You are so generous to share you ideas and your creations with us. Thank you.
I adore this Astrid!! What a sweet little Christmas Planner you have created! The design, the colour palette, the stunning cover, everything is simply gorgeous!! Thank you for sharing how it was created and for the printable pages as well. hugs xx
Astrid, you've created not only a useful book, but one that is equally lovely! The poinsettia on the cover is breath taking and I love the pages on the interior. Thank you for the generous gift of the printable pages! Your post was not long at all--just come have a look at my LONG posts! I enjoyed every word, and appreciate reading about your steps! Hugs!
Gorgeous Christmas planner Astrid love the tradition colours and vintage look you have achieved,fabulous and it has spired me to make one been meaning to for years lol, thank you for the freebies.
MaggieH
Absolutely beautiful!! Love it!!
Wow - what a wonderful album! I use that die frequently to make little notebooks for lists. Your pages are gorgeous - thank you SO much for sharing!! Now I think I have to make a Christmas one for sure. Also, love your idea of adding the notches like the Passport album. So clever! (and useful).
Thanks again for sharing.
I love your Christmas planner! I esp. love the pages you designed for the inside. I adore anything vintage Christmas. This is a must use idea!!!
Your Christmas planner looks so gorgeous and so inviting to start planning! I am always so last minute with Christmas, maybe I ought to have a go at creating one myself! Hugs xx
Oh My! What an inspiring start you have made to your planning! I love the colours and the fabulous cover you have made! Hugs, Chrisx
What a fantastic idea Astrid! I love the Christmas planner idea and you sure have made a gorgeous one! How generous of you to share your pages with all those wonderful vintage images and everything laid out so perfectly! Your cover is so stunning with that shimmery poinsettia and the fun charm down the side! A truly glorious holiday creation! hugs :)
Oh my, your Christmas planner is delightful! I love the red and green vintage look and feel with those beautiful frosty silver flowers - amazing 😁. The inside pages are wonderful too - Improve it! Wishing you a Happy November! J 😊
Gorgeous album, I love the stunning flowers on the front :) Take care, Shirleyxx
Gorgeous album!!! Love the vintage feeling!!!
Hugs, Nora.
This is awesome - truly beautiful planner!!!!
This really is stunning Astrid and instantly usable. A wonderful idea to plan Christmas and use each year. This would be one of those precious pieces that would be the first sign that Christmas is coming. Thank you so much for sharing.
Creative Wishes Tracey xx
Gorgeous album, love the cover and all the little details inside.
Avril xx
c'est une belle est riche idée ce planificateur est superbe
à bientôt NATE http://nate.over-blog.org
Saved as a favorite, I love your website!
Post a Comment