


Chipboard:
2 pieces 5.5" by 4"
1 diecut piece cut from a piece of 3" by 4"
2 pieces 1" by 4"
Cut your pieces and lay them out like this:

Next you are going to cover your chipboard with
Scrapbook paper. I used the Tim Holtz French Industrial collection. You will need:
2 pieces 5" by 6.5"
1 piece 5" by 3" (for the spine)
1 piece 4" by 4.5" die cut (for the shaped flap and the second spine)
This is to cover the outdside
For the inside you will need:
1 piece 7.25" by 3.75"
1 piece 10" by 3.75" die-cut at one end as before
For the hinges you will need:
4 pieces 2" by 3.75" of Kraft card or other strong left over card stock.
Start by covering the front and back covers with your chosen paper. Score at 1/2" around all 4 sides, miter and glue on to the chipboard with your adhesive of choice.


Next take your 4" by 4.5" shaped piece of paper and fold it round the second spine and shaped chipboard flap in the same way then glue them altogether, again, making sure you leave gaps between the chipboard pieces.


Next cover the inside with your chosen papers as shown in the picture below:

Alright, now for the hinges:
Score them all length-wise in the center and glue them together concertina style:


Now onto the fun part the inside pages, for this you will need:
6 pieces of 5" by 3.75 card stock of your choice. I used manila card stock by Ranger.
Here are my pages, - I used different types of stamps similar in style to the wonderful stamps Sin City Stamps make.
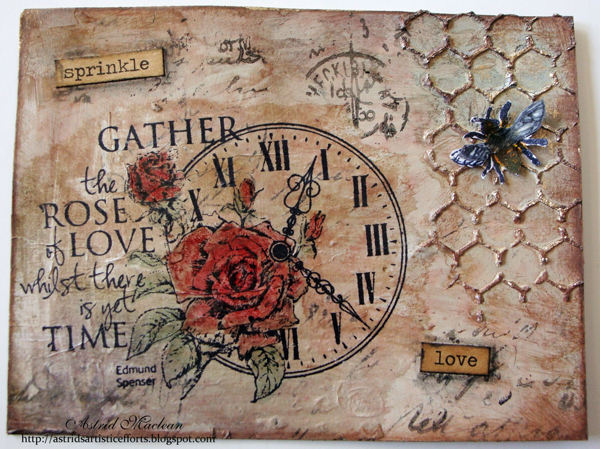


First I added some texture paste through a stencil. When dry I added different colours of Distress Paint, straight onto the card and then spritzt with water to let them marble

Next I added matching Distress Inks with my ink blending tool


And finally, the main stamped image, sometimes first stamped onto tissue paper and then added to the page with Glue 'n Seal, sometimes stamped straight onto the page:

Finally I embellished with flowers, leaves, a Sculpey heart, stamped before baking and coloured with Distress Paints and some Tim Holtz chit chat stickers. Textured bits were high lighted with gilding wax in gold and pewter
Here you can see still what the pages look like inside the book:


I am entering this to the Simon Says Stamp and Show challenge, where the theme is Stripes.
I used stripy paper to line the cover of my album. The album itself was definitely inspired by SSSS DT member Candy Colwell, who did a really cool mini book tutorial two weeks ago.


46 comments:
Hello Astrid
It is just gorgeous, you have covered many techniques showing-casing your versatility. Any design team in their right mind will jump through hoops to have you, I was able to follow the tutorial very well. Good luck, you have set the bar high.
Smiles:)
Sue
wow Astrid! You have gone above and beyond on this project....you have explained it so well and it is so beautiful, just gorgeous, I followed right along! You are always so ambitious!
Fabulous tutorial Astrid and I love this mini. Again your colour choices and all the textures you applied are so amazing. I think I might be making another mini soon. Have to try this one out. ox
Wonderful book and so kind of you to do the tutorial Astrid. I have it bookmarked and would love to make one even half as artistic as yours.
Thank you
Love Chrissie x
That is beyond gorgeous.
Thank you for the step by step tutorial. You have so much talent
. . . you amaze me. Do you ever get tired of hearing that? You must hear it all the time! You are a creative genius:)
Have a lovely week,
Connie
This is totally awesome; what a fabulous mini album. Thanks for the photo tutorial . xxx Marianne
Wow, your mini book is breathtaking. thank you for the tutorial, Astrid
great tute. and fab mini book (as always!).
Good Morning Astrid. One of my favourite things. It's absolutely stunning. I don't have any of the chipboard or the TH dies, but I will certainly give this a try. What an inspiration you are. Have a Good Day. Hugs Rita xxx
Glory be Astrid! Thought I'd pop onto your post and tell you how wonderful the main photo looked only to be awestruck by page after page of utter gorgeousness! Will have to be back to see this many times as taking it all in on one sitting is not possible for me - I am bound to miss things first/second/third time round. You truly are a master of your craft. Hugs, Jenny x
Thanks so much for this gorgeous tut here and your result is absolutely stunning Astrid. I love it.
Thanks so much for this gorgeous tut here and your result is absolutely stunning Astrid. I love it.
You are the BEST! What a great tutorial! Thanks for sharing, I may need to try this when I have time!
Hugs, Dena
Absolutely stunning mini book and such a fabulous tutorial. Thank you Astrid. I am sure I will come back to this again x
Love the pages!! The purple heart is gorgeous and I love how you created this amazing project.
Happy Crafting
Tracie
Another amazing project!! Love everything about it!
Fabulous tutorial, many thanks for that. The end results look amazing.
Astrid this is totally gorgeous, I am drooling! Elizabeth x
GREAT project, thanks for your interest in being apart of the Sincity Stamps DT
Oh Astrid! This is beyond stunning! Let's just say Sin City Stamps would have 'hit the jackpot' with you - (interesting stamps to learn of by the way)! Superb album! Thank-you for major inspiration and fabulous tutorial. Nicola x
This is stunning!! I adore the cover ... wonderful tutorial too ... Thanks for the inspiration!
Astrid, dear friend- WOW this is just stunning!!! What an amazing piece of art-work!! So many things to study, and see- a most beautiful journal created,-wonderful in every way, ..I know I said it before,..but you are a master with papers and stamps, and inks and .......!!
Hugs,Dorthe
...blowing me away .... gorgeous piece
This is just fabulous
Rosie x
Hi Astrid, this is gorgeous and your tutorial is fabulous. Love each page you added, wonderful use of imagery and the texture and dimension is fabulous. Everything works so well together. Fabulous design, beautifully executed. We are thrilled,you joined in the Simon Says Stamp and Show Challenge, thank you . Tracy x
What a stunning album. I love it.
xx
Astrid, I wish you the best of luck with Sin City Stamps, but after this gorgeous mini album, I believe you made the cut! Wow and I do mean WOW! This is so detailed and stunning! Love all the vintage pages! A real eye catcher! Hugs!
This is fab , such a gorgeous make and such beautiful pieces inside! The step by step is fab and between you and Candy I am itching to make a book...gorgeous. Xx hugs x
Gorgeous album Astrid, The attention to detail is Fabulous, Loved the tutorial & amazing Pages... Simply Brillianr... Hugs May x x x
I love mini albums and this is just gorgeous Astrid, full of wonderful geniuses, texture, colour and images. This will be bookmarked for future inspiration.
hugs Brenda xxx
Terrific tutorial Astrid and love all the techniques you've used to produce this fab piece of work. Hugs Annette x
http://nettysartadventures.blogspot.co.uk/
Outstandingly lovely, Astrid - what a wonderful make. Each page is delightful, and together - inside that wonderful cover - they make up a very special mini-album. Good luck with the application - I think they'd be mad not to leap at the chance of working with you.
Alison x
Astrid...this mini book is beyond gorgeous! I love how you used Tim's on the edge die cut to create such a cool front flap. That is brilliant! As always, I so love your use of color!! Just beautiful! All of your pages are exquisite. I love everything about them...it just screams "ASTRID!". Your style is so distinctive...I love it! I also wanted to thank you for the shout out in your post. You are so sweet. Thank you so much for sharing this beautiful piece and the tutorial with all of us at Simon Says Stamp and Show. <3 Candy
A gorgeous album! thanks for the tutorial I hope to have time to try this! I've been looking around your blog and you make fab vintage creations. Marlies
Oh MY! This is so lovely, Astrid! The front cover looks like a mysterious treasure just beckoning to be opened!
Thank you for sharing. I am so grateful for your work!
I do like this ever so much and appreciate you showing us how you did it!!!!!
sandy
WOWEE fabulous make and brilliant tutorial. Would love to make one of these, so gorgeous. Fingers crossed for you, but they would be mad not to have you on their DT. XX
Hello Astrid I grab a cuppa and took my time reading and looking real close shesh,PERFECTION, the whole post with your wonderful tutorial, the pages are stunning, one after another just gorgeous, they are like you fantastic tags but larger fabulous,the colors the layering, amazing, then that cover is the BOMB so creatively beautiful, the key is fantastic... I went to the page for your designer project ticked off all the boxes:), they would be crazy not to pick you, I think you're a shoe in good luck to the others, you have set the bar pretty high.. Thanks so much for sharing all of this, good luck but you won't need it..
Beautiful new creations, dear Astrid! I especially love this altered book and the "Muse of Poets"-Tag! Just great! Thanks for the instructions.
I wish you a wonderful weekend my dear.
Wow, Astrid, das sind so traumhaft schöne Seiten, ich bin überwältigt. Vielen Dank für die Beschreibung der Arbeitsschritte, es ist ein tolles Album entstanden!
Liebe Grüße, Bärbel
OMG Astrid this is a true Play of Art my friend,,,,,the vintage look on each diffenrent stamp is perfect,,,,,,love them, love them...
Told you I'd come back for another look! Just adore the whole feel of this and the way the texture paste just blends beautifully with the inky/paint marbling. Hugs, Jenny x
WOW!!! Exceptional project, and a real labor! Love the cover! Just beautiful embellishments on the front, and the striped paper inside of it is wonderful! Each page is textural eye candy, and so perfectly done! Beautiful work Astrid! Thanks for showing us your stripes this week here at Simon Says Stamp & Show!
Hi Astrid
this is beautiful and such a great tutorial.
Love this so much great colours and images
Ria
What a fantastic project, love all the details and great tutorial. Not surprised they picked you for the DT.
Hugs Ali x
Congratulations, Astrid! You are so talented and such a generous artist, they are lucky to have you on their team. Love your work!
Post a Comment