Showing posts with label Altered Manila file folder. Show all posts

Monday, 13 April 2015

Altered file folder part 2, - the tags

Hi all and thank you for dropping by today. A week or so ago I posted an altered file folder and today I want to share the first two tags I made to fit inside the pockets.
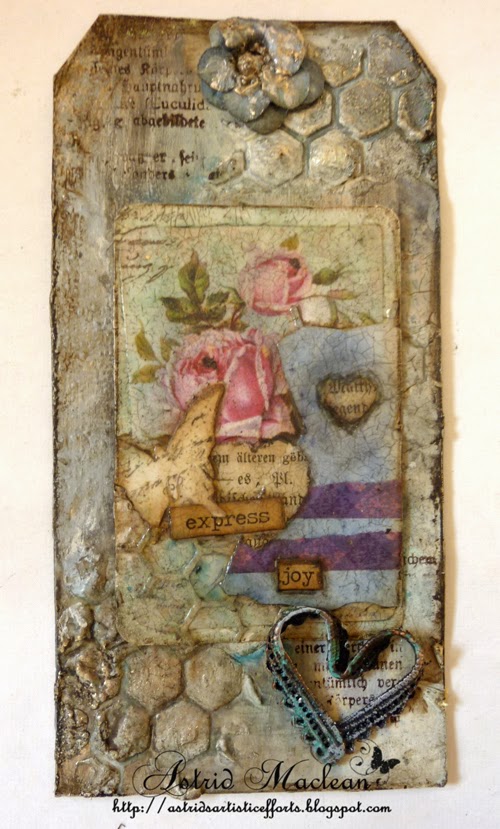
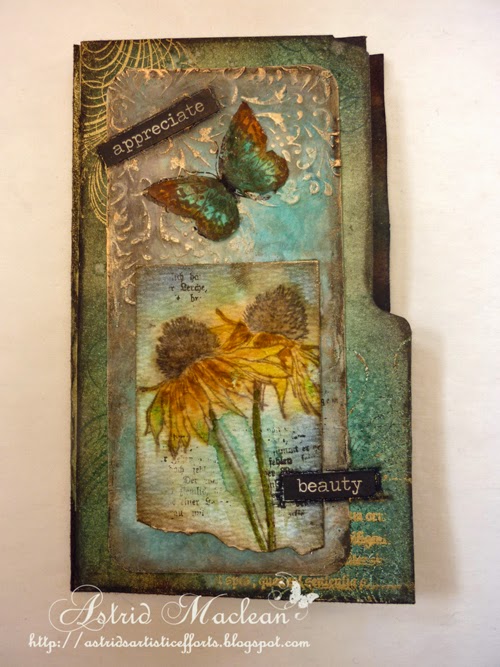
The one on the left was made almost entirely with bits and pieces the lovely Linda from the Funkie Junkie Boutique put in with a parcel of goodies I had ordered from her. I then tried to make the one on the right in a similar style. Here are some details:
The background to this one was done with a mix of texture paste through a Tim Holtz stencil, a mix of Decoart Media paints and Distress Paints and of course my beloved Treasure gold.
The central panel is about ATC size, background done in a similar way and then I collaged the rose image and a couple of die cuts Linda had sent me, added some hearts cut from book papers and a couple of chit chat stickers. I added shading, covered the whole panel with Decoart Crackle Glaze and then rubbed in Antiquing cream to bring out the cracks.
A little metal heart ornament altered with some paints finished it all off..

Now for this one I also want to show you the back quickly. I covered it with some paper from a DCWV 6 x 6 paper line I discovered while in the States. It's called Gauze paper, and yes the paper is actually covered with real gauze. (I found you can get it in the UK at Crafty Charlies)! I just loved it the moment I saw it. It comes in a variety of colours, this one was sort of dark turquoise, and then I just added some sprays and bits of Treasure gold, just as an experiment, but there are of course endless possibilities., - think dry brushing, die cutting, embossing etc etc.
Alright, now onto tag number 2:
Background done in a very similar way, with the addition of some die cuts cut with the Tim Holtz Mixed Media Thinlets.
This time the central panel was done on watercolour paper with a scrap of a paper serviette, some background stamping and some paints to blend it all together.
I die cut a heart from another scrap of the gauze paper, this time I dry brushed it with various colours to blend with the rest of the tag.
Here you can see how the tags fit neatly into the pockets of the folder:
Alright, 2 more tags to go for the next page, but I thought I would post them on another day so as not to make this post too long.

Thank you for visiting like always and have a wonderful week!

Thursday, 9 April 2015

Altered file folder part 1

Hello everyone and thanks so much for dropping by here.
While on a trip to the States recently I purchased some Manila file folders with the idea of altering them.So today I want to share the first one with you:
Just by the way, I would LOVE to know why it is not possible to get these Manila folders here in the UK, while in the US you can get them just everywhere.... I have searched and searched for them, so if anyone knows of a place where to get them here I would love to know. These are so much fun to do, and you can turn them into tag books, journals, mini albums or whatever you want. There are a ton of tutorials on how to do this on you tube, so I am not going to bore you with how I made mine, but as you will see, it has 4 pockets on the inside, which I am going to use for some tags.
The whole thing was coloured with a mix of Distress products, inks, stains and sprays using Peacock Feather, Faded Jeans and Walnut Stain. I created several layers, the top one being water colour paper and using Tim's Flower Garden stamps set. I stamped one, masked it and then stamped the other and coloured with Distress markers.
One of the butterflies from Tim's Water Colour set, stamped on water colour paper, fussy cut and then again coloured with Distress Markers.
This is the back of the folder, done in a similar way. This time the butterfly is from the Butterfly Duo Die and matching embossing folder. I added Decoart Crackle Paint to it and then coloured it with Decoart Media fluid acrylics in matching colours. I then highlighted the raised bits, first with Walnut Stain ink and then with Treasure Gold.
The cracks don't really show up, but I still quite liked the way it turned out.
Below are some pictures of the inside pockets.

I over did it rather with the Walnut Stain Distress Stain Spray, and they turned out a bit too dark, so I decided to lighten it all up a bit by stamping and gold embossing some swirls. This one is my favourite swirl stamp from La Blanche.

The tags are in process, but I'll show you those in another post...
Spring is in full swing here in the Northern Hemisphere, so I thought I would stick with a flower and butterfly theme.
I am going to add this to the new challenge blog Stamps and Stencils, the theme is anything goes and I used stamps and stencils through out this project.

Hope the weather is kind where you are, and thanks so much for visiting like always.

Related Posts Plugin for WordPress, Blogger...

One World One Heart

Photo

FEEDJIT Live Traffic Feed

Birthday Card

Birthday Card
Just got a whole lot of new stamps from a brilliant place called the Stamp Smith. This is the image that I first saw on Docraft and really liked. I asked the friend who has used it in an ATC, where she got it. Well she borrowed it from a friend who got it from ebay as a one off. But.... it had a title. I googled the title, and hey presto found the site. They have great stamps and offer a really friendly fast service. I highly recommend them!

Gothic Arch Trifold inside

Gothic Arch Trifold inside

Back of Gothic Arch Trifold

Back of Gothic Arch Trifold

Gothic Arch Within the Heart

Gothic Arch Within the Heart

Gothic Arch, the Key

Gothic Arch, the Key