Hello lovely visitors, today is a special day as this Friday it is the
75th Challenge on A Vintage Journey. it's also our 5th birthdaybirthday, and as one of the original team, what an amazing journey it has been! So many of my team mates have become close personal friends over the years, we have laughed and cried together and have shared our creativity together and with you our lovely visitors.
Well just last week I was able to visit one of my teamies, the lovely and talented
Annie, and we had a super fun day playing with some new techniques, so it seemed fitting to use one of my projects for this special celebration challenge.
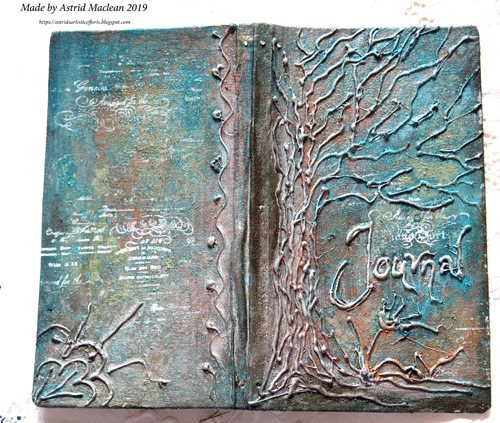
It's a journal cover created with Eileen Hull's fabulous journal die and I will give you an overview of how I put it together below.
My first step was cutting the cover from mount board with the die and gluing it together. I then covered the mountboard with calico fabric for added strength.
Annie had the fun idea of playing with hotglue, so the texture on the cover is created with a hot glue gun. This is what it looked like in it's first stage:
Sorry for the weird shadows, but I just took the photo quickly with my phone, so I could show you the first step.
We had watched some youtubes of people doing projects with a gluegun, and several showed, how after having covered everything with gesso, you can add some gold paint and when that has dried completely, go over it with a dark colour and then wipe away some of that to let some of the gold appear again.
. We decided to do that and when I got home, I used a mix of Paynes Grey and black Decoart media fluid acrylics for my dark layer.(
A quick word of warning, when using hot glue for texture you can't use a heat tool for drying between layers as it melts the glue and takes away the texture, that's why I had to finish my project at home).
At this point I decided I wanted a rusty patina look for my cover so out came a variety of sprays to try and achieve that, blueish patina first of all, I used both Lindy's Stampgang and Distress Sprays, as well as some Finnabair Magicals.
Too blue, some more coppery sprays to give it a slightly more rusty look:
Sadly the rusty shimmer does not really show up on the photo, but at this point I also decided to add some white background stamping using gesso, just to lighten it all up a bit.
Next I had to decide on a closure for my journal, - at first my idea had been to use a ribbon closure attached under some design paper on the inside of the covers which you can see here:
In the end I thought that looked awful, so I cut off the ribbon and instead used a simple elastic closure. (Eileen's die has precut holes for that). I also added a few little embellishments to both the front and the back:
The insert for the cover is a Midori blank one that I will use for quotes and to practice my lettering.
Learning to do dip pen calligraphy has been my personal journey in the last few weeks, something I have spent many hours on, so I thought I would close this post by sharing one of the recent samples of my efforts with Copperplate style script:
The script is my effort, the background is not!!! I printed that background from an image on the Graphics Fairy site. Doing flourishes like that will require a lot more practice for sure!!!
Well, that's it from me for today. If you have not been yet, do hop over to
A Vintage Journey to see the birthday projects my talented teamies have created and we would of course love you to show us your journey projects!
Thanks for your visit like always
xxxxx


