Friday, 4 May 2018

Dance to the music of your soul for A Vintage Journey

Hello friends and welcome! Today it is the first Friday of the month and that means a new challenge at A Vintage Journey.
The wonderful Alison  who is our host this month, chose Words and Music as her theme, and this is the project I created:
This is what Alison said about her challenge:
-->For this challenge we would love to see projects that are inspired by your favourite song or that incorporate musical lyrics or sheet music in their design. Just remember to create your project in our preferred styles of vintage, shabby, mixed media, art journaling, industrial, timeworn or steampunk.

Unfortunately I have no step out photos, but will try to talk you briefly through my process.
I used the largest of the Tim Holtz wooden Vignette boxes for the base of my project and glued a piece of  49 and Market design paper to the inside back. Next I added some scraps of Tim's Aviary collage paper that have musical notes on them.
I then fussycut some flowers from the same paper and adhered them to the background on top of some scrap chipboard, to add a bit of depth. Finally I added my little dancer, who is, as most of you will know, one of Tim's paper dolls.
I gave her dress a little bit of subtle colour with a soft pink Gelato.

Some flowers and curly wire from my stash were adhered with the help of a gluegun and that was the inside finished.

I painted the sides and top of the box in pale coloured acrylics, added Decoart Crackle Glaze and when that had cracked highlighted the cracks with Dark Grey Antiquing Cream. I also added a few strips of washi tape from the Prima Lavender collection, to make it all a bit more feminine.
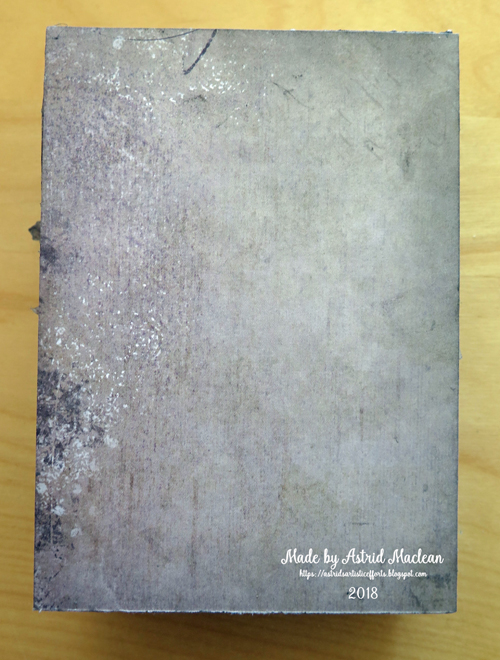
The back of the box was simply covered with another piece of the same design paper, all I did was darken the edges a little with Hickory Smoke Distress Ink.

So now to the front:

I cut another piece of the design paper to size and then made an aperture in the middle using the largest of the Tim Holtz Thinlitz Stacked Archway dies. I added a tiny bit of stencilling to the top using Tim's musical notes stencil,  adhered it to the front and decorated with the washi tape and some embellishments from my stash.
And finally a little computer generated sentiment to go with the little dancer and the music theme.

Well, that's pretty much it. Do have a look at what my talented teamies have created at A Vintage Journey. And of course we would love it if you decide to play along with our challenge!
Thank you for your visit like always, - have a great weekend and happy creating!
xxxxx


Tuesday, 1 May 2018

Rusty, May project for the Miixed Media Monthly challenge #48

Hello lovely visitors and welcome. Hope you are all enjoying some sunshine! This being the first of the month, I have two posts going live today, and here is my one for the Mixed Media Monthly challenge where our theme this month is "Rusty".
I love rust, so this was a joy to create, and even better, our sponsor this month is Emerald Creek

 who are offering a prize package of 3 of Seth Apters Baked Textures and 3 of their other powders, - so what are you waiting for, - do play along!! And remember, do add our graphic, - here it is:
On to my project:

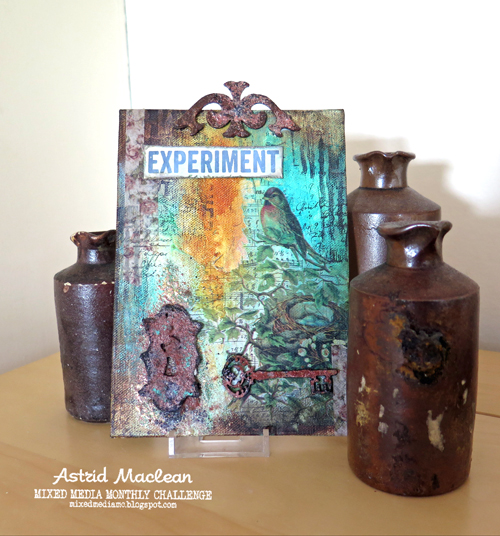
I created a canvas for this challenge and started with an abstract background painting using Golden Fluid Acrylics, Oxide ink and a Distress Crayon.
Next I added interest by using a scrap of the new Tim Holtz Collage papers (Aviary), some washi and ofcourse a couple of the Baked Textures which Emerald Creek had kindly sent the designers. I got Rust and Rocky Road and used them together for my projects. Below a close up of the amazing effect these powders can create:
My next step was to create some rusty embellishments:
This was a chipboard piece from my stash. I covered it in embossing ink and then added first Rust and then Rocky Road to get the effect.
This piece was a stamped image from a stampset designed by Seth Apter (Eclectica ESA08 by Paper Artsy). I stamped it in black archival ink, cut it out, covered it with embossing ink and then triple embossed with the two powders, added some patina effect with the help of a Distress Crayon and voila, a rusty lock.
Well, obviously a lock needs a key, and luckily I found a chipboard one in my stash and it got the same rusty treatment.
Then all I needed to do was add some background stamping, using stamps from the same stamp set by Seth Apter and I was done.
And here the same canvas in a different setting:
I am sure many of you will have played with these Baked Textures already, but having been away on a blog break, this was my first experiment with them, so I named my canvas Experiment (using another stamp from the same set).

Well, that's it for today, - thank you for your visit and do hop over to our challenge blog to see what my talented teamies have created and to get all the details of the challenge. Hope to see you there!
xxxxx

Small Notebook for the Mini Album Makers challenge

Hello friends, hope you are well and happy and Happy May!
I just recently returned from a trip to Australia and before I left I made myself a small notebook to take along and today I want to share with you how I made it:
I made the cover following various faux leather tutorials on youtube.
For those of you, who are new to this technique, this is how you go about it:
You will need:
Good quality Kraft card
A spray bottle
A bottle of Glycerine ( cheaply available from chemists)
An embossing folder
Distress Inks in brown tones (I used Vintage Photo and Ground Espresso), and if you want to add patina highlights you will also need a patina coloured art crayon (I used a Cracked Pistachio Distress Crayon).
1. start by making a mix of one part glycerine to approx 5 parts water in your spraybottle.
2. Cut your craft card to the desired size to fit around your notebook.
3. Spray your glycerine mix all over your card and then rub it in with your fingers. Do this on both sides. When it is well soaked in, crumble your card into a ball and then flatten it out again. Repeat this process about 3 times, making new creases each time and then rub over the creases with your chosen ink pad colour. It should now look something like this:

4. Fold your card in half and dry emboss each side with the help of an embossing folder. (I used a Spellbinders 3D embossing folder, but any folder will do).
5. Rub over the raised bits with your inkpad again and then spray lightly with water to make the ink run slightly.
6. If you decide to add some patina highlights, rub over some raised bits with your crayon. I chose  also to add a little metal embellishment that I also gave the patina treatment, and with that the cover was pretty much done.
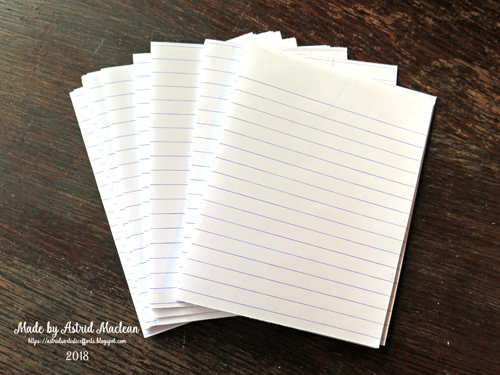
7. For my inside pages I chose to use simple note paper like this:
8. I chose the simplest, yet effective way of binding my pages together: Simply adhere the front of one folded page to the bottom of the next until you have the desired thickness.I would recomment using a glue runner or gluestick as wet glue would bubble thin papers like this too much.
9. Once you have you have your desired thickness of glued together pages, use some sports tape (again available from many chemists) to strengthen the spine of your pages and hold them all together. This is a trick I learnt from Birgit Koopsen who uses this binding method for her artjournal pages HERE is a link to a video where she shows exactly how to do it.
10. Now it's time to attach the cover to the pages: I simply folded my leather look cover around the inside pages and then glued the top page to the one side, and the bottom page to the other side. The final step was to cover those pages with some pretty design paper so that it is neat and firmly held in place..
The beauty of this way of binding a book is that there is absolutely no sewing involved and with thin writing paper like this there is no chance of the thread ripping the paper.
My little notebook is now filled with memories, notes and ideas.
Hope you like it, and if you ever want to create your own notebook, I highly recomment this method as it is really quick and easy to do.

Well, that's it for today's tutorial. We hope you will share your own books and ideas with us on the challenge blog, and meanwhile please take a peep at some of the albums my talented teamies have created and catch up on all the details of our challenge this month. Hope to see you there!
xxxxx

Friday, 6 April 2018

Rusty and Crusty for A Vintage Journey

Hello friends and welcome! Have you seen the fun theme the wonderful Autumn has chosen for our April challenge at A Vintage Journey? She called it Rusty and Crusty and of course there are so many different possibilities with this theme, do check out what my talented teamies have made!
I decided to keep it clean(ish) and simple(ish) at least for me, - and this is what I made:
 As many of you know I am in Australia at the moment, so created this before I left. Unfortunately the weather was so bad that I was unable to take step out photos, so I will try and talk you through my process:
The focal stamp is from the Darkroom Door London 2 set, I stamped it using a dark brown Faber Castell Big Brushpen. I then punched out a circle using a 2" circle punch to create a mask for the moon and then created my background blending Stormy Sky and Vintage Photo Distress inks. I added a few Walnut Crystals, spritzt with water and in that way created my rusty looking background. Using a waterbrush created the moonlight falling onto the building. I then scribbled some of the brown big brush pen onto my craftmat and using the waterbrush to pick up some of the ink created some shadows around the building. I also added a few doodles with a black fineliner. When I was happy with the image I used a Spellbinders cirle die to cut it out and put it aside while I worked on my background panel.

 For this I did some subtle stencilling with the Stormy Sky ink, did some background stamping and used various old Tim Holtz rub-ons and washi tape until I was happy with the composition.

 I adhered the die cut circle to the background and then used a couple of rusted embellishments to finish it all off. The cog was rusted with good old rusting powder and some vinigar and for the pen nib I used a mix of embossing powders to give it a rusty look.
 I matted and layered on to further bits of card and then one of Tim's word stickers finished it  all off.
Well that's it from me for today. Thank you for dropping by and do check out OUR CHALLENGE to get all the details or even better, play along and show us your own rusty and crusty projects! I can't wait to see what you will make!
xxxxx

Sunday, 1 April 2018

Happy Easter for Mixed Media Monthly

Hello friends, Happy Easter, hope you will have a fanatastic day if you celebrate this festival and in any case happy April!
I have created a super large (# 12) tag for the challenge and to wish you all a happy Easter! Our challenge theme this month is a colour challenge, and here is the graphic:
As you can see it is a complementary colour challenge and I decided to go with yellow and purple.
The initial background to my tag was a geli print. I then added further colours, some background stamping and I distressed the edges with a dark brown gelato.
The sentiment was computer generated, here you can also just see a little more of the original geli background. (I used a mix of Paperartsy and Decoart luid Acrylic paints, plus some stencils).
The focal thistle stamp is by Art Journey, I have had it on my wishlist forever and finally ordered it all the way from Holland. 
The rest of the tag was embellished with one of Tim Holtz's Botanical ephemera and some bits and pieces from the Prima Lavender collection.
Well, that's pretty much it, - I hope you will decide to play in our challenge and show us your colourful mixed media pieces and meanwhile check out what my teamies have made by clicking HERE, and remember if you decide to play do add our graphic to your post.
Happy creating and thanks for your visit
xxxxx

Tag wallet for Minialum Makers

Hello friends and happy April and as it is Easter today, also Happy Easter to those of you who celebrate it!
I have been spending quite a bit of time playing with my Geli Plate and for this months challenge decided to create a tag wallet where I can keep  all my samples. I shall show those at the end of this post, but first let me try and explain how I made it:
For the basic structure of your wallet you will need two tags for the front and the back (I used the small size 8, but you can of course use any size).
You will also need two strips of card folded accordian style as you can see in the photo above.They need to be about half the height of your tags, and the length can be as long as you choose, depending in the number of folds you want, and how wide apart you make your folds. Mine are 1/2 inch apart,and as I have 10 slots the width was 12" to leave me some space on either side to glue to my tags, I hope the photo below makes clear how to do that.
This is the first strip, the second one goes on the other side so you land up with it looking like the photo below.
As you can see there is a gap at the end, so you should make a spine to fold around that.
My spine looks like this, but you can of course make it as wide or narrow as you want, depending on how fat you want your folder to be.
Here you can see that the gap at the bottom is now covered, - it's a good idea to keep it in place while your glue is drying with some little clips. Below you can see what it will look like from the side:
So this is the basic structure of your album. I now took two more tags and decorated them to make the front and the back. I used texture paste, stencils, inks and sprays and decorated them with flowers etc.
Here is the front:
And here the back
I used a bit of seam binding ribbon to close my wallet.

Alright, now to the little tags that fit inside:
I had great fun playing with different colour combinations and stencils put on the geli plate.
Here is a close up of a couple of them:
After I had done the basics with the help of the geli plate, I decided to work on them further with more stencils, inks and doodling, so this is what they look like now:
Most of the stamps are older Tim Holtz ones. I even took out my old sewing machine and did some messy stitching around most of them. Finally a few close ups of some of my favourites:


Alright, that's it, - thank you for staying with me through this very long post! We hope many of you will join us for our challenge again this month, all you need to do is create an album, mini or handmade book in any style. Our sponsors this month are Gypsy Soul lazercuts and you could win a fabulous prize pack! Just click HERE for all the details and to see the wonderful labums my teamies have created.
Have a wonderful month!
xxxxx

Related Posts Plugin for WordPress, Blogger...

One World One Heart

Photo

FEEDJIT Live Traffic Feed

Birthday Card

Birthday Card
Just got a whole lot of new stamps from a brilliant place called the Stamp Smith. This is the image that I first saw on Docraft and really liked. I asked the friend who has used it in an ATC, where she got it. Well she borrowed it from a friend who got it from ebay as a one off. But.... it had a title. I googled the title, and hey presto found the site. They have great stamps and offer a really friendly fast service. I highly recommend them!

Gothic Arch Trifold inside

Gothic Arch Trifold inside

Back of Gothic Arch Trifold

Back of Gothic Arch Trifold

Gothic Arch Within the Heart

Gothic Arch Within the Heart

Gothic Arch, the Key

Gothic Arch, the Key