Monday, 9 February 2015

A Canvas full of Drips and Drops

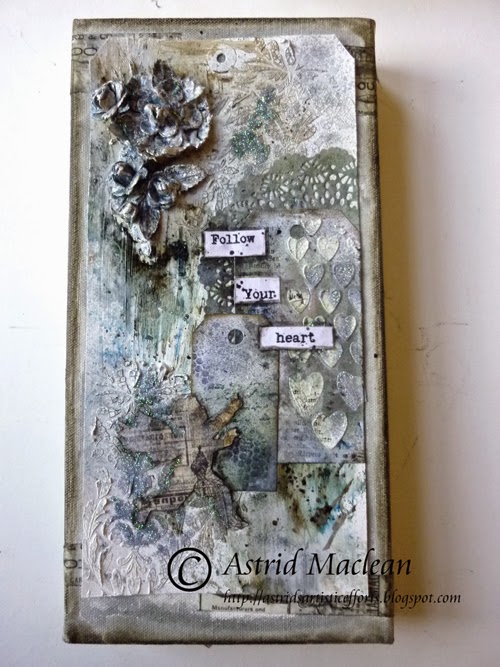
This month the theme over on the Countryview challenge blog is Drips and Drops. The moment I read this theme, I knew I wanted to have some real mixed media fun, and so decided to create a canvas, full of drips and drops of course.
It all started with a size 12 tag. 

I scraped gesso all over it with a palette knife and then added some Decoart Crackle Paste through a Memorybox Stencil in two places.Next I added some fine glitter to the wet paste for a bit of sparkle. When dry the start of my drippy background was created with two colours of Bister sprayed with water.
This was followed with a few quick sprays of Stormy Sky and Vintage Photo Distress Stain Sprays.

Next I wanted to create some other elements to add more interest to my tag. I took a piece of paper that I use to put underneath my projects when I use sprays, as you can see below, it is full of random drips and drops.
I used it to die cut some other elements to add to my large tag.
Two smaller tags and a doily, cut with the help of Tim Holtz and Cheery Lynne dies. 
Well, by this time it was dark, so I could take no further step by step photos, but as you can see, I added some further stencilling and background stamping to the smaller tags and then made a collage on the main tag using these. I also added a little cupid, left over from my earlier Countryview project.

After I was more or less happy with my tag, I started to prepare my canvas:
It was a prepped canvas, so no need to add gesso. I just sprayed some Iced Spruce Distress Spray around the edges and smudged it out with a baby wipe. I added some strips of Tissue tape and used a brown Gelato crayon to darken the edges.
Of course, the sides of the canvas should not be forgotten....
Here you can see what it looked like after I adhered the tag to the canvas with gel medium.

The final touch was to add some flowers, treated with gesso, glitter (sprinkled onto the wet gesso and the same colours of Distress Sprays.
I computer generated the sentiments and added some further drips and drops and that was pretty much it.

I had great fun creating this and I hope you like it. There is still plenty of time to join our challenge, here is a link to the blog.

I am going to enter this in the Artist Trading Post challenge Love is in the Air

Hope to see you there and thanks so much for visiting today!

Sunday, 8 February 2015

Fairy houses for Our Creative Corner

Hello everyone and lovely to see you.
Today I am sharing a sponsor spotlight project over at Our Creative Corner. Our sponsor this month is Tando Creative.

Here is a little preview of my project, if you would like to see the rest and how I put it together, just click HERE
Hope you'll take the time to look as I would love to know what you think.

Thanks for coming by here anyway and have a great week ahead!

Friday, 6 February 2015

Believe that you can and you will!

Hello and let me start by saying how much I appreciate all of you who drop in here! Those of you who come by every time I post something and those who just drop in occasionally alike. We are all so busy, so thank you for taking the time.
Today I want to share my latest journal spread.
I love to see all of the amazing Valentines pieces out there, but this year I have not been in the mood to do the usual red with roses type Valentines, so this is my alternative Valentines piece for this year.

I wanted a wintry feel to this spread and took out the Lynne Perella stamps my daughter gave me for Christmas, they had never been inked yet....
I started by  spreading heavy gesso with a palette knife and then added colour with 3 colours of Distress paint: Antique Linen, Weathered Wood and Pumice stone, spreading it on with a brush and baby wipe and then creating some texture with a crumpled piece of kitchen roll. When the paint was dry I added the snowflake detail with the help of a Dylusions stencil and Ranger Texture paste. While that was still wet I sprinkled on some Rockcandy Distress Glitter, which like usual does not show up on the photo sadly, because it looks lovely and wintry IRL
. I also added a few spritzes of the same colours of Distress Spray.
 Next came the stamps. I stamped them onto tissue paper in Wateringcan Archival. I had planned to use a smokey grey Versafine ink, but it proved too oily, and the images did not have the clearness I normally get when using black Versa fine. I have had this pad for years and not used it, so maybe that was the reason....

Here are a couple of close ups, I adhered the images to my page with Ranger Matte medium and then lightly dabbed on some more paint with my fingers to blend them into the background.


The heart was next, after all, this was meant to be a Valentines piece....
I glued some old text paper to a piece of card. Then hand drew a heart and cut it out, making sure the aperture was just big enough show the believe sentiment, (part of a larger stamp in this set). The rest of the text is computer generated.

After it was glued in place I went over it with Glue n Seal and then added shadows with Faber Castell Big Brush pens, they blend wonderfully over the Glue n Seal and when dry are totally permanent (unlike Distress markers for instance).

A bit of background stamping finished it all off.


Having been really busy with other things behind the scenes it was great to have some hours to just play in my journal. I love this message, it can have so many connotations with Valentines day, - from being desperately in love and keeping fingers crossed it will work out, - to like in my own case having been married for 40 years to a wonderful man (whose birthday is actually on Valentines day). We believed we could those 40 years ago and we did it!


I am going to add this to the Artist Trading Post challenge 9 "Love is in the Air", and also to the Inspiration Journal challenge where the theme is also Love is in the air.

Well, that's it from me today, thank you for dropping by! I'll be back soon and look forward to seeing you somewhere around in crafty blogland!

Wednesday, 4 February 2015

A fun request part 2

Hi everyone, hope your week is going well, thanks for dropping in!
A few weeks ago I was asked to create some samples for the new Crafters Companion Artist Collection Textures and Stamps. Each of the designers were given 4 of the 8 texture folders and matching stamps.  Here are some further samples that I created:


A really versatile folder that is fairly neutral, I coloured the background with Distress Sprays and then high lighted with Pebeo Gilding paste.
 A wonderful collection of grungy background stamps, stamped in Sepia Archival.

A brick texture with some more matching stamps. This time stamped in Maroon Archival and over stamped in Coffee.  I absolutely adore the word stamps, they have such cool fonts, and again would be great for journaling too.

 This one uses a pebble texture background, the same stamps used in a slightly different way.


This final one uses a leaf grain texture folder.

You can see my first samples HERE if you did not see them yet. These must be some of the most versatile folders and stamps, - you could literally use them with anything, great for journaling, scrapbooking etc etc. They proved so popular on Create and Crafts that as far as I know the shows for the rest of the week have all been cancelled, but they are still available on the Create and Craft site.

Well, that's it from me for today, thanks for visiting and hope you can find some creative time!

Sunday, 1 February 2015

More Mixed Media fun for OCC


Hello dear friends and visitors, happy February to you all, this is my second post of the day, this time for the new challenge over at Our Creative Corner. You can see my earlier post HERE

At OCC it's the wonderful and super talented Julia who is our challenge host this time. Her theme is Tic Tac Toe and she has given us this grid:

This is what she had to say about it: For this challenge please choose one line from the grid shown. This can be a horizontal, vertical or diagonal line but you must select the middle square as one of your choices. What you make is your choice but please ensure that the three items you have chosen are clearly visible on your make. Please state in your post which line you have chosen. Inks, stains, sprays etc can be used as necessary on your project.

Our sponsor this month is:Tando Creative


 In fact if you come back on the 8th of February I will share a project I made with one of their super products
 Now to my project: I love challenges like this and could happily have chosen the entire grid, but, that's not the challenge right, so in the end I chose the middle column using paints, stamps and stencils and this is what I came up with:
It's a canvas board, using all of my favourite colours and mediums of the moment.
Here's a quick step by step:
I added some texture paste through the Memorybox Lathenay stencil and while the paste was still wet added some Stampendous Aged Pewter embossing powder and then dried (and melted the EP) with my heat gun.
Next I added some background stamping, using a favourite text stamp from the Artistic Outpost Birds of a Feather stamp set, I part inked it with a Faber Castell Big Brush pen. I also added some more stencilling, this time using Wateringcan Archival ink and a Tim Holtz layering stencil. I added colour with 3 different colours of both watered down  Distress paints and the new Distress Stain Sprays: Stormy Sky, Chipped Sapphire and a tiny bit of Weathered Wood.
A metal flower was added to the centre of the stencilled design, altered with a bit of gesso, some more EP and colour sprays.

I decided I really wanted a bit of crackling, so added some Decoart Crackle glaze to some of the stencilled design, after the crackle glaze had dried I also added some Decoart Antiquing cream, to bring out the crackling more.
I love the almost porcelain effect this gives, definitely something to use again on a larger scale....

 Finally I added a sentiment, stamped in Watering Can Archival and then clear embossed, using a Donna Downey stamp, I also edged my canvas with Wateringcan Archival.

I will probably use this canvas to make a mini book or journal cover, I love using these boards for that, as they are so sturdy.

Hope you liked my project, do make sure to check out what my talented teamies have created, and we would love it of course if you played along with our challenge.

Thank you for visiting like always and look after yourselves!


It's a Drippy Droppy February

Hello everyone, welcome and happy start to February to you all!
It being the first, time to start new challenges of course. First up, my project for the Countryview Crafts Challenge blog, where the theme is Drips and Drops. Here's my make:
It being February, I could not help but have hearts come into my project, but this is not your ordinary Valentine's card, - it's for someone who recently had their heart broken, but this is to show her that somewhere down the track there may still be hope....

I started with a piece of 6 x 6 Prima paper and added a stencilled heart using Decoart Crackle Paste. When dry and Distressed it all with Decoart Media Antiquing Cream.

This splatty heart seemed perfect for the drips and drops theme, and of course as it was all about broken hearts, these larger size cracks (achieved by adding the paste quite thickly through the stencil with a palette knife) seemed perfect.
To add some further interest, I took another scrap of paper and cut out a cupid with the Tim Holtz mini movers and shapers die. Rather than using the actual cupid itself, I used the piece of paper with the cut out, added some black card to the back and then did some shading with a white Stabilo All pencil to add some depth and shadow to my black little cupid. After all, cupid is breaking hearts here....

Both elements were first mounted on a piece of 7.5 by 7.5" paper and then on an 8 by 8" folded Kraft card blank.
I scruffed the edges, added drips and drops with some Distress Spray inks, some word stickers and tissue tape to finish the card and that was it.

Here are some closeups still:
Some hand scribbling and an Industrious Sticker arrow to tie the different elements together
Some letter stickers mounted on another little scrap of card

The final message, hopefully lifting it all out a bit from the doom and gloom.

I had great fun putting this card together. Do hop over to Countryview Challenges to see what my wonderful talented teamies have created, and of course we all hope you will play along with this fun challenge!!

Thank you so much for visiting like always and I'll be back with another project for Countryview on the 9th.


Friday, 30 January 2015

A Fun Request

Hello everyone! Happy weekend and thanks so much for dropping in today!

Just a quick post from me to share some cards I was asked to make using some fabulous new mixed media style embossing folders and stamps from Crafters Companion. The new collection is called the Artist Collection and I loved working with them!
The new products are being launched on Create and Craft this coming week, and trust me, if you are at all into grungy mixed media style stamps etc, you don't want to miss these. I had only a short time to do my samples (I'll show 3 today and some more in the days to come), so I just made cards, but these goodies would be fabulous for journaling, home decor and all sorts of other projects too.

Here are my first lot of samples:
The stamps include all sorts of fun and funky background stamp elements and a brilliant set of grungy words too.The folders have wonderful textures, bricks, wood grain, pebbles etc etc.
Here is a sample using the pebble folder, - all folders are 8 x 8" square, so just so you know, you can't use them in a Bigshot or Cuttlebug as they are not wide enough....
Here is a Valentine's themed one, using a leaf background folder.

Below are details of the shows on create and craft, but of course they are available through Crafters Companion too.


Well, that's it for now, thanks for visiting and hope you will get some creative time!!


Related Posts Plugin for WordPress, Blogger...

One World One Heart

Photo

FEEDJIT Live Traffic Feed

Birthday Card

Birthday Card
Just got a whole lot of new stamps from a brilliant place called the Stamp Smith. This is the image that I first saw on Docraft and really liked. I asked the friend who has used it in an ATC, where she got it. Well she borrowed it from a friend who got it from ebay as a one off. But.... it had a title. I googled the title, and hey presto found the site. They have great stamps and offer a really friendly fast service. I highly recommend them!

Gothic Arch Trifold inside

Gothic Arch Trifold inside

Back of Gothic Arch Trifold

Back of Gothic Arch Trifold

Gothic Arch Within the Heart

Gothic Arch Within the Heart

Gothic Arch, the Key

Gothic Arch, the Key




