Sunday, 16 March 2014

Design Team call out

Happy Sunday everyone. Just giving a shout out here about the fact that The Artistic Stamper is having a Design Team Call!!! If you love Artistic Stamper Stamps and would like to be part of a great supportive team, do check out all the details by hopping over to THE ARTISTIC STAMPER CREATIVE TEAM blog for all the details!!
Here are just a few of my favourite past projects, I have picked three very different in style, so you can see just how versatile those stamps are. As none of these have ever been shown in full here on my blog I thought this would be a good opportunity.
An altered box
 Using these stamps:


A Journal spread

Using these stamps
A fold out booklet:
Using

Well, hope I have inspired you to check out the call, and who knows, if you love stamping, this might just be the perfect opportunity for you.

have a wonderful creative day

Friday, 14 March 2014

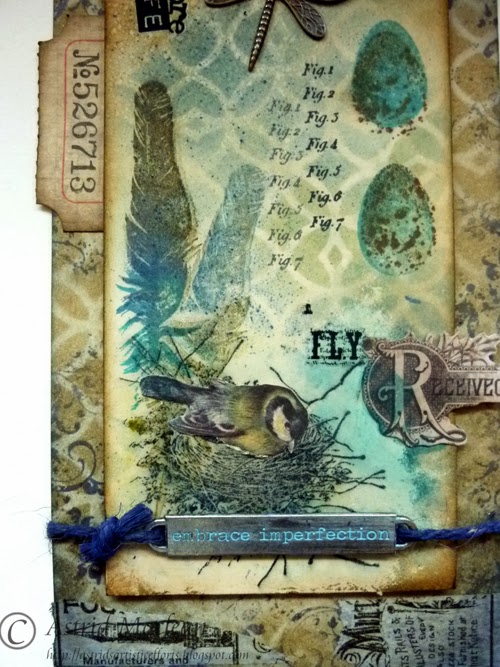
Tag Friday at a Vintage Journey.

Hello everyone, and so lovely to have you visiting.

It's been a bit quiet here this past week, - I have been busy with other things. But today I have a tag to share:
This is really my version of Tim's March tag, and I will be linking it there, but first I want to say that we have been so bowled over by your amazing response to our first challenge and to our projects over at A Vintage Journey, that we want to thank you from the bottom of our hearts for your wonderful comments, we are so enjoying reading them.

Once the normal calendar kicks in, the second Friday in the challenge fortnight will be the day to announce the winner of the previous challenge and to see a project from a previous winner as a guest Creative Traveller. But we aren't quite into the cycle yet so what better than to share some Tim tags with you to help keep you inspired and ready to hop aboard and join in the challenge. So if you want to see some amazing tags to inspire you, be sure to hop over by clicking HERE

On to my tag, I followed Tim's techniques pretty much, even though I have a different version of the Feathers and Flight stamp set, so I had to make some changes.

I stamped the nest and did just what Tim describes. Then I stamped the first feather, masked it and stamped a second lighter version over it but because of the mask it looks as if it is behind when you remove the mask. I cut out a bird from the Wallflower paper collection, cut a tiny slit in the nest and tucked the bird inside.
Because my eggs were smaller, I stamped two of them, using Broken China for the eggs and Coffee Archival for the speckles. Tim makes it look so easy, but I missed the exact over stamping. At that point I nearly ditched the whole tag but then I thought, ah well, embrace imperfection....
So there you are, that was the sentiment I chose for the word band. As I don't have the tiny attacher I just attached it with some string. I don't have the coloured jute either, so I took plain and stained it with Chipped Sapphire Distress Stain, works just fine.
I stenciled the background using the same stencil as Tim, I think it is going to be a new favourite. Like I did with my other tags I mounted the size 8 onto a size 10 tag and added the month. I plan to do that with all my tags this year.
To be honest, I struggled quite a bit with using the new Spritzer tool, again Tim makes it look so easy, but there is definitely a knack to it. It worked a little bit but in the end I added some more colour through the stencil with a blending sponge.
Some Tissue tape, a few Remnant Rubs and some other bits and pieces finished it all off.
Some hand dyed seam binding and a little dragon fly charm highlighted a bit with some Broken China Distress paint, top off the tag and that was pretty much it.

You can of course see Tim's original and how he put it together HERE

Well, hope you like my version and thanks so much for visiting. Happy weekend everyone!!

Thursday, 13 March 2014

Inspiration Card

Hello everyone and lovely to have you visiting.
Only a sneak peek post today I am afraid to say, but to see the full project and a how to, all you have to do is to click HERE
Hope you are having a creative day, and thank you so much for dropping by!

Friday, 7 March 2014

A Vintage Journey

Hello everyone, wonderful to have you drop by here and today I have some super exciting news to share with you! Today is the day of the official launch of a brand new challenge blog, A Vintage Journey
The blog is dedicated to all things Tim Holtz and will have challenges every two weeks, sponsored by Country View Crafts..
The idea behind this blog came from Brenda Brown from Bumblebees and Butterflies and when she invited me to become part of her design team, I was super excited of course.
The first challenge is simply "Anything Tim Holtz". So here is my first project:

When I think Tim, I immediately think tags, and so for my first project I created a booklet made of two tags connected with Tissue Tape.

Both tags were cut with my Sizzix tag and bookplates die.This die cuts tags that are pretty much exactly like the Ranger size 8 tags. The cover tag was cut from Kraft card, the second one from Manila Card stock.
For the cover I cut out the word dream with the dream movers and shapers die. I coloured the tag with a mix of Distress Stains and Inks in the colours Pumice Stone, Vintage Photo, Bundled Sage and Aged Mahogany and then embellished with a stamped ticket from the Going Somewhere stamp set, an image from the French Industrial paper pad and various bits of Tissue tape and Washi tape from my stash.
I added shadows to the letters with my black Distress Marker, to highlight them some more. Behind the openings you can just see the paper that covers the other side of the tag. I stamped a script stamp with Picket Fence Distress Paint, to add a bit more interest.

The butterfly was stamped and fussy cut from the small butterflies from the Haberdashery set, I also added a type charm with the letter V for Vintage and some hand died seam binding.
Here you can see the inside. The hinge was strengthened with more Tissue Tape
The back was covered with papers and images from the French Industrial and Crowded Attic paper collections, a part of the Weathered Clock die,cut from Kraft card and coloured with Walnut Stain Distress Paint, a gentleman cut from the papers, a stamp from the Steampunk set and some chit chat stickers.
The other side, wrinkle free distress on the main tag,  a second tag, cut shorter and layered on top, some stencilling with the Dot Fade, Measured and Rays stencils, an adage ticket, another butterfly stamp from the Haberdashery set. The Globe is from the Tiny Things set and I also added some more Tissue Tape. The stars and arrows are Grungeboard shapes, coloured with Brushed Pewter Distress Paints.
Finally the back was created with layering elements from the French Industrial paper stack.

This little banner is one of the stamps from the Way with Words set.

Well, that's it. I had great fun using some of the many Tim Holtz stamps and dies etc that I have collected over the years and using some of his wonderful techniques. Almost all of the products are available from Country View Crafts. They have a wonderful collection and no postage!!

I hope you will visit the Challenge Blog and see the wonderful projects the other talented design team members have created, I assure you, you won't want to miss them! And of course we all hope that you will play along with our very first challenge Anything Tim!!
Have a great creative day and Enjoy the Journey!!

Thursday, 6 March 2014

Playing with texture

Hello everyone and thanks so much for taking the time to visit.
Today is my day to show a project over on the Calico Crafts blog.
I had great fun playing with some of the yummy products available from Calico and I created an altered box for my 52 pickup altered playing cards.
 If you want to see more and how I altered my box, please click HERE.

I just created a new set of 4 cards, numbers 9, 10 11 and 12.
They are created in pretty much the same way. You can find a description and a link HERE

And here are some details of the individual cards:
 Heart cut free hand from old book papers, issue tape,a Tim Holtz journaling ticket and computer generated words.
 Same sort of thing, another part of the same ticket, a little vial label and some remnant rubs.


 And more of the same, though this heart was cut with a Sizzix die
 This one is a bit different. I fussycut a small part of one of the yummy new Tim Holtz Wallflower papers and collaged it on to the card that had been covered with tissue wrap and Gesso. I also used one of the Wendy Vecchi Love to make Art stamps for the background. I then blended it all together with some Bundled Sage Distress paint etc.Here is a little close up still.
 The box I made for it hold all of my cards just perfectly, - I really hope you will take the time to have a look at it and maybe also check out the shop. They have just added some fabulous new wood flourishes etc.
Well, that is it for now, don't forget to come back tomorrow, because that is when the new challenge blog A Vintage Journey will be starting!!!
Thank you so much for visiting and I hope you are having a day full of creativity and hopefully some sunshine too!!

Saturday, 1 March 2014

Let's get scrappy....

Hello everyone and so lovely to have you drop by here.
All right, so I know February is a short month, but still, time seems to be flying so very fast at the moment.....
So it's March, the month that Spring is meant to start here in the Northern Hemisphere, and I have to say, I for one can't wait. But first of all, it's time for a new challenge over at Our Creative Corner.
Linda, also known as The Funkie Junkie, has chosen the theme: Let's get scrappy.
This is what she would like us to do:
Use our scraps and leftovers from previous projects, pieces of paper, scraps of ribbon, embellishments made and never used. I'm sure you get the picture. If you want the full details of the challenge and to see all the wonderful projects my team mates have created, just click HERE

Well, on to my project. Like most of us, I can't bare to throw anything away, so have tons of scraps flying about, - what fun to be forced to use them... Here is a picture of just 2 of the boxes of scraps that sit on my craft table:

I started by covering a piece of mounting board with scraps of paper in a pretty random fashion..
Next I covered it all with a thin layer of watered down Gesso and then wiped bits away again with a baby wipe..
I decided to use some little scraps of book paper too, I have tons of this, mostly received as gifts from friends. I added arrows to the photo so you can see more easily where I put them.
I added another layer of Gesso and when that was dry some texture paste that I stamped into with a wetted script stamp. I did this in two corners of the piece.

Well, that was the background done more or less, though I added a little bit of Vintage Linen Distress Paint over the Gesso in the center and Weathered Wood Distress Paint around the edges, blending them with a baby wipe. (Forgot to take a photo of that stage).
 At this point I chose a vintage photo I wanted to use as my vocal image. Again I have a large collection that I have hoarded over the years. Before doing anything with it, I now adhered more strips of paper and other scraps to layer behind the photo.
I also gave it some spritzes of colour from a home made spray, made with Victorian Velvet re-inker and added some background stamping and stenciling with black archival ink for more interest. I then added the photo and layered embellishments from my overflowing tub over and around it, until I was happy with the composition; I then carefully glued them down with gel medium.
.Here is the photo, I'm afraid I cannot tell you where I got it, it must have been a freebie from somewhere on the net. The flowers on the right were of my tub of scraps, I covered them with Gesso first, added some more colour with my home made spray and then added a bit of Frantage embossing powder. The number 5, little key etc were all just random pieces from my scrap box.

The ticket was a little Prima wood one, the word hope was made from little Tim Holtz letter stickers. I added them to create a balance to some of the darker scraps that were added to the top and to add a suitable sentiment, - I am so hoping for some lovely warm weather and sunshine...
The little resin dove I think I picked up some time before Christmas at my local Hobbycrafts shop. I highlighted some of it with some paint and a bit of Treasure Gold

Finally, a piece of a metal time piece with a flower inside, rescued from another project and covered with Gesso and touches of Weather Wood DP, and that's about it.
Well, hope you like my little vintage style lay out. I had great fun putting it together. At least my tubs of scraps are a little bit emptier, but to be honest, there is still an awful lot left.....
Hope I have given you a bit of inspiration as to one way you can use up some of your scraps. Do hop over to see much more inspiration and we hope you will play along with us this month!!
Thank you for visiting and have a good month!!

Related Posts Plugin for WordPress, Blogger...

One World One Heart

Photo

FEEDJIT Live Traffic Feed

Birthday Card

Birthday Card
Just got a whole lot of new stamps from a brilliant place called the Stamp Smith. This is the image that I first saw on Docraft and really liked. I asked the friend who has used it in an ATC, where she got it. Well she borrowed it from a friend who got it from ebay as a one off. But.... it had a title. I googled the title, and hey presto found the site. They have great stamps and offer a really friendly fast service. I highly recommend them!

Gothic Arch Trifold inside

Gothic Arch Trifold inside

Back of Gothic Arch Trifold

Back of Gothic Arch Trifold

Gothic Arch Within the Heart

Gothic Arch Within the Heart

Gothic Arch, the Key

Gothic Arch, the Key