Pages

Wednesday, 26 September 2018

Coins, coins and more coins (plus another freebee)

Hello friends, it's been awhile,  as life has taken me different places, but today I have a little something to share. A few days ago I spent a wonderful day with my friends, Annie and her lovely mum Rita and we had a great day making Artist Trading Coins and a little booklet to hold them.
I posted about these coins and booklets in a previous post. They are so much fun. Here are the three little booklets I have made so far:
And below some of the latest coins I have made, the one in the middle at the bottom is the one that Annie made in exchange for a couple of mine.

Below a few close ups, -  a link to how to make the booklets I posted in my previous post, check it out if you are interested.
This one uses some paper dolls and a little vintage flower image cut with one of the Tim Holtz postage stamp thinlets dies, plus a few scraps of washi tape and one of Tim's word stickers.
This one was collaged with bits and pieces from the Stamperia Time is an Illusion paper collection. This paper is just perfect for this and for making coins too! The text is from Tim's Snarky comments stickers.
Here are a couple of mixed media coins, using die-cuts, a few chipboard scraps, texture paste and gold foiling.
These three use different backgrounds, the left distress inks and infusions plus a stamped image from Tim's  Mr Bones stamp set. The middle one was done with Oxides, infusions, a bird stamp (sorry don't know who made it), some foiling and washi etc. The one on the right finally was made with the same Stamperia paper I used for the album and some paper dolls.
Here finally is a close up of Annie gorgeous coin, I just love it. She also used the Stamperia paper/

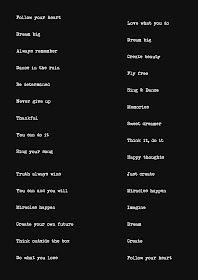
The words both she and I used on our coins, came mostly from a word sheet I made and will share as a freebie below. Just print out on white thin card and use as you want. I made up phrases and sized it so it would fit the 2.5" coins (printed on A4 card) But you can of course use them for whatever you want. Enjoy.
I tried to print it on black card as I thought that might save on ink, but it did not work, just to warn you.....

Well that's it from me for today. Tomorrow I am off to Australia for 4 weeks to be with my lovely family there, so it will be very quiet here indeed, but I will try and visit at least sometimes.
Thanks for your visit here like always


Thursday, 13 September 2018

Artist Trading Coins, a booklet and a freebie

Hello friends and welcome, specially also to my new followers!
Today I want to share my latest addiction, - Artist Trading Coins. I only very recently found out about these, when my lovely friend Jennie did a post on them on the Paper Artsy Blog, where these AT Coins are the theme of their latest challenge. It was love at first site and I just knew I had to give them a go. Years ago I used to swap ATCs, so this was just like going back in time but with a fun twist....
So far I have made 9 coins, plus a little booklet to store them in, so here goes:
Here first of all is the booklet. I made it following a video tutorial for which there was a link on the PA blog, you can find it HERE. 
I slightly adapted the size as the lady who made the video suggests, and I learnt several things along the way, but more about that in a moment. The cover of mine is made from Kraftcard and I used 45andMarket papers for the inside structure and pockets.

I used the Tim Holtz flower jar stamps and dies plus one of the bugs from the Entomology set to decorate the front of the cover and a couple of Paper Artsy stamps plus another bug for the back:

Here you can see how the pockets fit inside, the video shows a very clever construction, which was new to me.
The spine is one inch wide and I decorated it with a die-cut from one of Tim's new Dresden Trim 3D dies. The seam binding ribbon was dyed with Infusions Sunset Beach and a tiny bit of Antique Linen Distress spray.

Alright, onto the coins:
These 4 were made on collaged backgrounds and I used paper dolls to decorate them.
The next 4 were made with the help of a collage sheet I specially made for the purpose, I will share it with you as a freebie at the end of this post.


The final one I made I will show you inside one of the pockets of the booklet, so you can see what the inside looks like:
The booklet has 9 of these pockets, and this is what I learnt: The 45andmarket papers I used are very thick, they are more like card than paper. I absolutely adore them, but they were a bit too thick for this project. I also made the mistake of adhering the pockets on the wrong side of the internal structure, I should have stuck them on top, not underneath the gusset, as you can see on the photo above. (if you watch the video you will no doubt understand  what I mean).
The back of each coin is finished with these backings. My lovely friend Annie shared with me where you can get these, you can find them HERE.

If you are into making these Artist Trading Coins, or would like to give it a go, and are up for a swap, do let me know in the comments or be in touch by email. They are 2.5" in the round, so will fit the normal ATC pockets and things. You can find out much more by going to the Paper Artsy blog where there are some stunning examples!

Here finally is the collage sheet that I used as a starting point for 5 of my coins. The circles print at 2.5" on A4 paper (and I am pretty sure that for my American friends, they will print to that size on your letter paper too).

 
Well that's it, hope you are all having a good week, I am going to link to the Paper Artsy challenge and like always, thanks for taking the time to visit!
xxxxx


Monday, 10 September 2018

Mr Bone's love story

Hello friends and welcome to a first Halloween project from me....
Now to be honest, I am not a huge fan of Halloween and last year I managed not to make a single Halloween project.... This year however, after watching a Tim Holtz Facebook live where he showed some of his new Halloween products, I fell in love with some of the stamp sets... So I ordered 3 of them (ouch), so now I feel obliged to use them of course, so you can expect to see a few more in the coming weeks....

Let me give you a quick run through of this journal page....
I paper pieced the skull, i.e. I stamped it twice, first in black archival and then in Antique Linen Oxide ink.
I cut of the hat part of this second one, coloured the skull part with Distress markers and a Stabilo All pencil and then glued it onto the one stamped in the black Archival. For a bit of fun I added the two roses, because Mr Bones is desperately in love and trying to make a statement to his loved one.... (leave you to guess who that it)...
The Spiderwebs were done with emboss resist. I expect most of you know how to do that, but in case you don't:
Emboss resist:
1. stamp your image using embossing ink.
2. Emboss with clear embossing powder
3.Colour the background with any medium (aside from acrylic paint as that will dry on top of your embossed images).
4. Cover your project with kitchen roll and iron with a hot iron. The embossing will melt into the kitchen roll and you will be left with a beautiful white resist.

My background panel was done by blending different Oxide and other Distress Inks, but I think I used too many layers, because it turned out much flatter than I envisaged.
I embellished my page with another stamped image, some alcohol lift ink leaves left over from a previous project and some little flowers created with the Funky Florals dies, also by Tim Holtz.
I mounted the skull on two panels embosssed with a couple of 3D embossing folders and added two phrases from the clippings stickers by Tim that would suit my theme. The little spiders were from a free set that came with a magazine. I just stamped and fussy cut them.

I will add this page to Art Journal Journey where the latest challenge is A World of Fantasy , and like usual, thanks so much for coming by today!
xxxxx


Sunday, 9 September 2018

Blogger issues!!! HELP

Dear friends,
I just wanted to let you all know that I am unable to leave any comments on any blogs for some strange reason! I can't even sign in normally into my own blog!!! Whenever I leave a comment somewhere it just disappears the moment I try to post it.

If anyone know of any remedy, please let me know, it is so infuriating. I just wanted to let you all know, that if you have not heard from me, that is why.
xxxxx

Friday, 7 September 2018

Back to Nature challenge at A Vintage Journey

Hello friends, - it's the first Friday of the month and that means there's a new challenge starting at A Vintage Journey

The lovely Jennie is our host and this is what she had to say about her chosen theme:
This month we are asking you to celebrate natural elements in your project. Think real nature in terms of twigs, dried flowers, shells or pebbles or perhaps stamps and stencils depicting these wonderful elements. Immerse yourself in the colours of the seasons whether they be bright or muted and create a project in our preferred styles of vintage, shabby, mixed media, art journaling, industrial, timeworn or steampunk.

I decided to pull out some of my Tim Holtz goodies and created a large card:
I built the card layer by layer and started with a panel using the 3D wood grain texture fade and coloured with a mix of Oxide and normal Distress Inks.
After that I got caught up in the process and forgot to take step out photos, but I think it's quite easy to see how it all came together, so I won't write a long tutorial....
The central panel is a piece of design paper to which I added some texture, Design Tape and background stamping.
I then used the Flower Jar stamps and dies to create my little flower arrangement. They were stamped in black archival and coloured with Distress Markers.
The little ticket was the smallest of the postage stamps Thinlets dies, and the word is is made with letters from another Tim die.
I created another panel using the Botanical Texture Fade, sanded it down a bit and then wrapped some string around it and added a number brad.
I added some white splatters and then chose this "Snarky Comment" to finish it all off, - it seemed suitable as when I started I really had no idea where this was all going....
Well, that's it from me, - thanks for coming by here, and if you have not been yet, to hop over to A VINTAGE JOURNEY to see what my talented teamies have created, and like always we would love it if you play along with our challenge.
Happy September
xxxxx


Sunday, 2 September 2018

Positive and Negative

Hello friends, happy September! I love Autumn and can't wait to share some more Autumnal projects with you, but today I just have a fun little tag card to share with you, using the new Alcohol Lift Ink by Tim Holtz.
I am having so much fun playing with this stuff. I think many of you will have discovered it already, but if it is new to you, check out this video by Tim Holtz.
I called this Positive and Negative, as I used both the lifting and the coloured print off for my tag, which I then layered and embellished with some further Alcohol Lift Ink embellishments.

This is how I did it: I die cut a tag from Yupo paper and blended various alcohol inks in blue tones all over it.
I then used the stamps from the Tim Flower Jar set and stamped them with the Lift Ink and then stamped them off onto white card stock.
These subtly blue stamped flowers were then die cut, with the matching die set and adhered just below the lifted images.
A couple of leaves left over from a previous lift ink project were used to embellish the card further, and that was pretty much it.
Not quite my usual colour palette, but I had fun and it was quick to do and will make a useful card for someone.

Thanks for your visit like always and have a good week ahead!
xxxxx