Sunday 30 June 2013

Inspiration Board

Hello all and thank you for dropping by my little corner of blog land. Before anything else, remember, tomorrow is d-day and Google Reader will disappear. If you want to keep following me, please click Follow on Bloglovin.

It is my turn to post as an International Blog Ambassador for Spellbinders and I decided to make an Inspiration Board
As you can see I used quite a number of different dies, but this is a project that can be easily adapted to the dies that you may have. One of the great things about Spellbinder dies is that they all seem to work together.

I started my taking a piece of mount board, 15" by 12" and coated it with Gesso. When that was dry I created my background with various colours of Distress Paints: Picket Fence, Antique Linen, and Weathered Wood. I spritzt them with water to let them marble, dried them with my heat gun and when dry, did some background stamping with a Stempel Glede swirl stamp. I stamped with the Distresss Inks, first Weathered Wood and then Frayed Burlap. I dried it once more with my heat-gun and then used my ink-blending tool and Distress Inks in Frayed Burlap, Weathered Wood and Stormy Sky to add more colour..

My two end panels were done in the same way. I cut and embossed the largest of the Decorative Labels Eight out of white card stock. I then cut some scrap book paper (K & Co) in a lightish colour with the second largest of the A2 Matting Basics B, embossed it and while still in the die sponged it lightly with the same colours of Distress Inks I used for the background. Next I cut and embossed the second largest of the Decorative Labels 8 from another piece of light coloured scrapbook paper, coloured it with Frayed Burlap quite darkly for contrast and then matted these pieces all together with foam tape. Each panel was finished with a cut and embossed butterfly from the Les Papillions set. I cut these from some delicate floral papers to add just a hint of colour and then highlighted the embossed bits with some gilding wax, and finished with some Viva Decor pearl pen pearls.

The central panel was done slightly differently, I cut the second largest of the Floral Ovals. Mounted it in the same way and then added a Tim Holtz ornate plate made to look rusty with a variety of acrylic paints and some gilding wax again. The little heart in the center was made from Sculpey clay, covered in the same floral paper I used for the butterflies and then sanded down once the glue had dried. Again I also added some gilding wax for a vintage effect.
The inspirational quotes came from the Donna Downey Empowered Words set and were stamped onto  one of the Just Rite Antique  Labels 10 dies.

 
Finally I added one of the Ribbon Banners with another Donna Downey phrase, a butterfly and one of the Tim Holtz pen nibs to finish it all off.


Well, hope you like my inspiration board and maybe it will give you some inspiration too.
I am linking this to Country View Crafts Challenge where the theme is Die=cuts

Thank you so much for visiting and have fun creating!!

Saturday 29 June 2013

Class Samples

Hello everyone and lovely to see you here. Later on today I will be teaching a class. We will do several projects: Alter an envelope using Gesso, paints, paper serviettes and background stamping; altering a tag using texture paste and embossing folders as well as paints inks stamps etc; making a mini book out of two A4 sheets of card; and finally making some flowers. The workshop will run from 10 until 3, so you can imagine, we will be busy.

Here are just some of the samples I made:
Altered envelope


Another envelope


Flowers using various Spellbinder dies. These were of course inspired by the flowers I made with Rita last Monday
Well, hope you will all have a great creative weekend and see you next time!

Friday 28 June 2013

Friday Freebie Rosy Posy

Hello everyone and welcome to this week's Friday Freebie.
The paper I have created for you was definitely inspired by one of the papers of the Prima Romantique collection. This paper line is pretty much impossible to come by in the UK as it is sold out just about everywhere. So, I decided to design my own.... not quite the same I know, but then hey, I'm not a pro. Still, I hope you like it anyway. I have given you lots of different options: 6 x 6, A4 and some tags and things, - enjoy.


Wednesday 26 June 2013

Travel and See the Adventure

Hello everyone and welcome to my second post today. Beware, this is a long and photo rich one as it includes an extensive mini book tutorial. So if you have the time, you may want to grab a cuppa and I hope you will find it worth your while.
I created this mini as part of my design team application for Sin City Stamps

This is what you will need to create the cover of a mini like this:
Chipboard:
2 pieces 5.5" by 4"
1 diecut piece cut from a piece of 3" by 4"
2 pieces 1" by 4"
Cut your pieces and lay them out like this:
I used the Tim Holtz Plaque and Postage die for my shaped piece, but you could obviously use different dies in the same way.
Next you are going to cover your chipboard with
Scrapbook paper. I used the Tim Holtz French Industrial collection. You will need:
2 pieces 5" by 6.5"
1 piece 5" by 3" (for the spine)
1 piece  4"  by 4.5" die cut (for the shaped flap and the second spine)
This is to cover the outdside
For the inside you will need:
1 piece 7.25" by 3.75"
1 piece 10" by 3.75" die-cut at one end as before
For the hinges you will need:
4 pieces 2" by 3.75" of Kraft card or other strong left over card stock.

 Start by covering the front and back covers with your chosen paper. Score at 1/2" around all 4 sides, miter and glue on to the chipboard with your adhesive of choice.

2. Next do the spine, I gave my paper a decorative edge:
glue the chipboard down in the center and then fold the two decorative edges around the front and back cover, making sure to leave a gap as shown in the top photo, if you don't the paper will start to tear.
Here you can see what it should look like from the inside.
Next take your 4" by 4.5" shaped piece of paper and fold it round the second spine and shaped chipboard flap in the same way then glue them altogether, again, making sure you leave gaps between the chipboard pieces.
Here you can first see the inside. The shaped bit is lined up exactly, don't try and wrap it round. Below you can see the outside with the shaped flap folding around:

Next cover the inside with your chosen papers as shown in the picture below:
As you can see, I inked all the edges for a vintage look.
Alright, now for the hinges:
Score them all length-wise in the center and glue them together concertina style:
Score the two end pieces again at 1/2" and carefully glue them down along the center of your spine:

Well that is the cover done.
Now onto the fun part the inside pages, for this you will need:
 6 pieces of  5" by 3.75 card stock of your choice. I used manila card stock by Ranger.
Here are my pages, - I used different types of stamps similar in style to the wonderful stamps Sin City Stamps make.


Each page was made in a similar way.
First I added some texture paste through a stencil. When dry I added different colours of Distress Paint, straight onto the card and then spritzt with water to let them marble

Next I added matching Distress Inks with my ink blending tool
Some background stamping with Picket Fence Distress Paint

And finally, the main stamped image, sometimes first stamped onto tissue paper and then added to the page with Glue 'n Seal, sometimes stamped straight onto the page:
I always tear around the edges of the tissue paper to make them merge better into the page.
Finally I embellished with flowers, leaves, a Sculpey heart, stamped before baking and coloured with Distress Paints and some Tim Holtz chit chat stickers. Textured bits were high lighted with gilding wax in gold and pewter
Here you can see still what the pages look like inside the book:
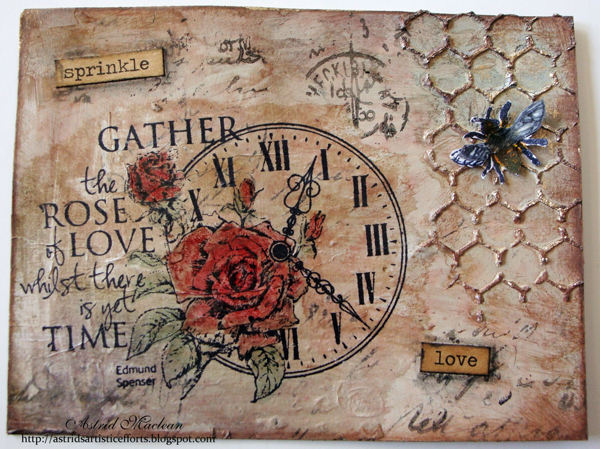
And here is some detail still of the front cover of the book, decorated with various bits and pieces including another little stamped clay heart. Love making these...
Well, that's it, thank you for sticking with me on this very long post and do check out both the Sin City Stamps Shop and their blog where you can see all their amazing stamps.

Thank you for visiting and see you next time

I am entering this to the Simon Says Stamp and Show challenge, where the theme is Stripes.
I used stripy paper to line the cover of my album. The album itself was definitely inspired by SSSS DT member  Candy Colwell, who did a really cool mini book tutorial two weeks ago.
Follow my blog with Bloglovin

Shabby Steampunk

Hello everyone and welcome. A special welcome to all my new followers and thank you to all those of you have chosen to follow me on Bloglovin also!
Here is the first of two post today:
My latest project for the Artistic Stamper

I'll be back with another project later on in the day. Thank you for visiting and have a creative day!!

Related Posts Plugin for WordPress, Blogger...

One World One Heart

Photo

FEEDJIT Live Traffic Feed

Birthday Card

Birthday Card
Just got a whole lot of new stamps from a brilliant place called the Stamp Smith. This is the image that I first saw on Docraft and really liked. I asked the friend who has used it in an ATC, where she got it. Well she borrowed it from a friend who got it from ebay as a one off. But.... it had a title. I googled the title, and hey presto found the site. They have great stamps and offer a really friendly fast service. I highly recommend them!

Gothic Arch Trifold inside

Gothic Arch Trifold inside

Back of Gothic Arch Trifold

Back of Gothic Arch Trifold

Gothic Arch Within the Heart

Gothic Arch Within the Heart

Gothic Arch, the Key

Gothic Arch, the Key